𝐖𝐡𝐚𝐭 𝐢𝐬 𝐆𝐮𝐢𝐭𝐚𝐫𝐢𝐭𝐢𝐬? Guitaritis is a deluxe suite of sophisticated amp racks, designed to make the most of Live’s Amp and Cab devices for electric stringed sounds, plus various effect racks to further modify and bolster them.
While designed for guitarists plugging straight into an audio interface in mind, these effects can be equally effective on midi-programmed or performed instrumentation.
𝐔𝐩𝐝𝐚𝐭𝐞𝐝 𝐟𝐨𝐫 𝐋𝐢𝐯𝐞 𝟏𝟐! A ridiculous amount of work went into this latest edition of the pack. Partially due to upgrading all the exising racks with the latest quality-of-life features from Live 11 and 12… but mainly because i kept getting sidetracked by awesome ideas for brand-new racks that i felt compelled to follow through on implementing!
All of the Combamps have been updated with tailored EQs to improve their general sound as well as further LR sculpting to refine the tonal contrast when stereo-widening the dual-amp chains.
There is a BUNCH of new stuff: the versatile “ParallAmp” and “ParaCab”, the cab enhancer “Cab Customizer ”, seven “Splyt”amps, “Pitch Down Amp”, “Chord Constructor”, some new “Stomper FX”, and even some hotrodded mods of guitar-centric racks from other PerforModule packs.
Altogether, the full pack includes a shit-ton of sweet goodies. That’s official scientific terminology, mind you!
I’ll be guest-hosting a live interactive class on audio mastering/finalizing with Brian Funk’sMusic Production Club Discord Meeting on June 25. I’ve recently given the final polish to Brian’s new acoustic EP which will be dropping soon and will be showing techniques used to acheive a clean and natural “radio-ready” sound.
It would be awesome to hang out with you there and you can sign up to the club for a super modest $6/month (which also garners you a ton of rad Ableton goodies)!
ꜰᴜɴ ꜰᴀᴄᴛ: Did you know that i’m the audio/video editor for the long-form episodes of the Music Production Podcast?
I’m happy to announce the release of the brand-new effects pack Drum Enhancerz Two, as well as a fresh update to the classic original Drum Enhancerz pack. This update took quite a lot of time and energy, but was quite fun to accomplish.
Drum Enhancerz One: $20.
Drum Enhancerz One (originally released a decade ago) includes updates to style, function, and documentation.
It includes racks which are calibrated for sculpting specific drum elements. Included are:
Each rack includes 8 macro controls for sculpting your drum sounds with ease. A few of the capabilities are… -plush control for smooth cymbals. -smack control to add top attack to kicks. -smash: go-to overhead compression. -pitch-matched resonance for boomy toms.
The new version for Live 12 includes updates to style, documentation, and function.
Functional updates include two new devices: 𝐊𝐢𝐜𝐤 𝐒𝐮𝐛𝐠𝐞𝐧 and 𝐊𝐢𝐜𝐤 𝐕𝐚𝐫𝐢𝐟𝐢𝐞𝐫; woohoo!
Kick Subgen is, frankly, badass, and i’ve used it a ton on mixes whilst behind the scenes in development. The official description: “An easy and tasteful method to generate sub content based on the input signal to reinforce and solidify your low end. It down-shifts and overdrives a parallel lowpass resonance.”
Kick Varifier is a niche thing which is only expected to be used occasionally. It came from my organic music background, being somewhat turned off by stale, repetitive kicks in some electronic music. It allows you to add a touch of subtle variation to individual kick hits (or any audio element) in rhythmically timed intervals.
Other inclusions to the update are Macro Variations, frequency values adjusted to more optimal values based on recent years’ intensive research, cpu streamlined where possible, loudness and tone re-balanced for relative all-purpose usability, and — for Push users, X & Y Controls given default assignments.
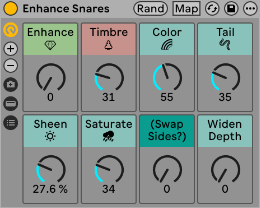
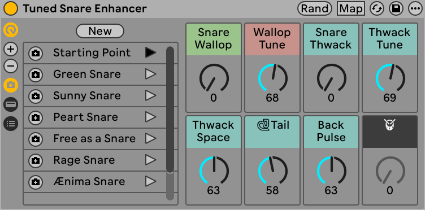
Drum Enhancerz Two is the brand-new pack that i’ve been working on. It includes seven Tuned Enhancer effect racks fine-tuned for specific drum instruments and also implementing all the latest Live 12 quality-of-life features. It includes:
Tuned Kick Enhancer. Tuned Tom (Floor) Enhancer. Tuned Tom (Low) Enhancer. Tuned Tom (Mid) Enhancer. Tuned Tom (High) Enhancer. Tuned Snare Enhancer. Tuned Cymbal Enhancer.
Each provides the ability to tonally sculpt standard drum types with enhancement points carefully chosen based on deep research into optimal drum element frequency curves.
For example, the Tuned Snare Enhancer will provide boost points perfect for a satisfying wallop and thwack typical of nicer-sounding snare drums. Etc… Artist-Based Macro Variations. Each of the Tuned Drum Enhancer racks includes some macro variations that are mimicking the tonal focus points of choice drummers in select songs. As one quick example, you might move your snare sound more closely towards the tasty low-end thump of Al Jackson’s snare from Al Green’s timeless piece Let’s Stay Together.
Hi, i’m happy to report that the 𝓑𝓾𝓼𝓼𝓲𝓯𝓲𝓬𝓪𝓽𝓲𝓸𝓷 pack update for Live 12.3 has dropped!
Brian Funk tries out the bussification effects on a mix.
This is the first of planned updates to every PerforModule pack in order to implement the latest Live 12 features. Continue reading to see the User Manual, the Changelog, and D&D-style Effect Rack Statblocks.
Just about every Ableton Push owner I’m acquainted with: “Yeah, I know the Push has a mode for custom MIDI mapping… but I don’t really use it for anything.”
I have at times gone to inordinate lengths to map controllers so they have as many different useful functions as possible. So upon finally acquiring a Push for myself, I was eager to brainstorm how best to integrate its User Mode into the grand scheme. Well, it took awhile, but I got something!
I soon found out that the MIDI values sent by Push in User Mode are non-adjustable. What? That sucks. Kinda surprising for such an advanced controller. There being no obvious immediate way around this issue without weird re-routings or whatnot, I went ahead and re-adjusted my existing MIDI plan to work with the Push 3’s User Mode values. Certain spreadsheet shenanigans and much remapping later, it all integrates together happily. Woohoo! It seems that inclusiveness can be beneficial after all.
[For example, Push User Mode’s D-Pad Left button triggers CC 44 of midi channel 1, and it’s been mapped to Locator: Previous in my template. The Korg PadKontrol also has a patch I want to have Locator controls for, so that has likewise been set to CC 44, channel 1 so that both controllers can accomplish the same function.]
One perk of non-adjustable mappings that the template ought to work identically for anyone with a Push 3 — no work needed on your part. Right on.
A Toggly Dilemma.
…But there’s another issue! Most of Push’s buttons in User Mode send values when pressed and when released, acting as a toggle such that if you map them to a switch-type control, the value will go on when you press the button, and off when released. This can cause problems for certain types of controls… like if mapping to Play it unavoidably creates an undesirable stutter. The toggle behavior CAN be useful — but only really when you want a momentary-type control (that stays on while held, then turns off when released). Cool for some things, like holding a button to momentarily enable Draw Mode or Automation Mode. These differ from key commands that can be momentary (such as ‘A’ for Automation Mode) in that they are less flexible — the Built-in Key Commands can be momentarily flipped off or on depending on their initial state, and can be toggled with a swift tap — whereas the User Mode Commands will always be on when held and switched off when released, no matter what. [Note that you can invert this behavior, so that pressing the button turns the control off and releasing it turns it on, by changing the mapping’s Mode; go into midi-mapping mode, then click on the midi map control you want to alter and change the Mode from Absolute to Relative (signed bit). Make sure to test it because not all of the controls respond exactly the same.]
I’ve brainstormed out functions that are either tolerable or genuinely beneficial and tried to map them to the most sensible controls. There’s a lot of subjectivity in those decisions so lmk which you find to be keenly insightful or a wackful waste.
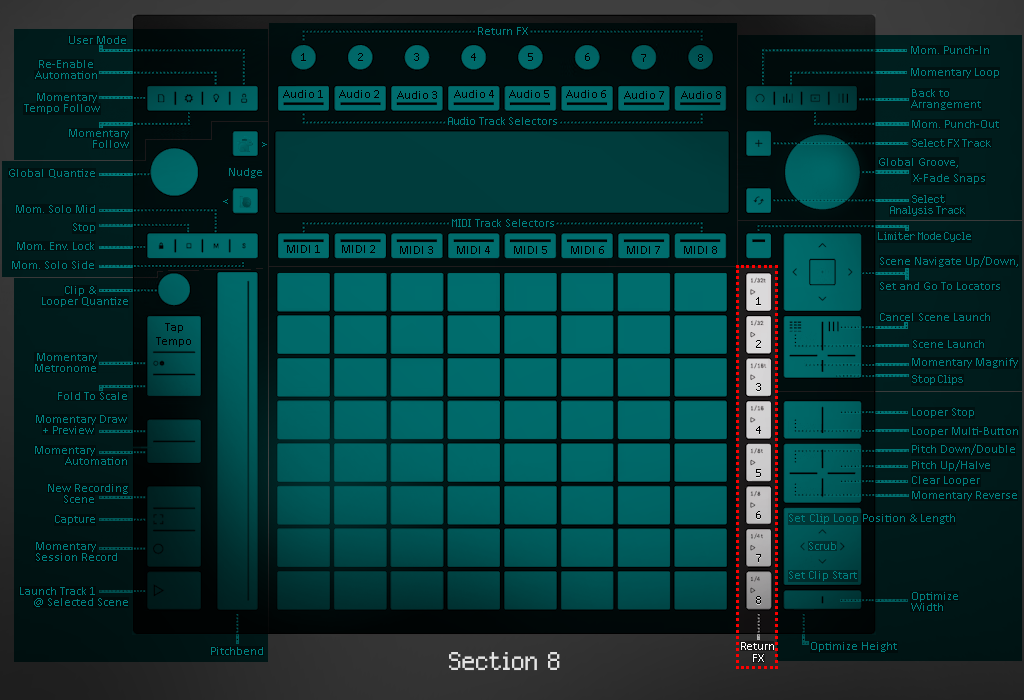
Push 3 User Mode Control Mappings.
There’s a lot going on here, so let’s take it in pieces, starting at the bottom-left and moving clockwise-ish around.
Section One: A Bunch of Miscellaneous Functions.
Tempo Encoder Twist: Clip & Looper Quantize. Cycles the Quantize setting for both Clips and for the Return Looper.
Tap Tempo Button: Tap Tempo. Works the same as in non-user mode.
Metronome Button: Momentary Metronome. Enables the metronome only while held down. Great for when you want to quickly check the tempo & time signature.
Quantize Button: Fold to Scale. In the Midi Note Editor, toggles only showing notes of a clip’s chosen scale.
Fixed Length Button: Momentary Draw & Preview. While held, both Draw and MIDI Note Editor Preview are switched on, allowing to quickly draw notes while hearing them before switching back to editing mode by letting go of the button. [I find this to be one of the most helpful controls!]
Automate Button: Momentary Automation. In Arrangement View, switches Automation Mode on while held, good for quick automation edits.
New Button: New Recording Scene. Presses the hidden Prepare New Scene for Recording button, which can be indispensable for off-the-cuff improv recording sessions.
Capture Button: Capture. Works the same as in non-user mode.
Record Button:Momentary Session Record. Turns on Session Record, but only while held. Useful for quickly recording automation in clips without accidentally leaving recording on afterwards.
Play Button: Launch Track 1 at Selected Scene. In the template this is mapped to launch Track 1 at whichever Scene is highlighted, allowing you to launch clips on Track 1 at any time without having to shift focus from another track.
Pitch Bend Touchstrip: Pitch Bend. Works the same as in non-user mode. You could map this to something, but then it ceases working as a pitchbend for instruments.
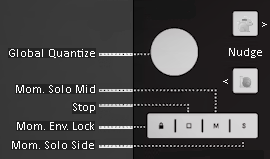
Section Two: Global Quantize, Tempo Nudge, Momentary Envelope Lock, Stop, Momentary Solo Mid or Side.
Volume Encoder Twist: Global Quantize. Cycles the Global Quantize setting.
Lock Button: Momentary Envelope Lock. Enables Lock Envelopes mode only while held. Use this to move something in the arrangement without taking any overlapping automation along.
Stop Clip Button: Stop. Stops playback.
Mute Button: Momentary Solo Mid. Mapped in the template to solo the Center (‘M’) signal while held.
Solo Button: Momentary Solo Side. Mapped in the template to solo the Sides (‘S’) signal while held.
Undo Button:Tempo Nudge Faster. Tap or hold to gradually & temporarily increase tempo.
Save Button: Tempo Nudge Slower. Tap or hold to gradually & temporarily decrease tempo.
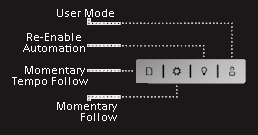
Section Three: Momentary Follow Modes, Re-Enable Automation, User Mode.
Sets Button: Momentary Tempo Follow. Enables Tempo Follow while held. Use it to quickly listen to and re-grab the tempo from an external source before going independent again.
Setup Button: Momentary Follow. Hold it down for the Arrangement View to follow the playback cursor. Let go when it’s where you want to do an edit and the screen will stay parked there, despite playback continuing. Or, tap it once to ‘teleport’ to an off-screen moving playback cursor. This is super handy for seamless edits whilst listening through material!
Learn Button: Re-Enable Automation. If you have any Session View clips with recorded clip parameter automation (which you should), and you adjust them live, the automation becomes broken (temporarily bypassed). Tap this button to restore clip automations.
User Button: User Modeswitch. Works the same as in non-user mode. It does also send a MIDI note if you want to map something to occur whenever modes are switched.
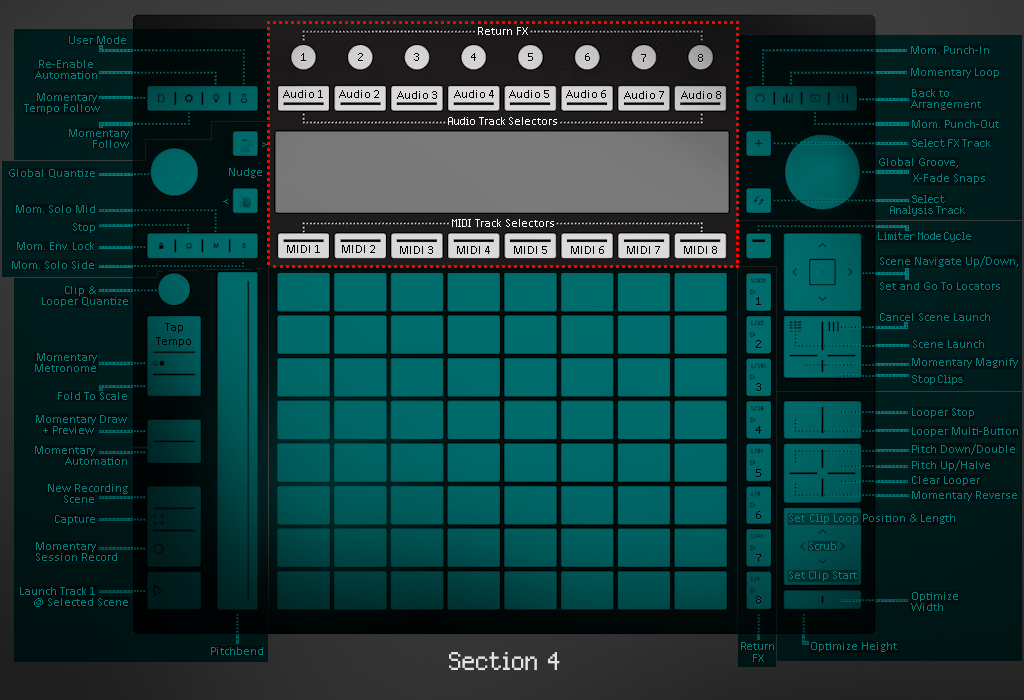
Section Four: FX Macros, Audio & MIDI Track Selectors.
Encoders: Return FX Macros. In the template these control the effects in the FX Return Track.
Upper Display Buttons:Audio Track Selectors. For the first eight audio tracks.
Lower Display Buttons: MIDI Track Selectors. For the first eight MIDI tracks. In the template these come loaded with starting-point MPE-capable ‘User’ presets for the following instruments, which you can play with the pads: 1 (Track 9): Analog. 2 (Track 10): Collision. 3 (Track 11): Drift. 4 (Track 12): Electric. 5 (Track 13): Meld. 6 (Track 14): Operator. 7 (Track 15): Tension. 8 (Track 16): Wavetable.
Device Button: Momentary Punch-In. Switches Punch-In on while held. Be sure the playhead crosses the punch-in point while held for arrangement recording to start.
Mix Button:Momentary Loop. Activates the Arrangement Loop while held; turns it off when released. Careful not to press this if you need the loop to stay on unless you’ll be ready to restore it with some other command straightaway.
Clip Button: Momentary Punch-Out. Switches Punch-Out on while held. Be sure the playhead crosses the punch-out point while held for arrangement recording to stop.
Session Button: Back to Arrangement. Restores Arrangement View playback, giving it precedence over Session View.
Add Button: Select FX Track. In the template, focuses the view on the FX Return track.
JogWheelEncoder Twist: Global Groove. Adjusts the Global Groove Amount.
JogWheel Nudge Left: Crossfader Left. Positions the Crossfader in the direction you hold the Jog Wheel. Snaps back to center when let go.
JogWheel Touch: Crossfader Center. The moment you touch the Jog Wheel, the Crossfader is set to the center value. NOTE: it’s highly recommended to use the Transition crossfade mode, since that doesn’t mess with the original tracks’ levels at center. Slow Fade, Slow Cut or Fast Cut are also valid options in this regard.
JogWheel Nudge Right: Crossfader Right. Positions the Crossfader in the direction you hold the Jog Wheel. Snaps back to center when let go.
Swap Button:Select Analysis Track. In the template, focuses the view on the Analysis Return track.
Section Six: Scene & Locator Navigation, Magnify, Stop Clips.
Main Track Button: Limiter Mode Cycle. In the template, cycles between modes for the Output Limiter (without affecting its other settings). It goes: True Peak LR > True Peak MS > Standard LR > Standard MS > Soft Clip LR > Soft Clip MS >…
Session D-Pad Up/Down:Scene Navigate. Move selected Scene Up or Down.
Session D-Pad Center Click: Set Locator (or Remove Selected Locator). Sets a locator at the current playhead location in the arrangement. Or, if the playhead is on an existing locator, deletes it.
Session D-Pad Left/Right: Go To Previous/Next Locator. Transports the playhead to the previous or the next Locator.
Note Button: Scene Launch. Works the same as in non-user mode.
Session Button: Cancel Scene Launch. Cancels a launched scene (if pressed in time based on Quantization).
Scale Button: Momentary Magnify. Works the same as in non-user mode.
Layout Button: Stop Clips. Works the same as in non-user mode.
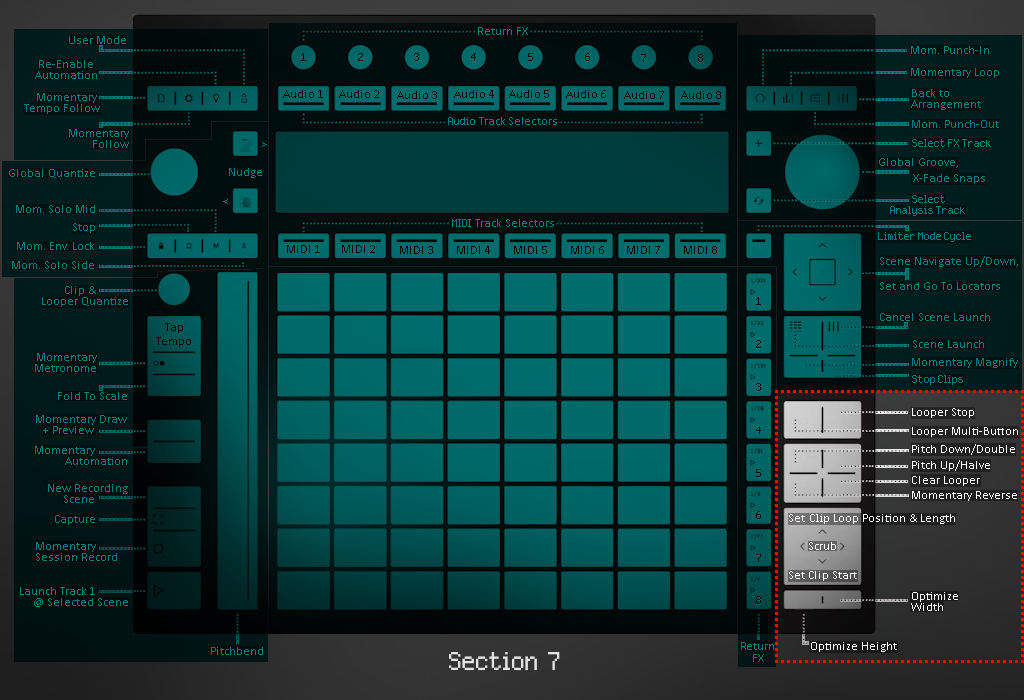
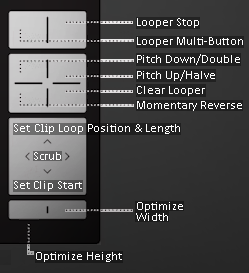
[_Looper Controls_] Reset Button: Looper Select & Multi-Button. Works the same as in non-user mode.
Accent Button: Looper Stop. Works the same as in non-user mode.
Double Loop Button: Pitch Down & Time Double. Works the same as in non-user mode.
Duplicate Button: Pitch Up & Time Halve. Works the same as in non-user mode.
Convert Button: Momentary Reverse. Works the same as in non-user mode.
Delete Button: Clear Looper. Works the same as in non-user mode.
[_Clip Controls_] Octave Up Button:Set Clip Loop Position & Length. Works the same as in non-user mode.
Octave Down Button: Set Clip Start. Works the same as in non-user mode.
Page Left Button: Scrub Clip Backwards. Works the same as in non-user mode.
Page Right Button: Scrub Clip Forwards. Works the same as in non-user mode.
Shift Button: Optimize Height. Works the same as in non-user mode.
Select Button: Optimize Width. Works the same as in non-user mode.
Section Eight: Return FX Buttons.
Repeat Interval Buttons: Return FX . Hold down one or more of these buttons to enable Return FX, and use the Encoders to manipulate the macros. The template’s Return Effects are: 1. Beat Repeat. 2. Convolute. 3. LR Delay. 4. MS Echo. 5. Filter Delay. 6. GrainShimmer. 7. Reverb. 8. Resonators. These are a lot of fun to play around with! Hot Tip: to keep an effect on and free up a finger, switch User Mode off while a button is held down, then let go and switch back to User Mode.
But What About the Pads? — Bonus Instruments!!
The Pads are used for playing notes of midi instruments. The Push 3 user Mode Template includes eight MIDI channels pre-loaded with native Ableton Live instruments that are optimized for play with User Mode’s pad MPE. One of the reasons this blog post is late is because I spent a bunch of time getting lost in playing them!
User Mode Pad Features_ • One copy each of Ableton’s flagship stock melodic synths, easy to switch between and mess around with. • Scale & Pitch devices on each; press ‘Y‘ to enable scale-aware mode, so everything plays in the set’s Key & Scale! • ‘User’ synth patches which are modest edits of the factory defaults, made extra MPE-capable. • MIDI Filters in place to prevent other button touches of the Push controller causing unwanted MIDI notes.
What’s with these Return Tracks?
There are three Return Tracks built into the PerforModule User Mode Temaplate. • FX. • Looper. • Analysis.
The FX Return allows you to send any audio to it to have layers of parallel fx added in. The Looper Return allows you to send any audio to a Looper, manipulatable with the Push. The Analysis track allows you to send any audio to, with Hi Res & Average Spectra plus analog-style VU & Peak Meters.
FREE Template!
System Requirements: Ableton Live Suite 12 (also make sure to have the Convolution Reverb pack installed).
Download the Push 3 User Mode Template. <-(under maintenance… available again soon)
The project also includes a version combining together the User Mode Template and the recently-released Key Map Template. I use that one for my Deafult Ableton Live Set. Either are excellent for diving in and being creative at a moment’s notice, with a wide-open, sandbox feel.
Momentary FX Reference List.
Here’s an alphabetical list of the controls that will switch on, then off again when you let go.
•Momentary Arrangement Loop. •Momentary Automation Mode. •Momentary Draw + Preview. •Momentary Follow. •Momentary Looper Reverse. •Momentary Magnify. •Momentary Metronome. •Momentary Punch-In. •Momentary Punch-Out. •Momentary Return FX Enablers. •Momentary Session Record. •Momentary Solo Mid. •Momentary Solo Side. •Momentary Tempo Follow.
A trick to get momentary controls to stay on is to switch User Mode off while one or more are held down; then let go and turn User More back on. To then switch a control that has been retained this way back off again, tap it whilst in User Mode.
Important Philosophical Note: Just because a viewpoint or an opinion exists does not make it useful or valid.
Finally. After 2+ years since the conception of the idea thru research and development, the DeathStalker Audio Effect Rack for Ableton Live is finally here!
What is DeathStalker?
Quite simply, DeathStalker is an Audio Effect Rack that makes guitars sound better.
It’s optimized for heavier distorted guitar tones, but can also sound amazing on clean or modulated electric guitars, acoustic stringed instruments, or just about any instrument.
Shapes is an installable Ableton Live pack built around the idea of custom-shaped modulations.
It consists of an assortment ofShaper presets for applying interesting modulations to any control (by yours truly), and intricate Instruments and Audio Effects built utilizing them (by pATCHES).
🧠Memorizing Sucks. As audio engineers, certain numerical values become often-used and thus can become useful to memorize. If you suck at memorizing stuff like me, graphs and charts can be helpful.
~`~
🎛0—127. In Ableton Live and other programs, range values are often scaled from 0 to 127, rather than 0 to 100. So it can be useful sometimes to know certain fractional values to type in (either mathematically perfect for extreme precision, or rounded values for quick input).