The PerforModule Key Map Template for Ableton Live 12: go-to keyboard key mappings for optimized workflow.
Continue readingTag Archives: Browser
Ableton Live 11 Key Map Guide & Template by PerforModule
The PerforModule Key Map Template for Ableton Live 11: mapping computer keyboard keys to as many potentially helpful functions as practical.
[Note: if you’re on Live 12 now, maybe hold off on downloading this perhaps for the moment, since i’m working on a new keymap template for Live 12. Feel free to steal some of the ideas from this post in the meantime, though!]
The Template
There are three parts to the template:
•a Live Set pre-loaded with the recommended key mappings,
•a Diagram showing color-coded key functions, and
•a Spreadsheet listing custom-mapped and built-in key mappings, also explaining some quirks.
~`~
Mosey on over to this dropbox folder to download the Key Map Template Live Set, Key Map Plan Diagram, and Spreadsheet Guide. Read on for nauseatingly meticulous details below.
Continue readingOrganize your User Library Like a Boss ~ Live 11 Style
One of the most popular PerforModule articles to date is How to Organize User Plugin Presets Like a Boss in Ableton Using the Hidden Architecture and it’s understandable — it’s very helpful to be able to integrate one’s own presets into the browser’s organization structure. And it’s pretty simple to accomplish. Read that article for an in-depth rundown on the topic in which is also explored further customization options for the truly OCD, if you have the desire.
Or just read on for a briefer summary…
~`~
•Basically, if you place your User Library presets into folders with the same specific names as the built-in categories, those presets will now also appear in their respective category folders in the browser.
•Further, you can yourself customize the system, adding your own bespoke categories. Read about that in part two.
Live 11 Has updated the default categories, adding a handful of new ones which is good news to me, since i’ll be able to integrate more stuff with the built-in system. Some of the choices are a bit odd… but hey, whatever.
Click here to download the blank category folders, and/or copy the following lists for reference.
~`~
Instrument Rack (Sounds) Categories:
Ambient & Evolving
Bass
Booms
Brass
Cinematic
Effects
Exotic
Experimental
Guitar & Plucked
Mallets
MPE Sounds
Orchestral
Pad
Percussive
Piano & Keys
Strings
Synth Keys
Synth Lead
Synth Misc
Synth Rhythmic
Templates
Vintage
Voices
Winds
~`~
Instrument Categories:
For presets of Live instruments that have not been racked.
The same as Sounds categories but with the addition of…
Components
~`~
Audio Effect Categories:
Ambient Spaces
Amp Simulation
Clean Delay
Distortion
Drums
Filter
Formant
Hall
Instrument
Mixing & Mastering
Modulated Delay
Modulation & Rhythmic
Performance & DJ
Room
Space
Special
Vintage Delay
Vocal
~`~
Drum Hit Categories:
Bell
Bongo
Clap
Conga
Cymbal
FX Hit
Hihat
Kick
Misc Percussion
Ride
Rim
Shaker
Snare
Snare Articulation
Tambourine
Timbales
Tom
Wood
~`~
Midi FX Categories:
Drums
Experimental
Monophonic
Polyphonic
Rhythmic
~`~
That’s it for today. Check here for a nifty list of all my audio production tips & tricks thusfar. More on the way!
Brian Funk’s Live Pack Archive — Powered Up!
Packification
So i recently helped our mutual friend Brian Funk reorganize his Live Pack Archive, a $10 massive grab bag of Ableton Live goodies assembled from the freebies that he’s been steadily churning out over the years, all the way from the very first pack in 2011 to the contemporary 200th. It’s a lot of stuff! Judging by the plethora of 5-star reviews of the product on gumroad, it seems like people dig it.
Ah, Convenience
Sure, you could go download all this stuff one at a time methodically blog post by post. However it’s much easier to just pay the convenience charge and get all the stuff in one bulk download. This collection has been on offer for a while now, but they were basically presented in a big pile of folders. Fun to scout around for sure, but not exactly optimal when it comes to workflow convenience.
Power Up!
Aha! See, now the collection is even more splendid, as all the devices come consolidated in two mega-packs with similar categories of sounds, effects, and clips sorted logistically for quick perusal and easy implementation directly from the Live browser (including signal previews). Find, grab, and use the stuff you want instantly. It’s very handy and nice. But… the price is still the same? What!? Crazy, i tell you!
Partake
Sound intriguing? Well then why don’t you pull up a chair, situate your ass real comfy, and grab yourself some.
Brian Funk’s Live Pack Archive 1-200.
click that▲
▼or that

[Pack 1 works with Live 9 or later, pack 2 with Live 10 or later.]
Synchronistically, this happens to be my 100th PerforModule blog post. Neato.
Peace, y’all! 😎
Organizing Your Ableton Browser Like a Boss PART 2: Custom Categories!
You might have already checked out the post about organizing your User & Plugin Presets like a boss using Ableton’s built-in folder architecture.
Well, now we’re ratcheting it up a level to give you ultimate control of your own personalized device organization structure, with the ability to decide exactly what those categories will be.
If you’re like me, you’re obsessed with systematizing your production tools and resources into a cohesive configuration, making it easy to access what you want when you want it, for maximally optimized workflow when diving into creativity.
While working along with the default categories for years, i was never quite fully satisfied by Ableton’s built-in selection of available choices, so i did some research and testing and determined that it’s not only possible, but actually fairly easy to set up your own custom categories. The trick is to plan things out logistically.
If at this point you have no idea what i’m talking about, please check out the above-linked blog post for background on how Ableton’s category structure works. Then come back here and continue on. The gist is that by including devices in folders of particular names, you can get them to automatically show up in Live’s Core Browser. Normally, we’re relegated to using the default built-in categories that Live comes supplied with. All PerforModule Premium Packs are set up with devices like this, so they install and devices show up in the Core Library for anyone who purchases them. But now, should you want to, you can modify those actual categories. Sweetness.
Virtual Folder Config
The trick to setting up your own categories lies with the VirtualFolders.cfg file.
VirtualFolders.cfg Locations (for Ableton Live 10, similar for Live 9)…
PC:
C:\ProgramData\Ableton\Live 10 Suite\Resources\Core Library\Ableton Folder Info
Mac:
Ableton Live Application (show package contents) > Contents/App-Resources/Core Library\Ableton Folder Info
Always Back Up!
When starting out on this mission, firstly save a copy of the original VirtualFolders.cfg file in a safe place in case you make a mess out of things and need to restore the default state. You can always reinstall Live to do so as well, but that’s not necessary if you back up the file.
In addition, you definitely, absolutely will want to save a backup copy of your own custom-crafted VirtualFolders.cfg in a safe place, because every time Ableton updates Live, it will get overwritten and you’ll need to replace it (just like with Themes aka Skins). Maintaining a backup of your custom configuration is essential in order to continue using it in the future, so do not forget to save a copy of it after you complete it.
Your Custom Configuration
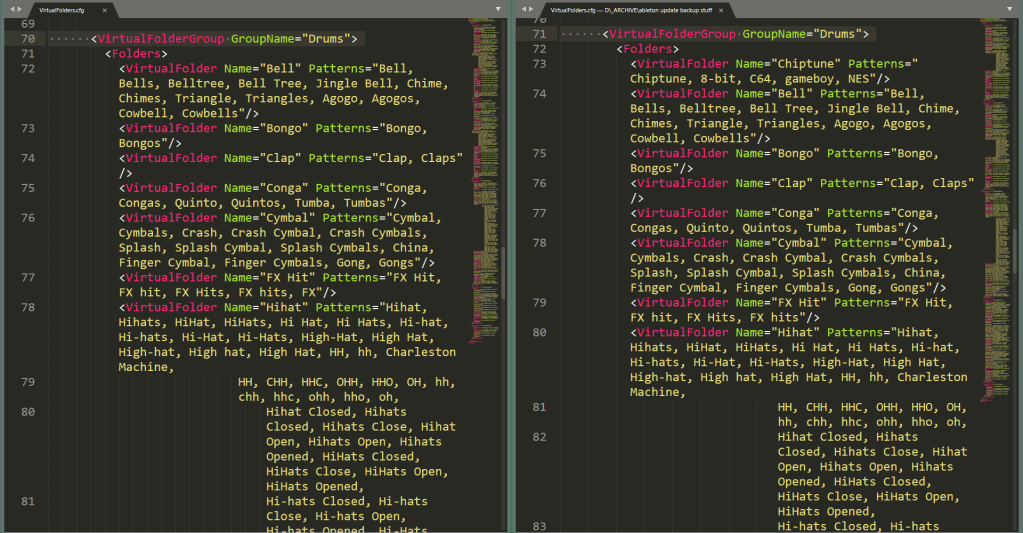
If you open up the VirtualFolders.cfg file in a text editor (such as the recommended Sublime Text 3) and gaze around at it for a while you’ll get an idea for how things work.
Virtual Folders are arranged in Groups. Each Group can include an arbitrary number of Virtual Folders, which will be the names of the folders that show up in Live’s browser. Each Virtual Folder allows two parameters: the Name (a single string of text that will show up as the category title), and the Patterns, a list of text strings which will trigger search results for devices in that category. Neat!
To set up your own system, simply alter the existing entries, and/or add your own new ones. I would recommend starting slowly, perhaps by adding in one new category to one group and testing it out, before planning a major overhaul to the entire scheme. Be extra cautious about deleting existing options, since while doing so won’t affect any devices directly, it may reduce your ability to easily access certain existing patches.
In the image below, see how on the right i’ve added the “Chiptune” Virtual Folder to the Drum categories. Now i can find chiptune-style drum hits easier. Radical.
After you backup both the original and your new configuration, replace the original with the new one, restart Live and check out what happened. Chaos? Euphoria? Now ponder whether you made a wise decision.
PerforModule’s Configuration Strategy
I’ve found Ableton’s default categories for the Sounds group to be mostly adequate, and so i haven’t altered much there. Notably, i’ve removed the “Booms” entry (new with Live 10), which i find useless and annoying to exist as its own folder, since anything i’ve found that could be classified as such could instead fit into a more appropriate category.
Because i was already invested in having sorted thousands of patches into the existing categories, it made sense for me to keep them, but perhaps in your case it might be a good idea to reassess the default categories and use ones instead that make more sense to you. Perhaps you would prefer to have multiple categories of basses available, for example—coordinating your clean, distorted, and wobbly bass patches separately. I might change “Synth Misc” into “Chiptune”, since that’s basically what i use the category for anyways…
Note that the Drums group is for drum hits, not drum racks. (Unfortunately, i’m still not sure of a way to suavely organize drum racks by type, so for those i still use User Library folders.)
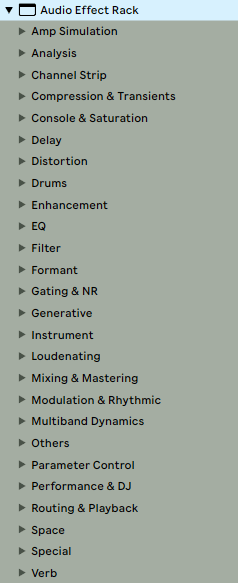
The AudioFx group is where i’ve shifted stuff around a bit more.
The “Analysis” category is added, and it is much welcomed.
“Distortion” has keywords added so that degradation effects show up there.
Various effects previously crammed within “Mixing & Mastering” have been granted their own categories…
I’ve added a “Compression & Transients” category to align with the Elemental Mixing Template.
“Gating & NR” category for dynamics-increasing and noise reduction effects.
“Console & Saturation” has been added as a category, since i tend to use those for different purposes than more overt distortions.
“Delay” (previously placed inside “Modulation & Rhythmic”) now has a dedicated category.
“Enhancement” category added for exciters and other special-purpose, hard-to-categorize processors.
“EQ” now has its own category apart from “Filter”.
“Generative” category added for audio effects that generate sound.
“Channel Strip” category added for multi-effect chain plugins.
“Loudenating” category (shoutout to chris from airwindows for that term) added for limiters, maximizers… things whose purpose and result is to make stuff louder.
“Multiband Dynamics” category added, because those beasts are unique and special-purpose enough to have their own demesnes.
“Parameter Control” category because all those MaxForLive gadgets are so damn nifty to have on-hand in an accessible fashion.
“Routing and Playback” for all the odd toys that do strange things with channel routing, signal sending, and et cetera.
“Verb” because why the heck is there not a reverb category to begin with? They used to live in “Space”, which now i can designate only for things to do with stereo panning, perceived positionality, phase, and depth of field.
“Drums” and “Instrument” still exist as effect categories, and are used for instrument-specific plugins (examples: eddie kramer DR, bass professor).
Should you use the same custom categories as me? Probably not. But you can use these examples as thought-food to inspire your own devious system planning that suits your particular preferences.
But Why?
“I can just custom organize stuff however i want in my User Library, and ignore the Core Library. What’s the practical point of this?”
I dunno… i guess if you’re an anal-retentive nerd. It just streamlines stuff and feels like a cleaner, more unified experience. If you can’t see the appeal, then this is not for you. Have fun with your disorganized midden heap of chaotically-organized junk. Just kidding. It’s all love. Well, mostly.
Limitations
As swagtastic as implementing a custom system in this way feels, it’s still far from perfect. There are various improvements that could certainly be had.
Being able to classify individual Samples, Loops, and Clips might be kinda neat. As mentioned above, drum racks don’t count as a group like the other device types, and that’s kinda dorky.
Being able to access things with a sort of tag-style metadata system might be more elegant than folder trees. I know some DAWs can do this.
What would you add or change?
Narrow Down Your Plugin Needs
So Many Plugins
Brand new plugins… promotional sales on plugins… they are SO tempting. But do you really need that new compressor plugin that just dropped?
In order to assess which plugin types are lacking in your toolbox, i recommend making a spreadsheet of all the plugins you own by category. You might discover, as i did, that you have such a vast variety of compressor options to choose from, it’s likely that you won’t benefit a whole lot from purchasing any more of them. You also might discover, like me, that you’re somewhat lacking in gate plugins, and could indeed benefit from picking up a few new models. Etc… Continue reading
2 New Packs Now Available at Isotonik Sounds: “Spirit Beats” and “ADM AMBIENT”
As curator of Isotonik Sounds packs for Ableton Live, i’ve gotten the chance to preview some amazing material. It’s been a great honor to be tasked with pinpointing unique and interesting artists and nurturing their product development. -animus invidious
Continue reading
Isotonik Sounds Launches with New Sale Packs
Isotonik Sounds has officially launched, a section at the Isotonik Studios webshop featuring instrument and sample packs for Ableton Live by various developers.
New sale packs will periodically be made available. The first is ADM DRUMS by yes, you guessed it, the acclaimed wizard of Live: AfroDJMac.
Continue readingAbleton Live 10: New Feature Highlights
So i’ve been delving into the Ableton Live 10 Beta for a little bit now, did a couple of large mixes and some experimenting with it, and have accumulated a fair impression of how it differs from Live 9.
Ableton Live 10 ~ What’s to Like?
I’ll run over some of the things i’ve noticed in particular which stood out to me, while slipping in mentions of more minor program enhancements. Everything i explain below i will have confirmed personally with Live 9 and Live 10 side-by-side testing.
You’ll notice i completely ignore some new features. These are things i’ve either not tested yet, don’t care about, or would take too much time to dive into properly here. I not even touching on the new instrument or effects (yet…)
My overall impression of Live 10 is that they added in a lot of workflow improvements i didn’t know i wanted. Continue reading
Animus Invidious on the AfroDJMac Music Production Podcast (+ new free effect racks)
I was super stoked to be a guest on the AfroDJMac Music Production Podcast. Here’s your chance to hear my actual, real-life voice(!) The sound quality on my side is not wonderful since i was recorded over skype, but whatexer. I had a great time chatting with Brian about random stuff… the conversation decided upon its own meandering path, touching on various topics including the crafting and sharing of Ableton Live racks, VST hoarding, my custom Elemental Mixing template channel strip database, workflow optimization, cassette processing, dynamic contrast between songs on albums, and even the Legend of Zelda (nerds). All in all it was a very invigorating experience and i definitely wouldn’t turn down being a guest again at some point in the future. I myself have quite enjoyed the other podcasts, as they contain a plethora of unconventional tips which are superb for kick-starting the creative juices.
Oh, and we also dropped a couple free audio effect racks for you to grab, including something i brainstormed up quite a while ago and finally implemented perfectly: ‘Dynamic Panning’ (compresses in one direction while it expands in the opposite for source-reactive width modification).
Check out AfroDJMac’s website to access the show.
