So i’ve been delving into the Ableton Live 10 Beta for a little bit now, did a couple of large mixes and some experimenting with it, and have accumulated a fair impression of how it differs from Live 9.
Ableton Live 10 ~ What’s to Like?
I’ll run over some of the things i’ve noticed in particular which stood out to me, while slipping in mentions of more minor program enhancements. Everything i explain below i will have confirmed personally with Live 9 and Live 10 side-by-side testing.
You’ll notice i completely ignore some new features. These are things i’ve either not tested yet, don’t care about, or would take too much time to dive into properly here. I not even touching on the new instrument or effects (yet…)
My overall impression of Live 10 is that they added in a lot of workflow improvements i didn’t know i wanted.
New Ableton 10 features will be highlighted in italics.
“CMD/CTRL” means “CMD on mac or CTRL on windows”.
•Snappier Overall Performance
This is totally unscientific and subjective, but it seems to me like Live 10 takes a little bit longer to initially load, but once loaded, runs much snappier. I feel like tracks, sets, plugins and racks load, delete, and move around faster. It also seems like i can load bigger sets with heavier cpu burdens with less chance of crash. It has only crashed on me once during my work with it so far, which is quite surprising considering i was working on one mix which had 74 audio tracks and i would often use quite complex chains before freezing or bouncing, and had some sidechain and master buss stuff going on the entire time.
I like the fact that MaxForLive now automatically loads upon program start, because those moments in live 9 when i’m working, load something up, and then have to wait for Max to start because it hasn’t yet, are always annoying.
•Nested Groups
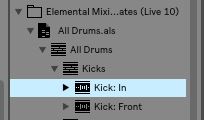
I absolutely LOVE the nested groups feature. It just seems natural for Ableton, since you can already nest effect and instrument racks however you like. This was definitely a longtime requested feature of mine, but i didn’t realize until using it in practice how much it actually aids my workflow. I was technically always able to configure whatever audio pipeline i needed to before with track routing, but nesting groups, for most purposes, is more elegant and efficient. For example, say i have snare top and bottom in a set of drum mic tracks. I can group the top and bottom mic tracks into “snare group”, which itself is nested inside the larger “all drums” group.
I could see an unorganized person creating a mess of a set by grouping things eagerly and arbitrarily, but for me, the system works beautifully. And if i need to do more complex routing—i still can, by sending tracks wherever i want, using return tracks, or resampling.

While i’m talking about routing, the new feature to route a drum rack pad directly to one of its sends is pretty cool. Now those selector slots on the far right of a drum rack’s chain list actually do something for the pads as well as the return chains.

Another new thing is that you can now unfold group tracks in the browser to access the contents directly. Very useful, especially with nested grouping. Still missing direct access to return tracks and master channels of projects… oh well.
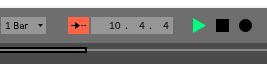
•Follow Stays On
Now when “follow” is on, it stays on. This means that you can pause, navigate somewhere, edit something, and when you hit “play” again, the view will go back to where you can see the playhead moving. Yes! I’ve been wanting this! Less constantly hitting the “follow” button to re-enable it. When i want it on, it’s on. When i want it off, it’s off. Nice.
•Loop On / Off Shortcut
In Live 9, CMD/CTRL + L sets the loop point to the selected area and enables it, but pressing so again does not then turn off the loop. This is now fixed and CTRL/CMD + L will toggle the loop on or off. When no time is selected, the previous loop will toggle back on, otherwise the currently selected time will become the new loop.
If you want to toggle the loop without resetting its position, map the Loop Switch.
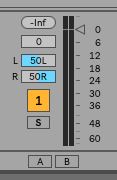
•Split Stereo Panning
So much yes here. I’ve gone on about how “normal” panning eliminates one side of the stereo field when you pan to the opposite side (and i’ve made various Ableton Racks to address this concern). It’s just essential to be able to independently pan the left and right side content when working with stereo tracks. My only irk is that you can’t type values into the sliders like you can with knobs.
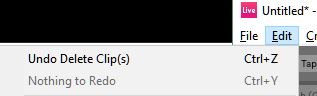
•Undo after Save
Ok now this is a real life-saver here. If you’re like me, there’s been at least one time when you accidentally hit CMD/CTRL-S instead of CMD/CTRL-Z. Well shit. That thing you were supposed to undo? You just locked it in. Damn. But no more will such troubles plague us! You can now undo even after you’ve saved your set. Less chance of irreversible mistakes. Swanky!
Live 10 also automatically saves backup copies of sets in a folder in every project which will undoubtedly save us from some potential problems.
•Double-Click for Default
You can now double-click on a value to return it to its default position. This works just like hitting “delete” to return a value to its default position. I like it, because sometimes it’s faster if you don’t have a hand on the keyboard, and it’s less risky than accidentally hitting “delete” while a device rather than a parameter is selected.
•Mouswheel Changes, Scrollin’ and Zoomin’
CMD/CTRL + Mousewheel now zooms in or out to the location on the timeline the mouse is hovering over. This makes Ableton Live’s ultra-slick navigation (one of the reasons it’s my DAW of choice) EVEN FASTER, as it’s now almost instantaneous to zoom out, move the mouse, and zoom in to the precise area you want to edit. This behavior update also applies to waveforms in Sampler, for example.
You can now scroll with two-finger trackpad gestures. I did test “Pen Tablet Mode” with my touchscreen monitor, but it’s a really bad touchscreen so i can’t give a good review of the mode.
Previously in Live 9, CMD/CTRL + Mosewheel scrolled left and right on the timeline; now use Shift + Mousewheel to scroll horizontally. Scrolling up and down is the same with the mousewheel as before.
You can instantly zoom to maximize a selected time area by pressing “Z” (assuming the Computer MIDI Keyboard is off, otherwise it will lower your octave as usual). I know i’ll be using that feature a lot. Use Shift + Z to zoom back to where it was before zooming in.

…before and after pressing “Z”…
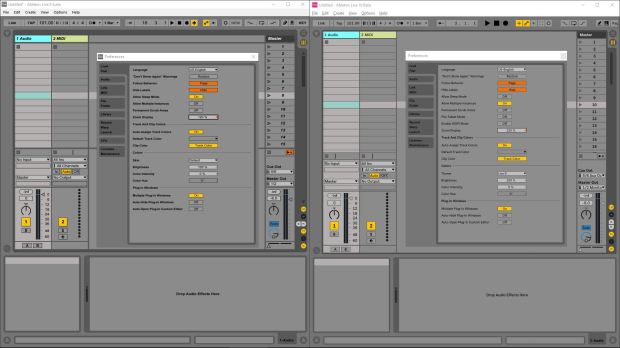
•Optimized Display
That wonky zoom display behavior has been fixed, and it feels better. Here’s a screenshot of Live 9 next to Live 10, both set to the same skin, zoom set to 120%. Notice how the track title bar is placed with less wasted space in Live 10. Every pixel counts, right?
•MultiClip Editing
I like to compose orchestral parts a lot, usually to go along with guitar parts i’ve written. I sometimes will write a tertiary element to play the combination tone of two other instruments, and seeing the notes overlap in one piano roll makes the process that much quicker to calculate.
CHECK IT OUT:
I’ll double-click in an empty MIDI track in the Arrangement View to create a new MIDI clip.
I’ll duplicate the track twice, re-color, and draw random notes in.

Now when i select all three clips… it shows the MIDI for each, and each can be edited. If i select a note, it and other notes from the same origin track become colored. Other notes are greyed-out in the background. If i draw a selection box to grab multiple notes, it only grabs ones from the currently highlighted layer. This makes it easy to manipulate notes for multiple clips very quickly. Also useful during times like working on a piano part with left and right hands as two different MIDI tracks.

(After adding some notes to a couple tracks…)

There are also “Multi-Clip Loop Bars” at the top of the edit area, one for each selected clip, which can be clicked on to edit a particular layer.

For contrast, here’s what Ableton Live 9 shows you when you select two MIDI clips. Not as cool:

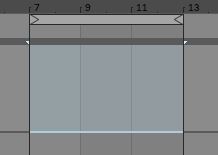
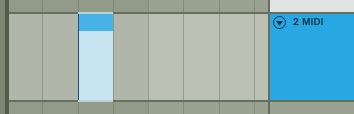
•Activate a Time Range
Previously, if you selected a portion of a clip or clips and hit “0”, it would deactivate the clips entirely. Now, doing so will automatically split and deactivate only the selected area. Nice little workflow enhancement.
Time selection, Live 9 and 10:
Hit “0”, Live 9 and 10:

•Reverse Command
Press R (with the Computer MIDI Keybord off) to reverse the selected clip or clip segment. It will automatically slice and only reverse the selected section, similar to the time range activation described above. You can even select multiple tracks of audio to reverse slices of simultaneously which was previously impossible.
Having a command for reverse was definitely a feature request of mine to speed up workflow, and i’m happy it’s been implemented. Now if only “save clip” could be MIDI-mapped… i would be over the moon.
•Automation Mode & Fades
Arrangement view now has 2 modes: one for Track Content and one for Track Automation. To toggle modes, click the “Automation Mode” switch (next to the “Lock Envelopes” switch, which by the way can now be MIDI- or key-mapped) , or press “A” (when the computer MIDI keyboard is disabled). You can also map the automation mode button to a MIDI controller, and/or to a keyboard key of your choice.
With automation mode on, everything is pretty much as we know it from Live 9.

When automation mode is switched off (“Track Content Mode”), clips become the solid color of their title bar. This is where you adjust fades now, instead of selection from a menu like other automation parameters.
Fades now have an extra edge handle for further control.
Notice the extra square breakpoint on the bottom left edge of the Live 10 fade (right). Also notice how the Live 10 curve goes all the way to the top of the clip, making better use of the available space and giving greater vertical resolution. The clip is also shaded on the faded-out side, providing a nice visual indication.
•New Metronome Options
There are now three default metronome sounds to choose from. I personally like “click” (which sounds more like “thump” to me).
You can now set the metronome rhythm. For example, you could set it to 1/4T while in 4/4 to get 6 clicks every 4 beats. Impossible time segmentations are greyed out (for example, 1/4T in 7/8).
You can now set the metronome to sound only whilst recording.

•Reposition Clip Sections in Arrangement with Arrow Keys
I’m a big proponent of not using the mouse when it’s faster not to do so. Now, a selected clip portion in the arrangement view can be moved left or right with the arrow keys.
Basically, it works like this: if the cursor is just a line, Left or Right will move its position, just as you are currently used to.
Press CMD/CTRL + Left or Right to jump to a clip’s start or end.
Press Shift + Left or Right to select an area of time.
Once you have a portion of time selected, the behavior changes, and moving Left or Right will not just move your cursor, but will move the selected portion in that direction. By Pressing CMD/CTRL + Left or Right while a time portion is selected, you can jump the clip around.
Since we’re talking about horizontal movement, it’s a good time to mention how you can now…
•Move Automation Envelopes Horizontally
Previously, you could always transfer the position of some automation by copying and pasting if you needed to. But now you can just grab a selection of automation and drag it left or right. Breakpoints which are in the way will be written over. Definitely hastens workflow for when you just want to move some automation around. Press shift while dragging horizontally or vertically to lock movement to that axis.
I’ll also mention here that breakpoints now snap to the grid (which can be easily disabled by disabling the grid), which can be handy when you want to be all technical and precise.
(windows) •”Fine-Tune” Modifier Change
Previously on windows, CTRL would allow for fine-grained control when adjusting parameters with a mouse. Now, Shift does it instead. I guess this was to increase cross-platform consistency. Ok, then.
However, i’ve noticed that while CTRL + Shift + Mouse used to give 1/100bpm control over tempo, now that feature is apparently gone???
•Dragging Clips to New Tracks
Dragging a clip from an existing track to a blank area will create a new track populated with any necessary devices (instruments, effects) to recreate the clip. Use CMD/CTRL-Drag to copy instead of move. You can also move or copy frozen tracks this way; the new track will include the frozen track, and it can be unfrozen to reveal and adjust devices.
•”Show All Tracks” in Arrangement View
This new option (key “S” when the Computer MIDI Keyboard is off) will reduce screen clutter by minimizing and collapsing all tracks in arrangement view.
Since you can already batch-fold or unfold all tracks in arrangement view by alt-clicking one of their unfold buttons (or multiple specific tracks by selecting each then fold/unfolding one), i don’t really get the point. Might use it occasionally.
•MP3 Export
What’s cool about this is that you can simultaneously spit out PCM and MP3 if desired. MP3s can be great for quickly tossing at a client or collaborator for feedback during a project. Not having to encode as an extra step in another program post-render is a real time-saver.
I compared my go-to LAME-encoded “insane” quality 320 mp3 via Audacity with Live 10’s 320 mp3 and they compared pretty much identically other some slight deviation under 30Hz. “Close enough for government work.”

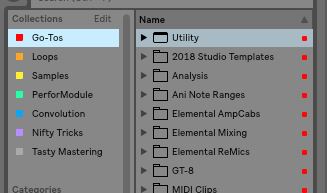
•Collections
Collections are basically 7 color tags you can apply to anything in the browser to be able to access via a shortcut.
What’s cool is you can tag different types of things—folders, effects, instruments, samples, etc. You can place items in multiple collections.
You can categorize and customize them however you like. Here’s what i have tentatively ended up with. I wouldn’t expect anyone to use the exact same categories as me, but maybe they’ll inspire an idea or two:
Red: “Go-Tos” ~ all the stuff i use the most often.
Orange: “Loops” ~ includes local + external hard drive organized loop archives.
Yellow: “Samples” ~ includes organized as well as not yet organized folders of waveforms.
Green: “PerforModule” ~ everything related to performodule device craft.
Blue: “Convolution” ~ one of my side projects is slowly making custom convolution reverb pro racks for a huge archive of impulse responses. Stuff related to that.
Purple: “Nifty Tricks” ~ specific racks & devices which perform really cool, useful tricks.
Grey: “Tasty Mastering” ~ everything used for my mastering business workflow.
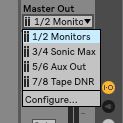
•Ability to Name Input/Output Channels
You can name your inputs and outputs. Cool! Especially useful for instances like mine where the output channel numbers do not match the ones shown physically on my audio interface (which can be confusing).
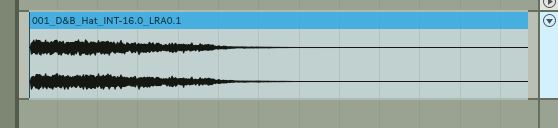
•See Waveform Samples
If you zoom in really closely to a waveform, you can actually see the discrete sample locations. This is really neat for a couple reasons. It lets you know the criteria used for “waveform reconstruction”, providing insight into the process of intersample peaking. It shows the point at which the audio data is quantized, therefore at which (theoretically at least) performing smaller-grained operations would be counterproductive. This very well could alter how i set specific automation for extremely delicate tasks in the future by taking into account the actual sample position at the moment it hits a parameter.

•Automatic Renaming & Recoloring
There’s a new option to recolor all clips in a track to match the color of the track (either in session or arrangement view) . Just right-click on a track title bar.
I already had a maxforlive plugin to do this, but a context menu option is that much easier.
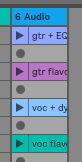 >
>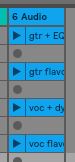
Unnamed Audio Tracks will now automatically be renamed to match the first clip dropped in. When dropping in multiple clips to one track, the name will follow the topmost clip. When removing all clips, the name will revert to default “# Audio Track”, and if you drop in another clip it will change names once more. When dropping multiple clips into multiple tracks (by holding CMD/CTRL upon drop), each track is given its corresponding clip’s name. This is awesome for mixing because most of the time i am working with one audio file per track. Manually renaming 74 or more tracks isn’t the best use of one’s time. Again, i had a max plugin to accomplish this task, but automatically is even better.
To disable automatic track naming, just give a track a custom name.

Recorded clips will have a timestamp included in the name.
This will undoubtedly be useful when organizing or searching through recorded files. “That can’t be the guitar recording we’re looking for. The date is wrong!”
![]()
•Capture
It works just like Looper in “set & follow song tempo” mode when creating a first loop during stopped playback (but without having to set the start point). In other words, it will automatically detect a logical pattern and set the start, end, and tempo appropriately. It does what it’s supposed to. Captured MIDI clips will be created in each track accepting said MIDI.
I experimented by screwing around with random notes for a while, settled in on a solid beat, then hit “capture”. Awesomely, it captured all the MIDI and decided to loop the section of solid beat at the end and set the tempo to it. Super Nifty.

In OTHER NEWS, i’ve done a massive, sweeping update to my “Elemental Channels” spreadsheet which i talked about on AfroDJMac’s Music Production Podcast (check it out for the direct link to the spreadsheet). The focus frequencies are now based on MEL banding, which effects are in which channel strips are even more optimized, plus i’ve incorporated my new workflow for recording parts with my strat guitar in each of its 5 pickup positions. I might provide the actual ableton racks in a pack at some point if anyone shows any interest.
That’s it for now!
*wipes sweat off brow*

Don’t have the money right now, so I have to stay on Ableton 9 for a while. Thanks for rubbing some salt into my wounds 😉
I’m currently saving up for it as well! Went a little overzealous with xmas gifts for the family this year. Hopefully i snag the 20% off upgrade preorder window.
I have some really basic questions about ableton that nobody seems to have since only I have such bad luck with such small things, there’s no way to contact anyone on this site so does the admin perhaps have an email which I can send my problems to? Thanks so much because I am growing grey hairs because of Ableton, every session about 25 minutes something always stops to work..
I would try Ableton tech support and https://www.ableton.com/answers . Be as specific as possible with the issues you’re having.
If they’re unresponsive i could refer you to some certified trainers for tech support (but i doubt those services would be free).
[quote]When automation mode is switched off (“Track Content Mode”), clips become the solid color of their title bar. This is where you adjust fades now, instead of selection from a menu like other automation parameters.[/quote]
Crap. So there’s NO way to remove that solid color from the clips when you’re adjusting fades? I find this “new” feature to be horrible. Makes the waveform hard to read and I really wish Ableton would give us the option to view it without the solid color without having to switch off automation mode. Ugh …