Category Archives: Tute
Magic Numbers: Rounded Fractions
🧠Memorizing Sucks.
As audio engineers, certain numerical values become often-used and thus can become useful to memorize. If you suck at memorizing stuff like me, graphs and charts can be helpful.
~`~
🎛0—127.
In Ableton Live and other programs, range values are often scaled from 0 to 127, rather than 0 to 100. So it can be useful sometimes to know certain fractional values to type in (either mathematically perfect for extreme precision, or rounded values for quick input).
PerforModule Recommends: Effects Order
While we all know that there is no such thing as a perfect or ideal FX chain order for all situations because it totally depends on context, i have eventually developed some general preferences for the order of effects in a signal chain. Recently updating all my templates for Live 11 has further honed my thoughts on the situation.
We can of course swap around the sequential ordering of effect devices, either for a specific intended result or as a matter of experimentation just to see if an alternate routing happens to sound better on given audio.
As usual when sharing my ideas, it is recommended that you not simply adopt the structure as presented, but rather that you test it out in practice and modify things over time to suit your particular style, keeping notes and updating your own templates as you go. Maybe you think the way i place transient shapers before compressors is idiotic. That’s totally fine!
I’ll share below my go-to effects order, and (most importantly)… WHY.
While some of the choices are probably pretty unorthodox, none of them are arbitrary; they all have reasons. Are they bad reasons? Good reasons? Who knows. But i like to think they are built on logical rationale.
Keep in mind you’re seldom if ever going to need all these types of effects on any single track, but for times when you are using even two different processor types, some guidance as to their ordering might prove useful. Resist the urge to add more effects to a chain just because you can. The fewer processors required to get a sound how you want, usually the better.
Scroll to the bottom for a handy cheat-sheet!
~`~
Continue readingRepurposing Bad Controller Knobs
Improvisational Optimization
It’s always been more of my mentality to try to figure out how to make optimal use of what i have on hand — even when flawed — than to try to find immediate replacements… from using a TI-83 calculator to code as a teenager (since that’s what i had access to), to learning how to mic two small guitar amps to sound amazing rather than try to buy bigger amps which i didn’t have space to store. Whether or not this is the optimal way to be, it’s been pretty ingrained in me over a lifetime of dealing with less-than-ideal equipment and environs, figuring out how to increase functionality past apparent limitations, and squeezing every drop of valuable usage i could garner out of existing gear.
~`~
Bad Encoders!
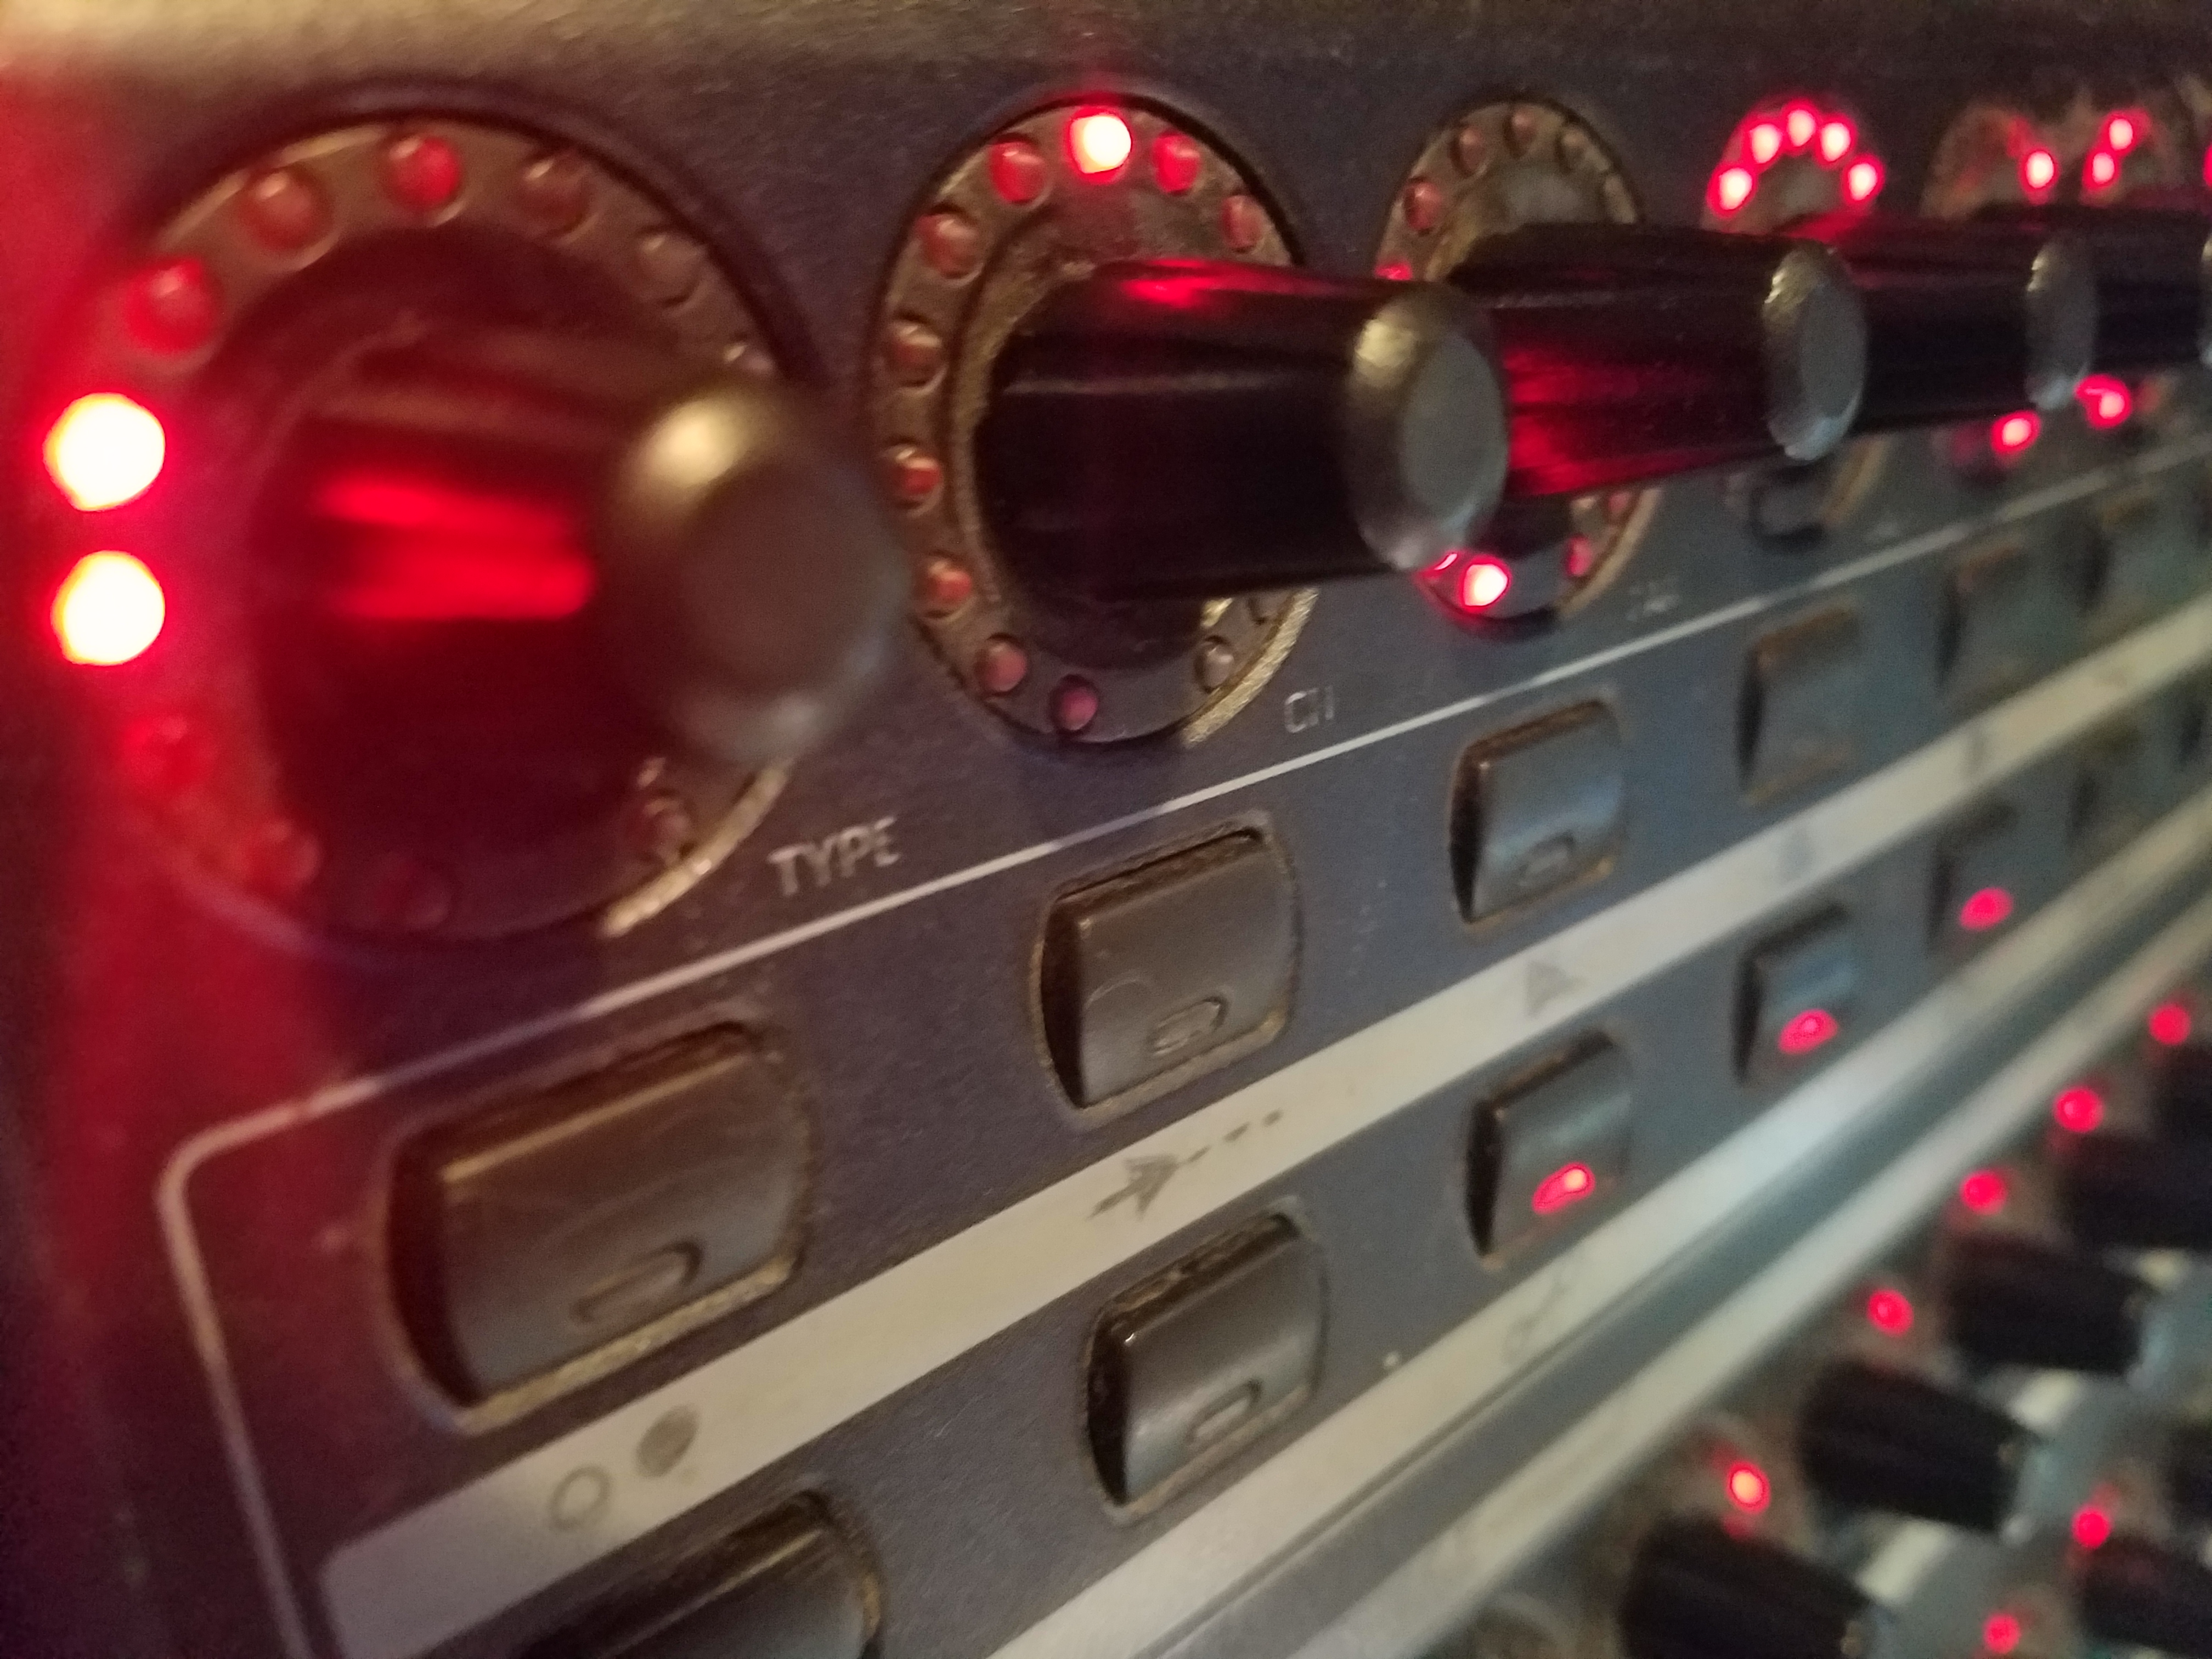
This BCR-2000 MIDI Controller i have happens to have a top row of encoder knobs which act all wonky, sending out their values all slow and choppy and making them pretty much unusable as MIDI controls. However, each knob does have a set of LED lights, and it is possible to send messages to those lights to make them move.
By using a couple of MaxForLive devices in Ableton, i have it set up so that the 8 knobs each provide a VU-meter type experience in reaction to whatever’s playing in Ableton Live. Now they aren’t useless! Yay!
Continue readingDumb Stupid Tip: Faster Right-Clicking
OK, so you know when you right-click on something to open up a context menu?
And then you move the mouse cursor to the item you want, and then you left-click the option you want?
Well, there is a way to do it a tiny bit faster. Maybe you already do it.
I found myself picking up the habit due to right-clicking to change macro colours so often. By saving a tiny little bit of time multiplied by a whole bunch of iterations, one can end up saving a substantial amount of time. Anything that streamlines workflow is useful, right?
So here’s the tip: Right Click and Release
WTF?
Instead of doing this:
right-click -> move mouse -> left click
Do this:
right-click (hold it down) -> move mouse -> release right-click
Doing this implements the menu option (in Ableton Live at least — not in all programs) with a single mouse click instead of with two mouse clicks, thereby saving you a precious minuscule quantity of milliseconds. For example, if you had to select a hundred boring context menu options, you’d be performing one hundred clicks, instead of two hundred. Brilliant!
This trick does not work in all programs, but it does in Ableton Live, at least.
So yeah.
NOTE: if following this methodology, make sure that your index finger gets some extra exercise to compensate for its less active role going forward. I recommend angry pointing.
Dry / Wet Anomalies of a few Ableton Live Effects
Often, plugins will cause an effect they don’t tell you about, and you may not realize is occurring.
Knowing exactly what is happening to audio is valuable, because otherwise if we set up chains of effects we may think that we are resulting in a more transparent sound than we really are. Subtle changes to sound can stack up and add to quite audible differences—which if we don’t know the sources of may be difficult to diagnose and address.
Here’s an overview of some of the things some of Ableton Live’s stock effects do to sound passing through them, which you may not realize at first. Some of these quirks many of you will have gotten to know by ear already just by using the effects, in which case seeing the analysis graphs can provide some “aha” moments.
Continue reading“Go-To” Macro Arrangements for 16-Knob Racks in Live 11
Macro Placement Consistency.
~`~ Consistency in parameters assigned to racks is useful, for always being able to grab a certain knob for a certain result. For example, on the 8-knob racks of Live 10 and earlier, for dynamics devices like compressors or gates, i tend to place Attack and Release on Macros 5 and 6.
16 Knobs! Yay! …but also, Uh Oh!
~`~ Live 11 now has the ability to allow up to sixteen macros on a rack, which expands our abilities — but also makes things easier to become sporadic and messy by just mapping whatever, wherever. More knobs means more searching text with eyeballs. So therefore it seems helpful if certain controls are always (or almost always) in the same places.
Reviewing a Bunch of Multiband Dynamics Plugins
It’s Time
I’ve decided that it’s time to write a post going over all the multiband dynamics processors in my audio plugins library. For me, this includes both multiband compressors/expanders as well as dynamic EQs, because i tend to use them for the same general purposes.
How to Warp Songs (in 3 Simple Steps)
So what exactly is Warping?
In Ableton Live, you can warp clips, so that they will always play in-tempo along with the grid. For most general composition and mixing tasks, you don’t want to do this, as it degrades audio quality, but for live performance it’s super amazing, since you can basically combine together any audio clips you want like legos. It’s also useful for transitioning between songs in more typical “dual deck” DJ-style setups, wherein the outro of one song can seamlessly blend with the intro of the next one, with a tempo ramp between them happening along the process.
Organizing Your Ableton Browser Like a Boss PART 2: Custom Categories!
You might have already checked out the post about organizing your User & Plugin Presets like a boss using Ableton’s built-in folder architecture.
Well, now we’re ratcheting it up a level to give you ultimate control of your own personalized device organization structure, with the ability to decide exactly what those categories will be.
If you’re like me, you’re obsessed with systematizing your production tools and resources into a cohesive configuration, making it easy to access what you want when you want it, for maximally optimized workflow when diving into creativity.
While working along with the default categories for years, i was never quite fully satisfied by Ableton’s built-in selection of available choices, so i did some research and testing and determined that it’s not only possible, but actually fairly easy to set up your own custom categories. The trick is to plan things out logistically.
If at this point you have no idea what i’m talking about, please check out the above-linked blog post for background on how Ableton’s category structure works. Then come back here and continue on. The gist is that by including devices in folders of particular names, you can get them to automatically show up in Live’s Core Browser. Normally, we’re relegated to using the default built-in categories that Live comes supplied with. All PerforModule Premium Packs are set up with devices like this, so they install and devices show up in the Core Library for anyone who purchases them. But now, should you want to, you can modify those actual categories. Sweetness.
Virtual Folder Config
The trick to setting up your own categories lies with the VirtualFolders.cfg file.
VirtualFolders.cfg Locations (for Ableton Live 10, similar for Live 9)…
PC:
C:\ProgramData\Ableton\Live 10 Suite\Resources\Core Library\Ableton Folder Info
Mac:
Ableton Live Application (show package contents) > Contents/App-Resources/Core Library\Ableton Folder Info
Always Back Up!
When starting out on this mission, firstly save a copy of the original VirtualFolders.cfg file in a safe place in case you make a mess out of things and need to restore the default state. You can always reinstall Live to do so as well, but that’s not necessary if you back up the file.
In addition, you definitely, absolutely will want to save a backup copy of your own custom-crafted VirtualFolders.cfg in a safe place, because every time Ableton updates Live, it will get overwritten and you’ll need to replace it (just like with Themes aka Skins). Maintaining a backup of your custom configuration is essential in order to continue using it in the future, so do not forget to save a copy of it after you complete it.
Your Custom Configuration
If you open up the VirtualFolders.cfg file in a text editor (such as the recommended Sublime Text 3) and gaze around at it for a while you’ll get an idea for how things work.
Virtual Folders are arranged in Groups. Each Group can include an arbitrary number of Virtual Folders, which will be the names of the folders that show up in Live’s browser. Each Virtual Folder allows two parameters: the Name (a single string of text that will show up as the category title), and the Patterns, a list of text strings which will trigger search results for devices in that category. Neat!
To set up your own system, simply alter the existing entries, and/or add your own new ones. I would recommend starting slowly, perhaps by adding in one new category to one group and testing it out, before planning a major overhaul to the entire scheme. Be extra cautious about deleting existing options, since while doing so won’t affect any devices directly, it may reduce your ability to easily access certain existing patches.
In the image below, see how on the right i’ve added the “Chiptune” Virtual Folder to the Drum categories. Now i can find chiptune-style drum hits easier. Radical.
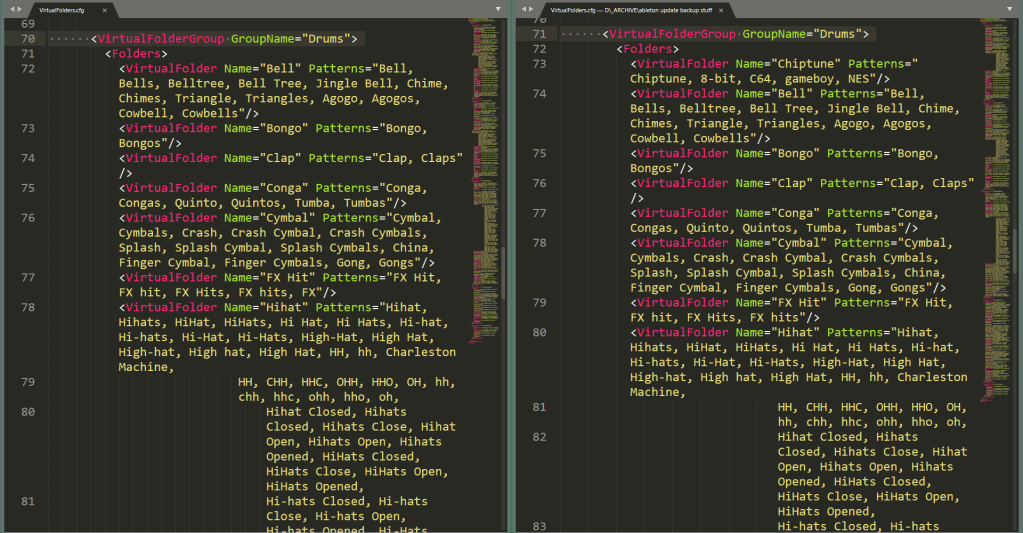
After you backup both the original and your new configuration, replace the original with the new one, restart Live and check out what happened. Chaos? Euphoria? Now ponder whether you made a wise decision.
PerforModule’s Configuration Strategy
I’ve found Ableton’s default categories for the Sounds group to be mostly adequate, and so i haven’t altered much there. Notably, i’ve removed the “Booms” entry (new with Live 10), which i find useless and annoying to exist as its own folder, since anything i’ve found that could be classified as such could instead fit into a more appropriate category.
Because i was already invested in having sorted thousands of patches into the existing categories, it made sense for me to keep them, but perhaps in your case it might be a good idea to reassess the default categories and use ones instead that make more sense to you. Perhaps you would prefer to have multiple categories of basses available, for example—coordinating your clean, distorted, and wobbly bass patches separately. I might change “Synth Misc” into “Chiptune”, since that’s basically what i use the category for anyways…
Note that the Drums group is for drum hits, not drum racks. (Unfortunately, i’m still not sure of a way to suavely organize drum racks by type, so for those i still use User Library folders.)
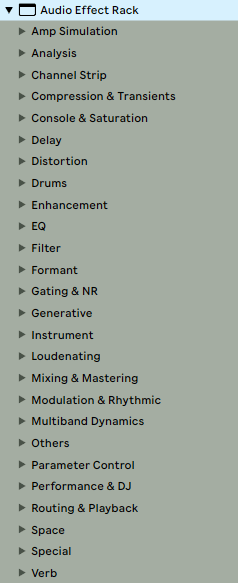
The AudioFx group is where i’ve shifted stuff around a bit more.
The “Analysis” category is added, and it is much welcomed.
“Distortion” has keywords added so that degradation effects show up there.
Various effects previously crammed within “Mixing & Mastering” have been granted their own categories…
I’ve added a “Compression & Transients” category to align with the Elemental Mixing Template.
“Gating & NR” category for dynamics-increasing and noise reduction effects.
“Console & Saturation” has been added as a category, since i tend to use those for different purposes than more overt distortions.
“Delay” (previously placed inside “Modulation & Rhythmic”) now has a dedicated category.
“Enhancement” category added for exciters and other special-purpose, hard-to-categorize processors.
“EQ” now has its own category apart from “Filter”.
“Generative” category added for audio effects that generate sound.
“Channel Strip” category added for multi-effect chain plugins.
“Loudenating” category (shoutout to chris from airwindows for that term) added for limiters, maximizers… things whose purpose and result is to make stuff louder.
“Multiband Dynamics” category added, because those beasts are unique and special-purpose enough to have their own demesnes.
“Parameter Control” category because all those MaxForLive gadgets are so damn nifty to have on-hand in an accessible fashion.
“Routing and Playback” for all the odd toys that do strange things with channel routing, signal sending, and et cetera.
“Verb” because why the heck is there not a reverb category to begin with? They used to live in “Space”, which now i can designate only for things to do with stereo panning, perceived positionality, phase, and depth of field.
“Drums” and “Instrument” still exist as effect categories, and are used for instrument-specific plugins (examples: eddie kramer DR, bass professor).
Should you use the same custom categories as me? Probably not. But you can use these examples as thought-food to inspire your own devious system planning that suits your particular preferences.
But Why?
“I can just custom organize stuff however i want in my User Library, and ignore the Core Library. What’s the practical point of this?”
I dunno… i guess if you’re an anal-retentive nerd. It just streamlines stuff and feels like a cleaner, more unified experience. If you can’t see the appeal, then this is not for you. Have fun with your disorganized midden heap of chaotically-organized junk. Just kidding. It’s all love. Well, mostly.
Limitations
As swagtastic as implementing a custom system in this way feels, it’s still far from perfect. There are various improvements that could certainly be had.
Being able to classify individual Samples, Loops, and Clips might be kinda neat. As mentioned above, drum racks don’t count as a group like the other device types, and that’s kinda dorky.
Being able to access things with a sort of tag-style metadata system might be more elegant than folder trees. I know some DAWs can do this.
What would you add or change?
