So what exactly is Warping?
In Ableton Live, you can warp clips, so that they will always play in-tempo along with the grid. For most general composition and mixing tasks, you don’t want to do this, as it degrades audio quality, but for live performance it’s super amazing, since you can basically combine together any audio clips you want like legos. It’s also useful for transitioning between songs in more typical “dual deck” DJ-style setups, wherein the outro of one song can seamlessly blend with the intro of the next one, with a tempo ramp between them happening along the process.
Below the Warping Guide is a video of me warping the song “Put Down That Weapon” by Midnight Oil, one of my favorite songs which i used to listen to on cassette tape as a kid. Ideally you’ll want to read this guide as you watch that video in another window, if possible.
Warping Guide
Preparation: Drop in the Song Clip and enable “Warp”, if it’s not already.
Use the metronome or drop in some warped drum loops to use as a metronome (my preference).
~`~
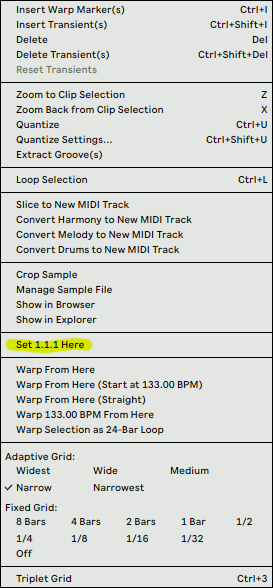
Step 1: “Set 1.1.1 Here”.
Select “Set 1.1.1 Here” at the initial onset of the waveform. If the song has an amorphous intro, set it at the first obvious solid one beat.
To do this, right-click on the grey area just above the waveform in the Sample Editor. Make sure to right-click the darker grey area below the lighter-grey Loop Brace and Scrub Area, otherwise it will just give you “Loop Current Region”. You’ll want the big context menu:
~`~
Step 2: “Warp From Here”.
Right-Click on the Transient Marker that was just created and choose “Warp From Here”.
The warping options are just below “Set 1.1.1 Here” in the context menu. Usually the first option, “Warp From Here”, is sufficient.
After you do this, you’ll be able to see the Seg. BPM value for the clip that Live detects (just under the “Leader/Follower” button in the Clip View). If you want, set the session tempo to this value. Or not. That’s a personal preference. Setting to it will result in the most natural playback of the song, but on the other hand playing back at a stretched tempo can be more enlightening.
~`~
Step 3: Fine-Tune yer Warp Markers.
Getting good at this comes with experience. At first you might feel the urge to position EVERY SINGLE transient you see EXACTLY on a warp marker (i know i did this for awhile), but this is not recommended for a few reasons. One, it robotically stiffens the natural groove of the performers, which tends to not sound better. Two, it tends to unpleasantly maximize the amount of signal degradation by constantly stretching the audio to different degrees moment-by moment. And three, it’s time consuming and boring to do.
DON’T FORGET TO SAVE THE CLIP AFTER YOU DO ALL THE WORK!
0:07: Warp On
0:18: “Set 1.1.1 Here”
0:24: “Warp From Here”
0:32 on: Fine-Tuning Warp Markers
~`~
TIP: Use as few Warp Markers as you can get away with.
You’ll notice in the video that i’m trying to strategically place warp markers to align whole groups of nearby transients. I’m not worrying about each of them being absolutely perfect individually; it’s more about overall feel, looking out for areas where the tempo of the instruments has drifted forward or backward in time, and gently pulling it into place.
TIP: Onset of Transients, not Peaks.
Something i picked up from warping and DJing hundreds of songs over time was to set the warp markers to line up just before the onset of most transients, rather than at their peaks. You’ll notice this in the video when i zoom in closely. This tends to sound more natural when stacking various clips with different timbres, frequency spectra, and grooves, i’ve found. Positioning transients for multiple clips to zenith at the exact same moment can create unnecessarily loud momentary peaking as they all hit in unison, whereas smearing them a little bit, analog-style, may result in more headroom and a less harsh sound.
TIP: Use your Ears above all else.
Sometimes a transient might look like it’s positioned perfectly, but it just doesn’t sound right (or vice versa). Always trust your ears above the visuals on the screen, and nudge the thing back and forth, replaying that segment, until it sounds right. In the video, the main thing i’m doing over the course as i play the song and fine-tune the warp markers is to listen very carefully, so that the blend of random drum loops combined with the song just plain feel good.
Intros?
If a song has an intro with a hard-to determine tempo, i recommend setting the 1.1.1 point to the first obvious “one” hit, rather than at the very start. Then after warping the song like usual, you can move the clip start position to the left, to include the intro if desired, setting it to line up in a sensible fashion… for example so that the intro lasts exactly 2 measures before the “one” drops.
Outros?
A cool way to segue between two songs in a DJ set is to let the outro of the first song loop while you slowly crossfade and tempo-shift to the new track (perhaps with some spicy FX for flair). If you use the loop marker strategically, once the song gets to that point, it’ll keep looping indefinitely until you stop the clip. Setting up your clips with some of these loops points pre-loaded is handy when preparing for DJ sets.
