Macro Placement Consistency.
~`~ Consistency in parameters assigned to racks is useful, for always being able to grab a certain knob for a certain result. For example, on the 8-knob racks of Live 10 and earlier, for dynamics devices like compressors or gates, i tend to place Attack and Release on Macros 5 and 6.
16 Knobs! Yay! …but also, Uh Oh!
~`~ Live 11 now has the ability to allow up to sixteen macros on a rack, which expands our abilities — but also makes things easier to become sporadic and messy by just mapping whatever, wherever. More knobs means more searching text with eyeballs. So therefore it seems helpful if certain controls are always (or almost always) in the same places.
~`~ Until now, my Elemental Mixing Templates have been left unmapped to macros since they contain too many controls. However, now it seems feasible to do so. Thus i’ve planned out a “16-Knob Template Template” for updating them according to (as well as VST Template Racks), which i will outline below. The sequence of knobs are meant to sorta align with the intended signal flow, from beginning to end. The point of the templates is “quick ‘n’ easy, quality results” but it’s always possible to unmap individual parameters i need to fine-tune individually in a project (for example perhaps to decouple a particular EQ frequency band from a “tone” knob).
~`~ Scroll to the bottom to download the blank template for yourself, if desired.
Read on for a breakdown of the rationale behind each macro knob’s existence and positioning.
The Template Template (It’s Gettin’ Meta Up in Here).

Macro 1: High Cut
~`~ Why place high cut as the very first effect? Because it reduces the chances of aliasing being generated by subsequent effects in the chain, leading to a generally less “harsh, digital” sound when using saturation-generating plugins. I’ve found this positioning leads to the cleanest results in terms of getting the highest default sonic fidelity. Conversely, the low cut filter is normally placed at the end of the signal chain; however, when both are supplied by a single device, they are often placed together (either at the start or end) for the sake of convenience.
Macro 2: Drive
~`~ This controls preamp gain, distortion, harmonic saturation, etc. If an Elemental Mixing channel strip has multiple distortion- or saturation-generating devices, i’ll usually map them all to this knob. Thus, a little usually goes a long way. Using a touch can often help lead to a much more organic, cohesive, punchy sound.
Macro 3: Gate / NR
~`~ For gating, noise reduction, and de-essing type effects. Basically “things to clean up the sound”. The name (like other macros) is customized for each template to fit what it’s actually doing. So for example if on a particular rack it’s controlling the Gate and the DeEsser, it’ll be named “Gate / DS”.
Macro 4: Tone
~`~ Not how much tone (like Macros 5 through 7), but rather which tone. This usually controls multiple parameters of multiple effects, allowing you to sweep around the frequency focus of tonal boosts (or cuts, inverted). It’s useful for quickly colorizing things by ear. Specific effect bands can be unmapped to tune them individually, but i’ve found myself going with the “quick ‘n’ easy” knob-twist results surprisingly often.
Macro 5: Dark
~`~ The first of three frequency-based tone boost/cut controls, it affects the overall amount of bass range frequencies. For this and the next two macros, generally the central value of 63.5 is neutral, but occasionally 0 or another value is the default instead, depending on how the linked effects work. It will also often control things like a compressor’s sidechain filter detector — preserving more bass in the higher values or allowing itself to compress the bass more freely at lower values. Thus, many of these tone knobs end up being partially dynamic, and extremely powerful.
Macro 6: Mid
~`~ Affects the overall amount of midrange frequencies. The Tone knob often controls the focus frequency. Sometimes, instead of being a boost/cut at a single midrange frequency, this knob acts as a balance control between lo-mids and hi-mids.
Macro 7: Bright
~`~ Affects the overall amount of high frequencies, with the sentiments about Macro 5 and 6 also applicable.
Macro 8: Press
~`~ Compression, baby! Pushed threshold down while increasing ratio and wet amount. Push it to just the right amount of compression to tame wild signals, or to add a bit of groove (depending on how you set the next two macros). Some special enhancement effects might get mapped here too, particularly if they are dynamically reactive to the source level.
Macro 9: Soft vs Hard
~`~ Turning it down causes dynamic effects to result in a more soft feel, with leading-edge transients absorbed and nullified. Turning it up, on the other hand, allows more initial transients through, leading to a “harder-edged” timbre. This is achieved by mapping to it: compression attack values, compression knee values (inverted), gate attack values (inverted), and transient shaping. The default value for this and Macro 10 is usually 63.5.
Macro 10: Tight vs Full
~`~ Turning it down causes dynamic effects to result in a more short, staccato-style response (with compressors by decreasing the release time; gates by increasing it). Turning it up — on the other hand — allows sustain to bloom longer, leading to a denser sound. Usually the feedback parameter of delay-type effects gets mapped here as well.
~`~ While Harder gives transients more impact, Longer fleshes out the sustain-based portion of the signal. For the most impactful result, try going harder and longer. (That’s what they said.) Due to the way attack and release values for compressors and gates are mapped, the Hard and Long controls between them can define the overall dynamic response with great versatility.
Macro 11: Weird
~`~ This one will bring in your modulation effects, such as flangers, phasers, chorus, or whatever. It also will ramp up possible modulation (or other weirdness) in other effects, i.e. a filter LFO on a reverb.
Macro 12: Wet
~`~ Dry/Wet controls of the reverb and delay feeds (or other ambience/space-based effects). It also will often modulate whatever effect Weird is bringing in (in whatever way makes it sound subjectively more “watery”). So the Weird and Wet controls often cross-pollinate each others’ results in synergistic ways (whatever that means). Set to 100% for use as the feature of a Return channel.
Macro 13: Big
~`~ Big is usually mapped to reverb’s spaciousness parameters, and also to the repetition time of delay effects. Simply, turn it up to make things feel more like you are in a big cavernous space with long echoes and diffuse lushness, or turn it down to make things feel more intimate like recorded in a small room, with shorter slapback-style reflections.
Macro 14: Wide
~`~ Controls overall stereo width. Generally, lowering it narrows the image and increasing it widens it, method dependent on what plugins are placed in the rack of course. Also affects width controls of effects in the chain, or alters things like L-R delay offset.
Macro 15: Fader
~`~ It’s really helpful having an output level control, so that’s what this knob generally functions as. Sometimes it may affect the amount of output limiting or saturation too, according to the signal chain.
Macro 16: Low Cut
~`~ Why have Low Cut at the end of a chain? Similarly to with using High Cut at the beginning of chains, i have found that it’s most often most beneficial (for the “highest-fidelity” results) to have a low cut filter placed at the very end of a chain (even after the limiter), rather than some other position in the signal chain. The reason for this is that sometimes compressors, limiters, saturation, distortion, or modulation effects, can sometimes add a bit of DC offset to the signal. This unnecessary ultra-low-frequency content can be helpful to nip out, to optimize available headroom and for a maximally clean signal. Just keep in mind that using a filter after a final limiter may change the peak reading, so be sure to check your levels after it’s in place, and adjust the ceiling and/or output level as needed.
~`~
~`~ I’ve mapped out a couple dozen template racks using this system and it has been working well so far.
~`~
Free Download: 16 Macros Template
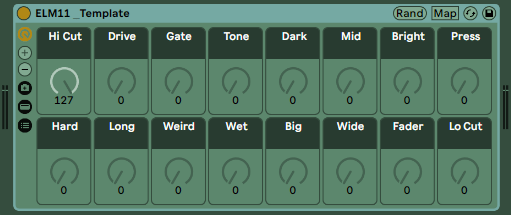
This is just a blank rack for Live 11, so it’s not that exciting, but if you personally resonate with the described macro system, feel free to grab 16 Macros Template and save yourself the trouble of typing out the names yourself. Hopefully it will inspire you — and you can of course edit it to fit your personal needs.
