Effect Racks for Live Intro.
Since my son has now acquired Ableton Live 11 Intro, I thought it would be interesting to make a pack of effects that utilize only effects native to that iteration of the software. These include Audio Effect Rack, Auto Filter, Auto Pan, Beat Repeat, Channel EQ, Chorus-Ensemble, Compressor, Delay, EQ Three, Erosion, Gate, Grain Delay, LFO, Limiter, Looper, Phaser-Flanger, Redux, Reverb, Saturator, Tuner, and Utility. This is no paltry collection to smirk at! Quite a range of possibilities. But also — a nice change of pace, being arbitrarily limited in options according to what I am used to as a rack craftor. I saw it as an exciting challenge. At the end, I’m super proud of what I’ve come up with. Methinks I’ll definitely be using these racks in the full version of Live 11 Suite aplenty moving forwards.
~`~

-> Download the Introspection pack for Ableton Live Intro, Standard, or Suite <-
(or acquire via Gumroad if you prefer).
Read about the process of the device creation below.
The Research Phase: Planning the FX.
…Wherein I try to figure out a cohesive game-plan for a brand new set of racks.
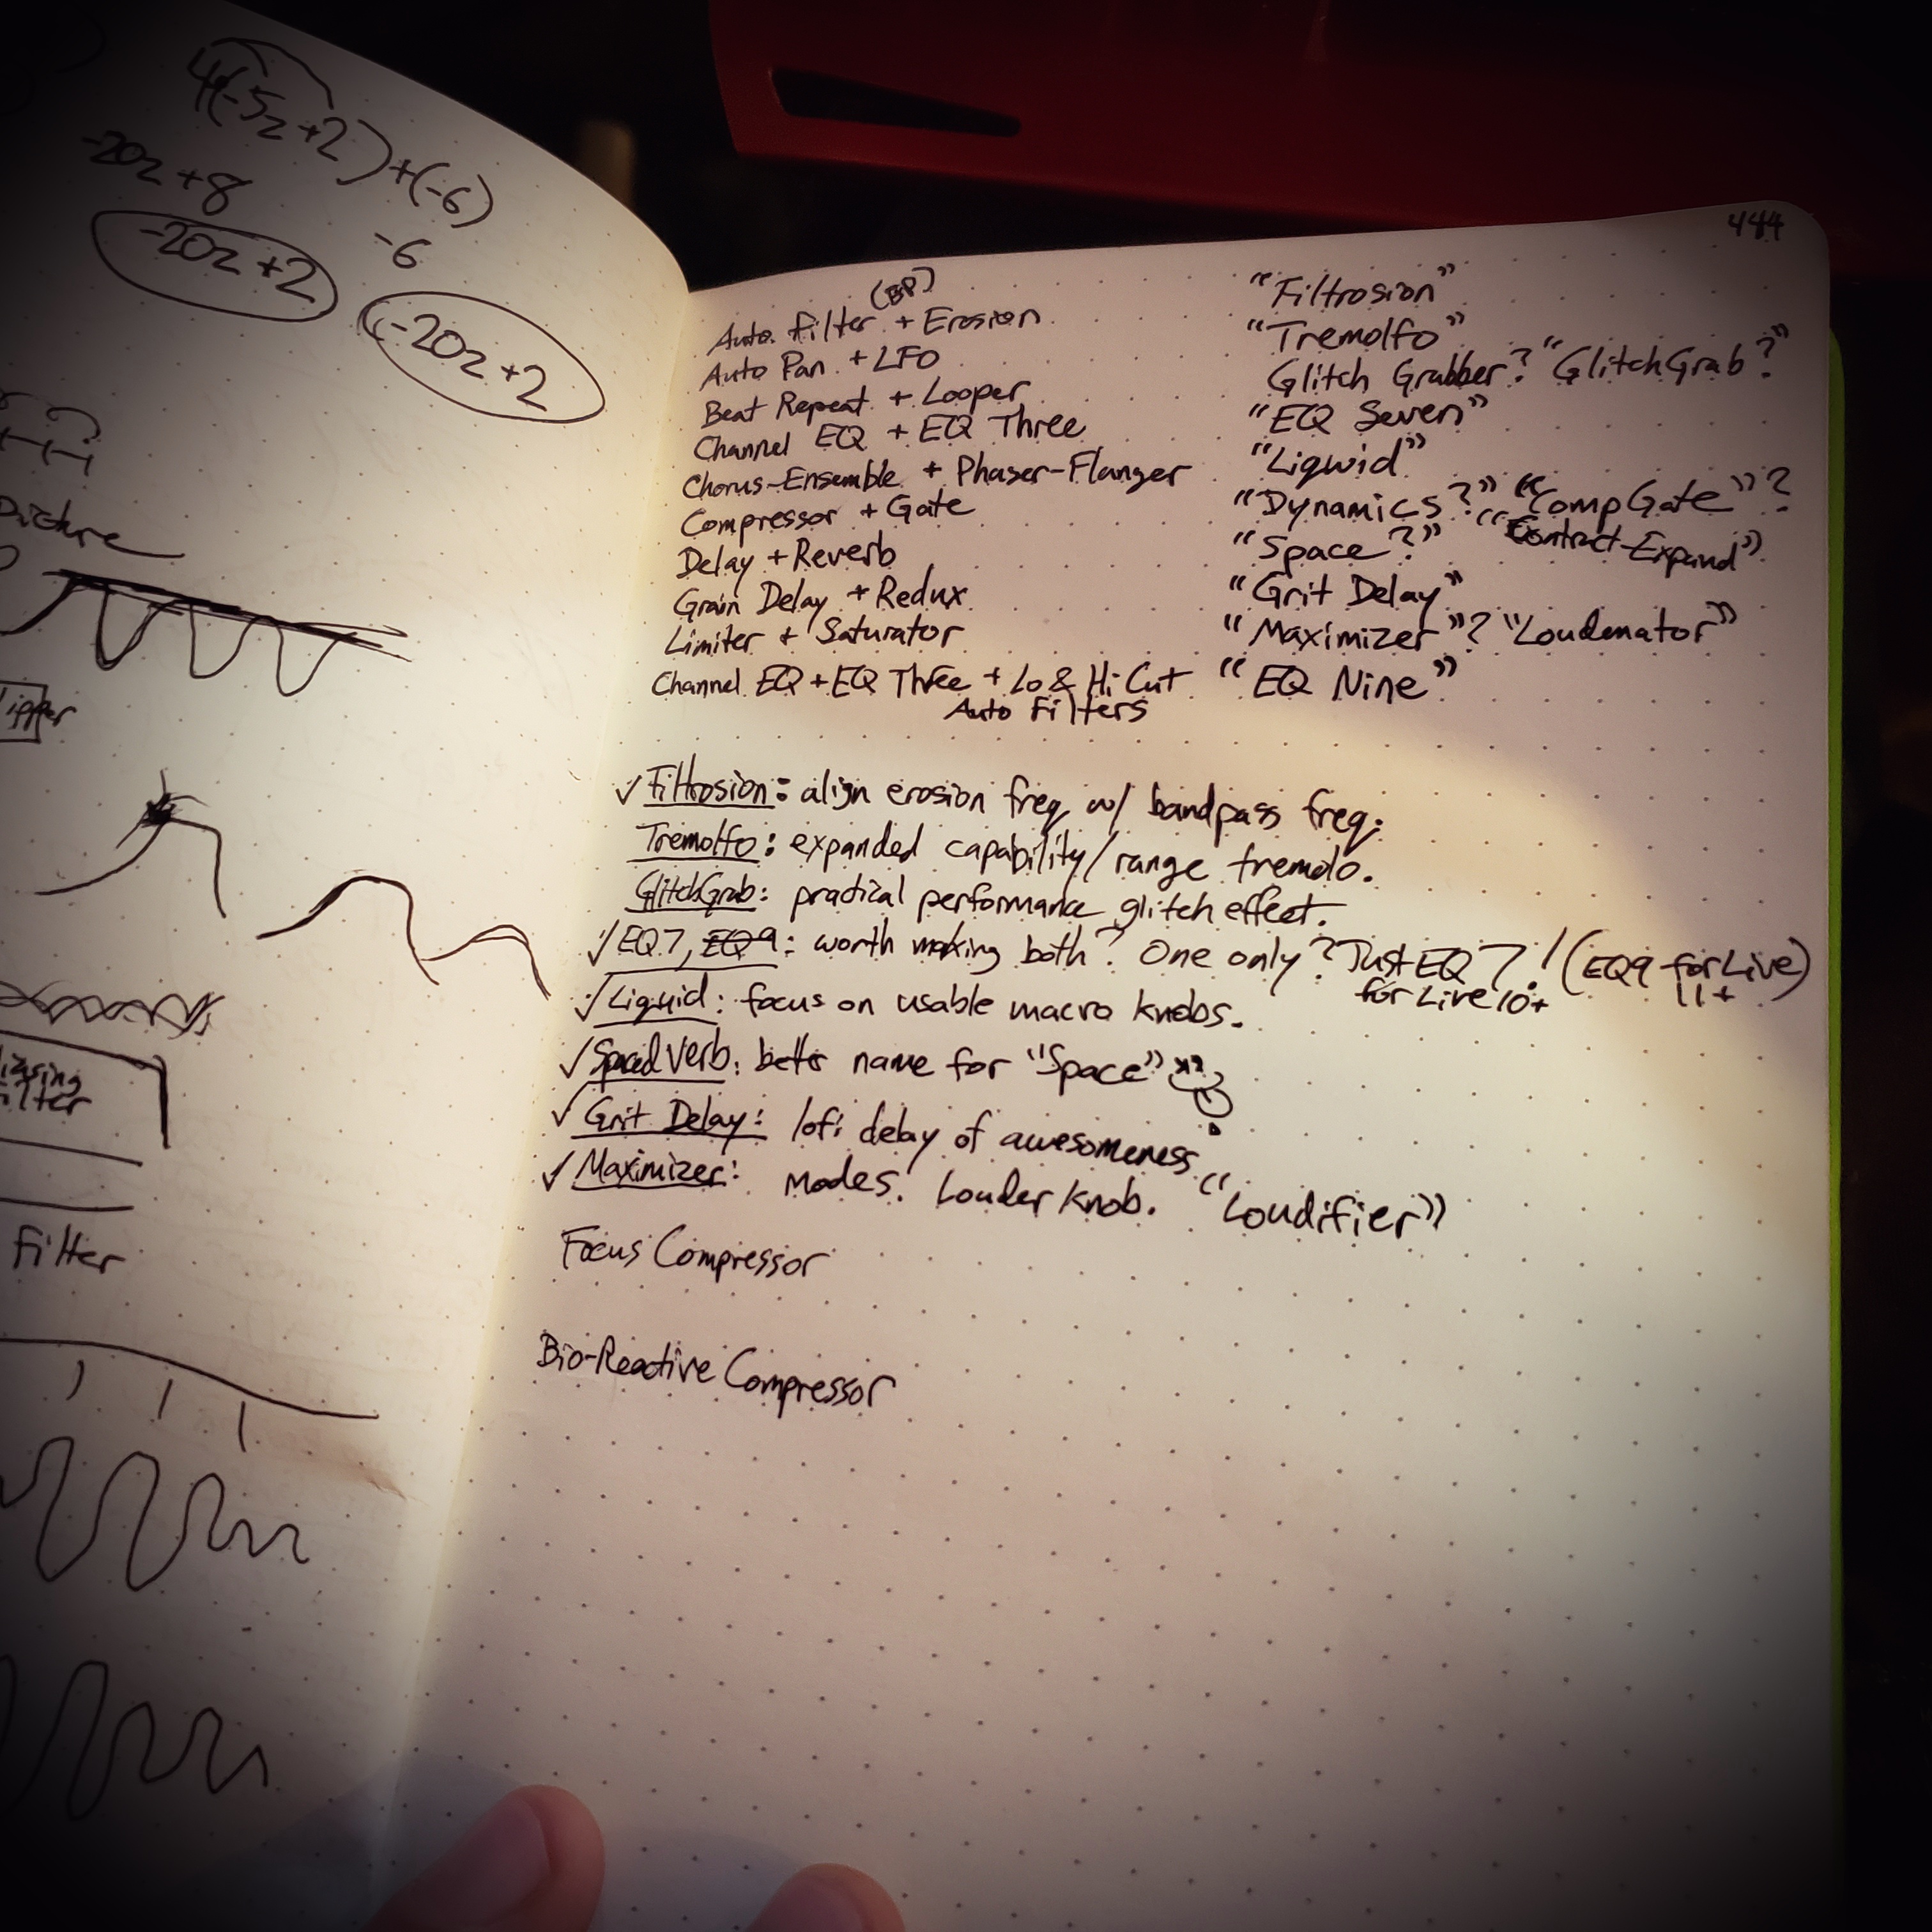
The first step was listing out the effects on paper and pairing them up, with the basic premise of using each effect one time in order to showcase their general capabilities. Here’s what was envisioned:
• Auto Filter (bandpass) + Erosion.
I thought that it might be cool to match up Erosion’s frequency focus with a bandpass filter, to supplement each other. Why not? Since so much can be done with Auto Filter, I didn’t want to get lost in a rabbit hole. This keeps the purpose very intentional.
• Auto Pan + LFO.
How nifty is it that Live Intro comes loaded with LFO? I didn’t know that before. I experimented a bit with the idea of using the LFO to add a new dimension of movement to Auto Pan, struggled for a while, but then honed in on a wicked way.
• Beat Repeat + Looper.
As the previous, It took a while to find “the way” to implement the concept, which in this case was to combine Beat Repeat with a Looper to make it more interesting. A devious glitch machine was fashioned. Making an exception to the “one device per rack” rule for the pack, a Grain Delay device was also added in order to use its pitch-shifting capabilities for extra fun.
• Channel EQ + EQ Three.
I figured — since Live Intro doesn’t come with EQ Eight — why not try to make a “more robust” EQ Rack? Fiddling around with the combo, I found it to have a sweet bonus capability which is a pultec-like result when boosting and cutting the same frequencies using the mid-frequency bands of both the classic EQ Three and the newer Channel EQ. More on that below!
• Chorus-Ensemble + Phaser-Flanger … (Chorus + Phaser + Flanger).
I started making the Introspection pack in Live 10, in order to have versions for both Live 10 and Live 11 available, as I try to do when feasible. However, Live 11 has evolved Chorus, Phaser, and Flanger, into new beasts: Chorus-Ensemble and Phaser-Flanger. I started making the rack for Live 10 first. The rack I came up with using the legacy Chorus, Phaser, and Flanger devices turned out so nifty that I decided to not also make a more differenter Live 11 version. This makes it extra cool I think for Live 11 users who may not be used to using the legacy versions of the classic “modulation trio” of effects, providing quick access to them.
•Compressor + Gate.
During development I sat on this combo last. Tried to make a Tightener rack. It was lame. Came up with a better idea! The Gate sits in the sidechain signal that a compressor listens to, and uses the built-in sidechain filtering (soloed) to create an ultra-frequency-sensitive compressor!
• Delay + Reverb.
The classic combo. How to make it unique / interesting? Ok. The classic query: does reverb sound better with delay before it, or delay after it? Sometimes either. I decided to use a delay plugin instance to pre-delay the reverb in a special manner. And then a post-reverb, longer feedback delay instance to augment / spaceify the reverb. Have both and eat it too. A reverb sandwich with delay for bread.
• Grain Delay + Redux.
Dunno what’s gonna happen here, but know it’s gonna be crazy. Basically what happened: a delay that can be really crunchy and smeared — not all that crazy in fact, but definitely purposeful, especially for textural sound design.
• Limiter + Saturator.
Placing a saturation device pre-limiter seemed like an obvious choice if the goal was “how to make Limiter more powerful and exciting?”
• Channel EQ + EQ Three + Auto Filters (lo & hi cut).
EQ Seven ended up more like a unique weird tone box; not really a full-fledged EQ. I felt there may be something more helpful to offer Live Intro users for general surgical EQing tasks. The idea here is if someone would want to robustly EQ material using native devices, they are probably going to go for all of these effects, and want dedicated controls, for maximum flexibility… so that’s what it provides. It’s the only one that has sixteen instead of eight macros.
The Development Phase: Building the Racks.
…Wherein I start putting together the pieces, choosing mappings and adjusting value ranges, all the while testing the audio results and functionality (both by ear and with before/after analysis) over various assorted loops. After many revisions and fine-tunings, ultimate versions of the devices are settled upon, and macro help info text is composed for each device header and macro control. Read below for info on each.
~`~
• Auto Filter (bandpass) + Erosion = Filtrosion.
Tone highlight / sweep FX device using an eroded parallel bandpass filter.

This simple idea turned out pretty rad. Use Poke to add in the Filtrosion spike as a parallel effect. Fine-tune the exact Hz value that is affected with Freq, from 300 to 18k (unfold the rack to see the value — or better yet, adjust it solely by ear). The audible effect of Width depends on the Mode. Spice things up with LFO and/or Envelope Modulation, and alter its behavior with Mod Wiggle.
Use this effect subtly, set to enhance specific frequencies of different instrument parts like you might an EQ boost, helping them to stand out in a cluttered mix… OR go extreme, with wild automation for crazy fun sound design. You could use Filtrosion to temporarily transform any sound into an “uplifter” or “downlifter”, for example, by automating frequency sweeps fading in and out. It’s a delicate beauty, or a raging beast, or both — whatever you need it to be.
~`~
• Auto Pan + LFO = Revolvotator.
This dual-action stereo tremolo revolves as it rotates, adding a new dimension to the traditional Auto Pan with controllable oscillation of the LR offset. Think of a normal rotary panner like two moons orbiting around you, opposite each other. Think of this, on the other hand, like those two moons orbiting around a third moon, which is orbiting around you! Or something.

Amount is like a dry/wet control. Turn it up to hear the effect in action. Offset Amount determines how much the phase alignment between the L and R channels is modulated, for the dual rotation effect. Dialing in various values for each of the two Speed controls leads to endless rhythmic combinations for creamy stereo width modulation. Offset Swing skews the timing of the supplemental LFO for a more swung or syncopated feel. Smooth vs Skittery will make the panning more unpredictable and also more abrupt as you turn it up, which can leads to pops and clicks on some material and thus is usually reserved for more experimental purposes. The device opens by default with extreme offset rotation settings so that it is easy to hear for dialing in, after which one can reduce the Amount knobs to taste. Doing so automatically adjusts output gain slightly, but if you need a touch more, use Volume Recover.
Note: While you can — technically — set the timing values to be beat-synced, this is not usually as much fun… since imperfect timing alignments between the rotations are often the very thing that provide that special element of dreaminess we so desire.
~`~
• Beat Repeat + Looper = Glitch Grabber.
Grab stuff! Glitch it! Wacky expanded edition of Beat Repeat, adding in bonus capabilities for bizarre glitch shenanigans.
1. Use the Looper‘s big button to capture a loop of playing audio during a live jam.
2. Adjust Grid to glitch the audio in realtime as it plays. Leave at certain values and/or move it around as you go. Snap to zero to turn glitching off.
3. Adjust the other macros to mess with the way the repeats are played back. Ideal with a MIDI controller, so that you can alter multiple controls simultaneously.
Think of the Glitch Grabber as Beat Repeat in “Super Saiyan” mode. In the past, I’ve generally only used Looper during live performance (usually with guitar). However, this rack opens it up for experimental usage in the studio for sound design as well. During production, resample glitched-out snippets into separate tracks to generate raw audio material for arrangement composition. Or use it during performance, but be careful about coming back on-beat after going down a crazy wormhole! You can still use most of the controls even without using the Looper button, but by grabbing a loop you gain access to two additional fun and dangerous functions: Speed and the Reverse toggle. The Repeat? control is a switch; turn it on temporarily to “grab” a specific beat to emphasize by repetition, while adjusting other controls still causing interesting effects.
~`~
• Channel EQ + EQ Three = EQ Seven.
Simple rack set up for easy “Push-Pull” EQ workflow.

In order to fit everything onto eight macros, and for convenient workflow, the frequency adjustments have been distilled to one control, which has been carefully calibrated so that EQ Three and Channel EQ’s mid bands are perfectly aligned with one another. EQ Three’s mid band (labeled Mid B) is more rounded, with both a more broad peak area, and yet steeper Q edges. Channel EQ’s mid band, on the other hand (labeled Mid A), is more “triangular” — poking more precisely to a specific frequency, but also, at the frequency edges, tailing off more gradually. This means that you can’t really say that either of them are more narrow or wide than the other… at the focus point, EQ Three is wider — but at the outer edges, Channel EQ is wider. If you boost and cut the same frequency with them, they do not cancel out, but create an interesting contour. For example, by boosting Channel EQ’s mid band and cutting the same frequency with EQ Three’s, you get a little poke at the chosen frequency with a bit of a ripple effect, dipping the immediately adjacent frequencies (due to the EQ Three mid band’s more rounded shape). This so-called “push-pull” EQ technique can be a great way to highlight certain tones whilst curtailing the total amount of added energy and headroom reduction. For this reason, EQ Seven‘s dual mid bands are set to the same frequency, but you can adjust their gains independently. MidA moves about 150% more energy than MidB does, so if matching them, adjust dB values by that percentage. The other macro controls show the frequencies they affect, namely 80Hz Low Cut (toggle), 160Hz LoShelf, and 3k HiCut / ShelfBoost. The Variable Lo and Hi Shelves will adjust the frequencies below and above the chosen mid band frequency, respectively. By adjusting the various shelving options carefully, one can also achieve “pultec-like” effects.
Since it’s not obvious at a glance what’s going on with these interactions and they are delicate to balance, I’ve figured out some tasty “push-pull” setups using careful frequency analysis and provide the following nifty cheat sheet for engaging certain desired behaviors (also saved in the racks as Macro Variations). The Focus Bump and Adjacent Bump variations are meant to be used with variable frequency of your choosing; the other variations, however, are less adjustable, being only balanced at the shown freq macro values (namely: 33 and 78). To get two instruments in a mix to stand out from each other, place Focus Bump on one instrument, set to a chosen freq value, and place Adjacent Bump on the contrasting instrument, set to the same or a slightly lower frequency value. Thud Reducer could be useful on non-bass, non-drum instruments and Mud Reducer for lessening the dreaded boxy tone from pretty much any home-recorded audio. Upper Mid Bite happens to enhance a frequency that is perfect for making distorted guitar or synth tones sound more gnarly, and Bright Antiharsh might serve as a nice contrasting counterpoint to that.
| Setup | Channel EQ Band & dB Value | EQ Three Band & dB Value | Audible Result |
| Lo AntiThud | 160Hz LoShelf +12dB | Variable LoShelf -11dB (freq 33) | bottom end bump w/ 120 dip |
| Lo AntiMud | 160Hz LoShelf -5dB | Variable LoShelf +6dB (freq 33) | bottom end bump w/ 300 dip |
| Focus Bump | MidB +6dB (any frequency) | MidA -4.5dB (any frequency) | focus boost 180 to 13k; adjacent dips |
| Adjacent Bump | MidB -5.25dB (any frequency) | MidA +4.5dB (any frequency) | focus dip 95 to 12k; adjacent bumps |
| Upper Mid Bite | 3k HiCut / Shelf + 7.5dB | Variable HiShelf -8.25dB (freq 78) | top end dip; 2.5k hi-mid bump |
| Bright Antiharsh | 3k HiCut / Shelf -5.5dB | Variable HiShelf +6dB (freq 78) | 1k mid dip; 4.5k bump; >14.5k hicut |
~`~
• Chorus + Flanger + Phaser = Triple Liquid.
Classic modulation effect trio, sympathetically integrated.

This rack is a reliable go-to for when you want to add modulation to something, but are not sure what or how. The first three macro controls — Phaser, Flanger, and Chorus — each implement their respective effect, with evocative default parameters that immediately elicit the characteristic flavor of the device type chosen. You can alter the overall vibe with the Tone, Reso, and Wave controls. Add a degree of source-reactivity to the Phaser and Flanger with the Tone Envelope Mod control. Mix and match how much of each of the three effects to blend in with each other.
A couple of things about Chorus: The C Width macro affects its stereo width. Certain settings can make a chorus device sound more like a flanger and this objective has been intentionally sought out and cross-mapped; by turning up the Flanger control, the Chorus module morphs more towards the audio process of flanging. Thus, combining the Flanger and Chorus knobs together results in the formation of a “Super Flanger” (well deserving of two exclamation marks)!!
~`~
• Compressor + Gate = Focus Compressor.
Highly selective compression engine.
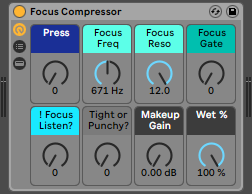
It’s a compressor which allows you to squish down based on very specific frequency content of the material it’s listening to. You can already set a compressor to be frequency-selective using its built-in sidechain EQ, so… what’s the point of this? It’s even more frequency-reactive than ever before. Plus the sidechain focus can be gated, for choosy intentional character response. Want a compressor to ONLY compress when a certain timbre strikes? It’s now more doable than ever. It’s not quite the same as a dynamic EQ or multiband compressor, because it ducks the whole signal whenever it’s triggered. It’s unique, and potentially very helpful. Setup is a breeze, with instant auditioning of the focus frequency and gating isolation behavior. Switch Focus Listen on to isolate and listen to the trigger signal. Adjust the Focus Freq, Reso, and Gate macros to isolate exactly what you want the compressor to be reacting to. Bold Reso values are recommended for a more blatant effect. After honing in on the desired offending frequency, turn Focus Listen back off and adjust Press to increase the amount of potential compression. Select between a Tight or Punchy mode — Tight will curtail peaks more abruptly, for a more controlled sound (optimal for the purpose of controlling wayward level); Punchy will allow transients to breathe and restore release in a less linear manner, for a generally louder, more aggressive sound (possibly more well-suited for enhancing groove & vibe). You will probably want to adjust Press after switching between modes, because they hit differently.
~`~
• Delay + Reverb = Spaced Verb.
Reverb Sandwich.

-> Pre Reflect provides custom enhancement to the reverb’s initial onset, coordinating a tempo-aware pre-reflection along with the reverb’s built-in pre-delay and early reflections parameters. Bigger values sound like there’s more distance between the listener and the nearest reflective surface. Try to set it so that the reverb fluctuates in groove with the beat. Verb is the main parameter to determine how much reverberation diffusion sound is evident. Post Delay -> provides further echoes tailing off, resulting in the feeling of more connected areas branching off from the listening room. Spread increases a sensation of stereo width and Mass alters the apparent size of the sound-generating object and inclusion area, leading to lusher, longer decays (but without messing with the groove timing). Tone provides effortless sculpting and Swirl adds some subtle modulation, helpful for emulating environments that include non-uniformly-shaped and/or non-static surfaces and objects. After dialing in all your values to taste, you may wish to use the Wet Mix knob to blend in some dry signal with the now-diffused effect signal chain.
~`~
• Grain Delay + Redux = Grit Delay.
Lo-fi, pitch-shifted, ducked Delay.
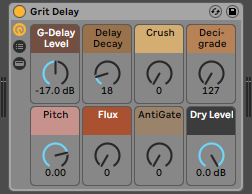
G-Delay Level will bring in the grit delay layer. Delay Decay increases both the decay time and the feedback amount; macro settings of 18 or higher generate tempo-synced echoes, while below that (the “flam” zone) it switches to using raw milliseconds. Crush destroys bits, and at maximum switches to the hard decimation mode. Downgrade simultaneously reduces sample rate and grain size. Pitch transposes the delay repetitions, while Flux adds randomness to the pitch and grains for a more scattered sound. After all of this, there was still something missing… and so an Antigate was incorporated which adds ducking capabilities using an inverted gate. Setting the value carefully according to the material passing through it lets you add breathing space by tastefully dropping out the delay signal during louder moments. This can be especially useful when Crush is bumped heavily which can greatly reduce overall contrast. The more you turn up AntiGate, the more it listens to the pre-redux signal (using built-in parallel sidechaining), helping to retain a musically rhythmic behavior despite any transient obliteration caused by the Redux effects.
~`~
• Limiter + Saturator = Loudifier.
Make stuff louder.
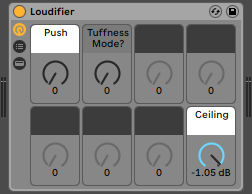
It’s so dumb, it’s brilliant. Slowly turn up Push until things start to sound definitely a little fuzzy. Reduce the Push dial a little (maybe by 5 or 10). Now, turn up Tuffness Mode until at some point suddenly it becomes very obviously too fuzzy. Lower the value by about 20 from there (to back down one mode). Finally, reduce Push another slight touch, just to take the edge off. You should now be left with a tasty degree of loudness at this point, threatening the boundary of what is considered polite.
~`~
• Channel EQ + EQ Three + Auto Filters (lo & hi cut) = EQ Nine.
A robust equalizer encompassing Live Intro’s tonal shaping tools.

This is meant as more of a fully-featured tone-shaper than EQ Seven quite amounts to. Since Live Intro doesn’t have access to EQ Eight, providing the ability to tweak as many frequencies as possible — as easily as possible — in that version of the DAW seemed a worthwhile endeavor. Sixteen macro controls in total are provided, split across two sections. Section B is first, followed by Section A. While as surgical as is manageable, I’d still think of it more as an “analog EQ” than as a “clean parametric digital EQ”, since it’s not flat at default settings and is somewhat quirky.
Section B includes a clean digital HiCut Filter followed by an instance of EQ Three. Why a HiCut Filter as the very first process? As mentioned in the PerforModule Effects Order Recommendation blog post, removing ultrasonics prior to anything else reduces the likelihood of unpleasant digital aliasing being generated by harmonics-altering effects later in the chain (such as EQ Nine‘s output circuit drive, for example), and so is an advantageous workflow when seeking to generally maintain a pristine sound. Use the Lo-Mid & Hi-Mid Split macros to determine which frequency zones the Variable Lo & Hi Shelves and the Mid B bands will affect. Changing these values will certainly change the phase response and can also alter the frequency contour at certain settings… even without altering band gains! You have more control than EQ Seven here, which is also more unpredictable when randomly sweeping knobs around. The energy of Mid B wholly depends on the frequency settings — with a wide berth between low and high, Mid B acts like a plateau filter, creating a flat boost or cut area between the extremities. Steep Slope?, when turned above halfway, will switch both the HiCut and the EQ Three band splits into doubly strict designations, for more intense frequency separation (and also more phase shift).
Section A includes an instance of Channel EQ followed by an output LoCut Filter with analog Circuit Drive enabled. Like with EQ Seven, the nonadjustable bands helpfully name the affected frequencies directly on the macro. The Mid A band is adjustable from 120 to 7.5kHz and can be used to highlight or attenuate a specific target frequency in a tasteful manner. The LoCut Filter being last in the chain allows for cleaning up any DC offset generated by previous processes. There’s also included a Filter Drive macro for saturating the heck out of weak signals that need some extra vitality. Use Lo Circuit/Slope? to alter both how steep the low cut filtering is, as well as the specific analog filter model applied (at maximum also switching on the Channel EQ 80Hz LoCut Filter). Adjusting this can change the sound greatly and afterwards may require further tweaking of LoCut Freq and LoCut Reso.
You can easily swap the serial order of Section A and Section B by drag-and-drop, if for any reason you prefer the LoCut Filtering and Circuit Drive to take place before the HiCut Filter.
~`~
Grab Introspection for free via dropbox or gumroad now!
