Handy Ableton Tip – Macro Default Positions

You already know that you can hit the “delete” key on any parameter in a device to return it to its default position (or, in Live 10, double-click it).

But did you know that if you save a preset as a rack and then tweak a macro (after re-opening the version you saved), you can hit “delete” to return to whatever YOU set as the default position for it?

When you hit “Delete” on a macro of a plugin (Ableton Core or VST/AU), it returns to that plugin’s default position, which cannot be changed (set per plugin device).

So like if you drop Ableton’s “Chorus” effect on a track and mess with parameters and hit “Delete” on them, they will return to the Chorus Device’s default positions for those parameters. But sometimes you may not like having those pre-chosen values as the defaults to snap back to. The solution is to use Racks!

For saved rack presets in your library, the “Delete” key on one of the 8 macro knobs will return the value of a given macro knob to the position it was set at when it was saved (the “default position”).

[Note this does NOT work with the chain selector or chain volumes. Hitting “Delete” on the chain selector returns it to 0 and hitting “Delete” on any chain volumes returns them to 0db.]

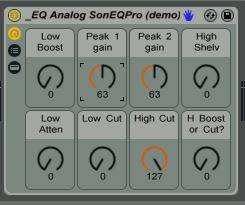
So let’s say i make a preset for a VST EQ Audio Effect and set the “Mids” to +0 Gain as default at the exact half range (63.5). Then if i tweak the mids macro up or down and want to return to 0, instead of typing “63.5” in the macro or try to line it up with the mouse, just hit “Delete”! Way easier.
~`~

1) Saved Preset
Default Macro Positions 1

2) Tweaked Macro

Default Macro Positions 2

.

.

.

3)”Delete” key snaps it back to default!

Default Macro Positions 3

.
.

.

.

(the display rounds to nearest whole #… in this case 63.5 reads as 63)

`~`

Limitization – 3 free Limiter Devices for Ableton Live 9

Francis Preve ( http://www.francispreve.com/ ) posted something which inspired me to make Glue Compressor- and Saturator- based limiter device presets using their clipper functions. I went ahead and made them as one-knob fx as there weren’t too many parameters to deal with. I also decided to make a device similar to the performodule “hybrid” compressors which can be used to compare between the 3 limiter possibilities (calibrated with matching settings) in one device rack, which is a real time-saver. That one also has control over fine-tuning parameters for fully robust usage.

How to use: place one of these devices as the final device on a master track for a final master. Turn up the “push” knob to the desired setting (maximum is +9db). Try to boost it while avoiding any unpleasant distortion. The final output will not exceed 0db.
I would describe the GluLimiter as rich, the SatuLimiter as meaty, and Ableton’s Limiter as straightforward.
For the Try Limiter: Set the push knob as above. Try the 3 limiter choices and decide which one fits the piece most appropriately. Try different settings for attack and release (including auto-release if desired), and you can set the final output from -.5 to -.2 db. One workflow method is to turn push all the way up so the effect is extreme, set attack and release where they feel the most natural and dynamic, and then turn push back down to the ideal value. Then choose the limiter type that has the favorite character at those settings.
(turning the “chooz” knob during playback can cause an unwanted temporary peak. If that happens hit “shift-spacebar” twice to reset your peak meters)

Get the single-knob GluLimiter:
CLICK HERE

Get the single-knob SatuLimiter:
CLICK HERE

Get the triple-auditioning Try Limiter:
CLICK HERE

Performodule Fx

~`~


PerforModule – uno Freqification Series – six free Ableton Live 9 single-knob effects

Did you know that Ableton’s “Frequency Shifter” effect can be used to simulate a few different types of effects such as phaser, flanger and tremolo?

Here are 6 different effect racks each set to something different that can be achieved with the frequency shifter device, each handily set to have just a single macro control. Continue reading

Magical Gate: an input-receptive Gate device for Ableton 9 + Max For Live

Magical Gate

— A gate with soul.

Magical Gate

“Magical Gate” is a gate effect with a magical touch — it moves according to the input signal. It doesn’t cut off sounds as linearly as a normal gate.

It’s organic. Kinda like it’s alive or something. It is more reactive and sensitive to the host material. It’s less cold and digital and robotic and linear than most gates.
…You could say it has a soul. Continue reading

PerforModule – uno Glitchification series: 9 free Ableton Live 9 single-knob glitch effects

 New PerforModule one-knobbies! GLi+tChH c-C-r>.’|)razZy_y !

These are relatively simple rhythmically-based one-knob effects, designed primarily for live performance, each based on a built-in ableton effect or two.
Individually, they are very simple and easy to understand. They are optimized to be grouped into your own more complex multi-effects to map to midi controllers, with each knob having one specific function. Continue reading

How to Organize User & Plugin Presets Like a Boss in Ableton Live Using the Hidden Architecture

Problem: Hot-swapping… have to navigate to all these different folders. Wah! So annoying. End up neglecting certain folders of presets due to their unfortunate locations. Presets get sad and lonely, and begin to wither.

Solution:
Ableton 9 has a built-in secret “Folder Architecture”. Fiddling around with how things appear in the browser i discovered that if you make a folder with the same name as one of the built-in categories (for instance: “Amp Simulation”) in your User Library Presets folders, any presets in that folder will appear in the respective folder of the same name in the “Categories” pane of the browser (instrument, drum, audio effect, or midi effect racks). Customizing this way provides more unified access to all factory and user-created content in the same location, which makes my life easier. If i want an amp coloration effect preset, for instance, i have one single folder i can open up where i see all user AND factory presets (and even vst and max for live presets) all in one nice list together, easy to hot-swap and preview amongst. How to do this? Simply save files in your user library, organized however you like, but in folders with specific names. That’s all! The text has to be verbatim. There are only certain folder names you can use, which i figured out with experimentation.  Continue reading

Vocoverb: Reverb using Live 9’s “Vocoder” Effect.

Vocoverb

— Cavernous Digital Sand.

Vocoverb Icon by Bird McElroy

Did you know you could make a reverb-type effect with ableton’s “vocoder” effect?

Vocoverb is a reverb effect that is made using 2 instances of ableton’s vocoder effect, providing a very unique reverb to add to your production palette.


Download the FREE Vocoverb Effect Rack for Ableton 9 -> CLICK HERE

Continue reading

Guitar Stringonator – free Effect Rack for Ableton 9

Guitar Stringonator

This effect rack will simulate the extra resonations of the unplayed guitar strings when strumming a guitar. It adds one extra tone per string, according to standard EADGBE tuning, with the option to layer in some higher octaves to simulate a 12-string guitar, and the ability to shift the root tone up or down to simulate a re-tuned guitar.

Download the Guitar Stringonator effect rack for Ableton 9 -> PLUCK HERE

386119_10151091275985043_1807936105_n Continue reading