Free LANDR “Tone Sculptors” Ableton Live pack + other nifty stuff

I recently helped tweak and finalize a set of free audio effect racks in collaboration with online mastering service LANDR.
These are three effect racks suited for quick and easy “tone sculpting” of parts which are centered on low, mid, or high frequency ranges.

Check out the story about it and find download links here: www.ableton.com/en/blog/free-landr-tone-sculptors/
tone sculptors ableton

If you’ve never used LANDR, i highly recommend it as a way to test your mixes. Finish a mix and send it off to LANDR… listen to the master they send back to you, hear problems more clearly, and then go back to your mix and fix. It’s also a great way to get a new track ready for live performance before it has been sent off for professional mastering or officially released.

Also, check out the new ARCHIPEL ELEMENTS live pack, with drum racks featuring juicy recorded samples ranging in the 4 elements – earth, water, air and fire. Great material for sound design and experimental composition.

archipel elements

Enjoy!

Sometimes the simplest things are the most useful… introducing the free “Utilification” Ableton Live Pack

Here’s a {free} ableton live pack of effects that are made for simple yet extremely useful purposes, including fading, stereo panning, m/s encoding and decoding,.

It is highly recommended to grab these and implement them into your Ableton Live library.

toolz

INCLUDES:

Audio FX

“-inf to +0 Fader” — just like it says, this is a simple fader from negative infinity to zero decibels. When you want a quick and easy volume knob that goes all the way to silence and maxes out with no boost (unlike the “utility” device), use this.

“LR to MS Controller” — this will switch a Left-Right Stereo file to transmit its left channel as the sides and its right channel as the center, or you can swap those results so the right is the sides and the left becomes the center.
You can then tilt the center and sides channels, mute them, and alter their levels.

“MS to LR Controller” — this will switch a Mid-Side Stereo file to transmit its sides channel as the left and its center channel as the right, or you can swap those results so the center is the left and the sides becomes the right.
You can then tilt the left and right channels, mute them, and alter their levels.

[an example of using these controllers would be to make an MS recording into LR to be able to apply a stereo effect to it, then to return it back to MS again]

“Instant Muter” — Mutes the audio, plain and simple, the moment the knob is moved above its minimum value. Use this to be able to easily interrupt the audio flow wherever you want within a chain.

“Stereo Panner” — Allows for “stereo panning”. Using clever routing, this allows non-exclusive panning of audio wherein the content from the opposite side is moved over rather than being faded out (while maintaining overall level). This allows for more natural-sounding panning of stereo sources without losing material.
[For example, let’s say you have a stereo track with a guitar panned hard to the left side and a piano panned hard to the right. Normally if you use a pan knob to move right, the guitar sound would be lost. With this, panning right will gradually move the guitar over to the right along with the piano, rather than removing it.]

“Phase Adjust” — Select among 4 phase-flip options with one knob, and implement micro-delay to align waveforms more carefully, either between the source and the mix or between the left and right halves of the source.

“Utilify” — “Swiss army knife” which includes most of the above devices in one rack.  Use this as a more robust replacement for Ableton’s built-in Utility effect.

—>>> Download “Utilification” for Ableton Live 9+ <<<—

Free Ableton Live Pack: Midi Dynamics

Midi Dynamics BrowserPresenting Midi Dynamics, the latest PerforModule free pack.

It includes 4 simple yet useful devices specifically for controlling midi dynamics, and one silly device with various fun-ctions. Click image to grab!

Midi Dynamics

Included Devices:

Midi Compressor
Smooth out too-loud midi instrumentation.
Use this like you would an audio compressor, to attenuate midi notes which exceed a certain velocity. All notes exceeding the threshold will be attenuated. The further past the threshold it is and the higher the amount is set, the more a note will be attenuated. Notes below the threshold velocity will not be affected at all.
Example usage: Playing a synth instrument melody in which notes above a certain velocity become too harsh-sounding due to a filter resonance tied to the velocity. Use the midi compressor to soften only those too-harsh notes. 

Midi Expander
Smooth out too-quiet midi instrumention.
Use this like you would an audio expander, to boost midi notes which are below a certain velocity. All notes under the threshold will be boosted. The further below the threshold it is and the higher the amount is set, the more a note will be boosted. Notes above the threshold velocity will not be affected at all.
Example Usage: Trying out a melody with a different synth instrument, and the quietest notes are now much quieter than they were previously due to the new instrument’s velocity mappings. Changing the mappings or note velocities would take too much time so you just use the midi expander to lift up the quietest notes.  

[Midi Compressor and Expander Special Notes: You can use Live’s “Velocity” device by itself to attenuate or boost overall note velocity; however these devices are useful for more precise and careful dynamics control, by using the threshold to set a cutoff point. Notes nearby other notes do not affect each other’s response the way an audio compressor’s transients do, so imagine them as if they have perfectly fast & noiseless attack and release.]

VelociRaptor
Set the velocity to a specific value.
Use this when you want rigid control of the velocity of an instrument, to be able to use a knob or automation to set the level at any moment to an exact setting. This overrides input velocity and all velocity effects prior to it in the chain.

Velocity RNG
Add in a bit of random fluctuation to an instrument’s velocity.
At small amounts, this will add in a bit of “humanization” and make the playback of instruments less robotic sounding. At higher settings it will vary more sporadically, until at maximum, a note of any input velocity may result in an output of any possible velocity. Tip: record a midi track with little or no dynamic variation into another midi track, routed through this device at a low setting. The new midi track will now have random difference applied to each note.

Rad-omizer
This is a rack with various tools to quickly alter a midi instrument’s input. Macros include:
Mutant DNA: adds in a random chance that played notes will instead “improvise” and play a different note. The higher the control is set, the more chance of a mutant note, and the further away from its original value it might stray.
Force Scale? Key Major … Minor?: optionally implement a scale selector to force all notes to conform to a chosen major or minor key. Niftily see the choices in the macro control’s numerical box.
High Octave+ … Low Octave+: Blend in added octave notes (Make sure the instrument you are using has enough voices enabled to cover the added notes).
Random Velocity: adds in velocity flux just like the “Velocity RNG” device.
Dynamics: the default position for this is in the middle (63.5). Turn this up to drive overall note velocity; turn it down to soften overall note velocity.

CLICK HERE to grab the stuff!

“8-Bit Reverb” free effect rack

Sometimes you want a pristine reverb with the most delicate and precious tail imaginable.
Other times, you want a layer of digital dirt to add a touch of gritty color.

For those other times…
here’s another new free audio effect rack for Ableton Live 9.
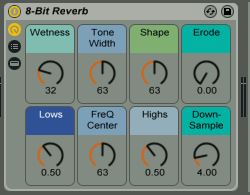
It’s called “8-Bit Reverb” and is a lo-fi reverb effect that can be used on individual tracks or in a return channel.
It stays at an output bitrate of 8, for an old-school computer noise sound.
It has robust controls for sculpting the timbre easily to apply to many versatile usages.

GRAB “8-Bit Reverb” for Ableton Live 9 for FREE by clicking here
8-Bit Reverb Image

Macro Controls

Wetness:
The amount of reverb.
At 0, effect is bypassed.
To use this as a send effect in a return channel (in order to add amounts of the same reverb to different channels), set it to 100% (127).

Tone Width:
Affects the reverb and erosion bandwidth.
Increase this for a more dense, colored sound.

Shape:
Alters many parameters simultaneously.
Set this carefully for the desired reverberation contour.

Erode:
Adds in erosion coloration to the reverb layer. At 0, no erosion is added.

Lows:
Sculpts the lower range of the reverb. Boost this for more boominess.

Freq Center:
Sets the midpoint of the reverb and erosion tones.
In conjunction with Tone Width this has a great effect on the overall sound.

Highs:
Sculpts the upper range of the reverb. Boost this for more shimmer.

Down-Sample:
Divides the sample rate by the number shown.
(Note that the bit rate is always set to 8; dividing the sample rate further degrades the sound.)

“Planetary Convolution” – a new set of impulse-based reverbs for use with any DAW.

Now unveiling “Planetary Convolution” – a pack of Reverb Impulse Responses, each based on a planet (including dwarf planets!) in our Solar System.
planetaryConvolution

They were created using different custom settings of Ableton’s built-in Reverb Algorithm, re-sculpted into Impulse Responses, and then further enhanced.

Each is presented as a “Convolution Reverb Pro” preset for Ableton Live 9 (+MaxForLive) with individual IRs, tone control parameters and a special 1-knob extra effect each.

Using Ableton Live, the presets will open with their corresponding impulse files automatically.
Non-Ableton users can use the IRs too… just open them with your favorite Convolution plugin (though you won’t have access to to the custom EQ shaping parameters and bonus FX, sorry).


“Planetary Convolution” is available at Isotonik Studios.  <<<<—- Click Here.

(If you’d like to snag some original Convolution Reverbs by PerforModule for FREE… check these outGT-8 Convolution & Fostex MR8 MKII Convolution.)

Now for an overview of the Impulse Responses that come with “Planetary Convolution”.

Mercury Reverb_
Has a sizzling, bright tone, like you’re getting fried by the sun.
Xtra FX: “Liquid” – adds a creamy movement; molten.

Venus Reverb_
Sandy-sounding with a smooth high end.
Xtra FX: “Scorch” – adds a subtle fuzz which is affected by the tone control. Also has an enhanced “Thick Chorus” control.

Earth Reverb_
Our good ol’ home planet, you know? This has a medium room sound, good for hip hop drums. The overall tone is (you guessed it) earthy.
Xtra FX: “Gravel” – this adds a nice gritty, chalky color to the reverb.

Mars Reverb_
This reverb has a punchy, forthright quality. It is well-suited for march-style drum patterns, brass, or other high-energy instruments.
Xtra FX: “Anger” – dials in some burning bite to the sound.

Jupiter Reverb_
This reverb has a ridiculously long and smooth tail (25.6 seconds to be precise). Use this for extreme spaciousness and super fade-outs.
Xtra FX: “Storm Swirl” – adds movement to the sound as you get carried along the current.

Saturn Reverb_
Very large and with a resonant, ringy quality.
Xtra FX: “Rings Twirl” – take a trip along the concentric circles.

Uranus Reverb_
Has a billowy texture, as if enveloped in thick fog.
Xtra FX: “Vapor” – adds a smoky layer of reverbish decay.

Neptune Reverb_
Has an icy, chilly spaciousness.
Xtra FX: “Frost” – dial in some crystalline crunch.

Pluto Reverb_
Very small, very cold. Just listening to it will drop your body temperature by a few degrees.
Xtra FX: “Interior” – fade into the interior cavity of the sphere. It must be hollow?

Eris Reverb_
A lesser-known dwarf planet, Eris is known as the Goddess of Chaos, having a bizarre orbit.
It has a short, foreboding sound, like the feeling of someone watching over your shoulder.
Xtra FX: “Dirt” – adds a muted, broken darkness.

~`~

By Style_
Booth Type (very small)
-Pluto
-Eris

Room Type (small)
-Mercury
-Venus
-Earth
-Mars

Hall Type (large)
-Uranus
-Neptune
-Saturn

Epic Type (vast)
-Jupiter

`~`

Mars Reverb Image

Ableton Racks Macro Controls_
Dry/Wet: Convolution Reverbs tend to be quite lush, and often are audible at even 1% wet. These start at 23% as a default starting position — make sure to adjust this carefully to not over-apply reverb.
Tone: Starts in the middle by default. Each planetary reverb has its own unique band-interactive filtration which will occur upon moving the “Tone” control up or down. If you have the EQ pane open you will see the visualizer of the audio input spectrum and the EQ curves. After adjusting with the “Tone” dial, you can grab any of the 3 individual EQ nodes and adjust them by hand to fine-tune (they are not locked to the macro). However, once you move the tone knob again, that planet’s custom filter curve will take over again.
Distance: This begins at the default (normal) setting. Turning it down will make the object sound closer; turning it up will make it sound further away. Use this to alter the spatial depth of elements in a mix.
______ (Special Effect): This Macro is named differently for each planet, and has a different sonic effect on each.
Predelay: The time before the reverb first begins. Can be useful for preserving your original transients or adding a stuttered rhythmic feel.
Chorus: Adds a subtle creamy stereo movement. The planet Venus has a more extreme “Thick Chorus”.
Stereo Width: Lower settings place the reverb at the middle of the stereo field; greater settings lead to more spread, up until the maximum possible.
Also: Using controls on the Convolution Pro device (which aren’t mappable to the audio effect rack), one is able to lengthen or shorten the decay, shorten or lengthen the size, combine 2 different planet IRs attack and decay sections, alter the shape of the early reflections and length, cause “cascade” overlapping of decay curve, implement reverb fade-in or fade-out,  adjust the Damping Curve (basically the EQ for the decay), or even flip into a reverse reverb.

Grab PLANETARY CONVOLUTION at Isotonik Studios by clicking >>>>>>>>>>HERE<<<<<<<<<<<

Includes:
-“Planetary Convolution” self-installing Ableton Live Pack. Simply drag the .alp file into Live to install it, and the presets will show up in the “Room” and “Hall” folders under “Places”. BAM. That easy.

-“Planetary Convolution” set of .aif Stereo Impulse Responses (L + R files). These are for anyone who doesn’t have Live.

Provided as a single zip file to download. Once unzipped:
If using Ableton Live: use “Planetary Convolution by PerforModule.alp”
If using another DAW: use “Planetary Impulse Responses” zip file. Unzip it and find the aif IR files inside for usage in your Convolution plugin of choice.

Audio Demo_

~`~

ps. On the topic of celestial bodies, check out the “moon reverb” ableton preset which comes with “PerforModule – Dephaultz”.

new free Multiband Reverb effect rack for Ableton Live 9

“PerforModule: MultiBand Reverb”

MultiBand Reverb Image

A reverb effect rack sending different calibrated reverb algorithms to the lows, mids, and highs. The lengths, widths, and shapes of each reverb chain are scaled compared to each other leading to very complex, smooth and lush sound which can be used from very short ambience “small box” reverbs to extremely long-tailed hall reverbs, and everything in between. The tone can be altered carefully with just a few macro controls to sculpt the sound with great versatility and ease.

Add in Low, Mid, or High reverberation, change the room size and tightness, and alter the tone with the cutoff and diffusion knobs.

Each chain of the reverb is suited for the frequencies of material sent through it.
The “Low” chain additionally saturates its output. Tip: Try using it on a kick drum or drum buss with a higher “Tightness” setting and turn up “Low Reverb” then play with the room size to add a natural boom to kick drums. 

Click the image above or these words to grab “Multiband Reverb” for free!

Check out an audio demonstration of various settings of the “Multiband Reverb” applied to drum + percussion loops_

~`~

ps check https://performodule.wordpress.com/2013/05/24/how-to-organize-user-plugin-presets-like-a-boss-in-ableton-9-using-the-hidden-architecture/ for how to save this in your Live 9 library so that it shows up in the “Places” section of the browser. Super nifty.

[update] HUGE thanks to ABLETON for featuring PerforModule’s “MultiBand Reverb” for “Free Stuff Friday”!!!

New free GT-8 Impulse Responses by PerforModule at Bedroom Producers Blog

I got inspired one day and sampled a convolution for each effect i could procure out of my Boss GT-8 Guitar Multi-FX pedal. I sent them off to Bedroom Producers Blog, where they are now available for FREE download.
I also made a default “Convolution Reverb Pro” preset Ableton device for each IR and made them into a pack.
I sampled them at 96k 32 bit for no compromise of quality.
If you have Ableton Live 9 + MaxForLive, you can install the effects simply by dragging the .alp file into ableton and clicking “yes”.
If you do not own Ableton Live, do not fear! You can still use these convolutions with your preferred Convolution plugin.
Click the “Boss GT-8 Impulse Responses” image to teleport to Bedroom Producers Blog and grab them!


~`~

Oh and, if you didn’t catch it already, be sure to grab the PerforModule “Pitchbend Vibrato” midi rack over at subaqueousmusic.com! Click the image below to go there.

PitchBend Vibrato Image

Huge thanks to Bedroom Producers Blog and Subaqueous Music both for hosting my crafts and spreading the love. The worldwide creative community is so inspiring!
And a huge thanks to you, reading this. I never imagined this blog would become what it has, and every single visitor here is partially responsible and you have my personal gratitude.

much love
~animus

Handy Tip: Custom Metronome Sounds in Ableton

Sick of the default Ableton metronome sound?

Since it is already described more eloquently than i could, i recommend Sonic Bloom’s nifty guide:
http://sonicbloom.net/en/ableton-live-tutorial-how-to-change-the-metronome-sound/

Do that thing.

Here’s what my current metronome sounds like.

and remember: NEVER HESITATE TO MAKE LIFE MORE FUN!

Free “Chopper” Effect Rack

Here’s a free effect rack.  It allows you to chop up your audio, with a rate knob that fades between 1, 1/2, 1/4, 1/8, 1/16, and 1/32 notes, and avoids triplets. Or, the rhythm can be switched to “Triplets” mode instead. There is built-in extra gating for adjustable dynamics, an “LFO Type” knob to select between 4 different flavors of chopping including random, and an “invert LFO” switch which will make the chop come in where it was going out and vice versa.

Good for live performance, especially on sustained synth tones.

Enjoy~
Chopper Image

<- click image to D/L “Chopper”

~`~

p.s.

Bonus shoutouts to ISOTONIK STUDIOS

Ableton Live & MaxforLive


The brain behind PerforModule has had the pleasure to delve into the “Modular Series” set of devices and wow is there some truly innovative and useful stuff in there! “Follow” adds some much-desired added functionality to clip launching, such as the ability of making a clip launch the next clip when it ends, no matter the length. “Smart” is a great multi-knob to map anything to anything, with the ability to set response curves. So you could for example have one knob that controls parameters in two or more different effects parameters in different tracks in your set, and one of them could ramp up then ramp back down while another just ramps up. Endless possibilities. “Looper” adds extra control to using the loop brace in arrangement view, and there are 3 super-wild glitch effects as well as more nifty gadgets. What’s super cool? If you get one of the Isotonik sets, you get lifetime updates to all the devices.
Check out “Follow” here: https://isotonikstudios.com/product/follow/