Drum Enhancerz Two Released + Drum Enhancerz One Updated!

I’m happy to announce the release of the brand-new effects pack Drum Enhancerz Two, as well as a fresh update to the classic original Drum Enhancerz pack. This update took quite a lot of time and energy, but was quite fun to accomplish.


Drum Enhancerz One: $20.

Drum Enhancerz One (originally released a decade ago) includes updates to style, function, and documentation.

It includes racks which are calibrated for sculpting specific drum elements. Included are:

Enhance Cymbals
Enhance Kicks
Enhance Overheads
Enhance Snares
Enhance Toms


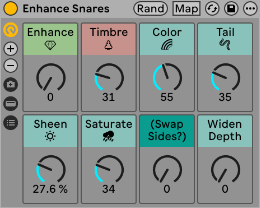
Each rack includes 8 macro controls for sculpting your drum sounds with ease.
A few of the capabilities are…
-plush control for smooth cymbals.
-smack control to add top attack to kicks.
-smash: go-to overhead compression.
-pitch-matched resonance for boomy toms.

The new version for Live 12 includes updates to style, documentation, and function.

Functional updates include two new devices: 𝐊𝐢𝐜𝐤 𝐒𝐮𝐛𝐠𝐞𝐧 and 𝐊𝐢𝐜𝐤 𝐕𝐚𝐫𝐢𝐟𝐢𝐞𝐫; woohoo!

Kick Subgen is, frankly, badass, and i’ve used it a ton on mixes whilst behind the scenes in development. The official description: “An easy and tasteful method to generate sub content based on the input signal to reinforce and solidify your low end. It down-shifts and overdrives a parallel lowpass resonance.”

Kick Varifier is a niche thing which is only expected to be used occasionally. It came from my organic music background, being somewhat turned off by stale, repetitive kicks in some electronic music. It allows you to add a touch of subtle variation to individual kick hits (or any audio element) in rhythmically timed intervals.

Other inclusions to the update are Macro Variations, frequency values adjusted to more optimal values based on recent years’ intensive research, cpu streamlined where possible, loudness and tone re-balanced for relative all-purpose usability, and — for Push users, X & Y Controls given default assignments.

Purchase Links:
Drum Enhancerz One at Isotonik.
Drum Enhancerz One at Gumroad.


Drum Enhancerz Two: $20.

Drum Enhancerz Two is the brand-new pack that i’ve been working on. It includes seven Tuned Enhancer effect racks fine-tuned for specific drum instruments and also implementing all the latest Live 12 quality-of-life features. It includes:

Tuned Kick Enhancer. 
Tuned Tom (Floor) Enhancer. 
Tuned Tom (Low) Enhancer. 
Tuned Tom (Mid) Enhancer. 
Tuned Tom (High) Enhancer. 
Tuned Snare Enhancer.
Tuned Cymbal Enhancer.


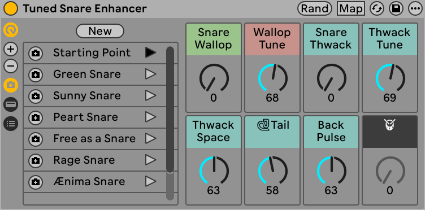
Each provides the ability to tonally sculpt standard drum types with enhancement points carefully chosen based on deep research into optimal drum element frequency curves.

For example, the Tuned Snare Enhancer will provide boost points perfect for a satisfying wallop and thwack typical of nicer-sounding snare drums. Etc…

Artist-Based Macro Variations.

Each of the Tuned Drum Enhancer racks includes some macro variations that are mimicking the tonal focus points of choice drummers in select songs.  As one quick example, you might move your snare sound more closely towards the tasty low-end thump of Al Jackson’s snare from Al Green’s timeless piece Let’s Stay Together.

Purchase Links:
Drum Enhancerz Two at Isotonik.
Drum Enhancerz Two at Gumroad.


Drum Enhancerz Bundle: $30.

The Drum Enhancerz Bundle is also available, to grab both packs for ten bucks off!
Drum Enhancerz Bundle at Isotonik.
Drum Enhancerz Bundle at Gumroad.

Many thanks to Push Patterns for the new video about the packs!


ᴏɴʟy ʜᴜᴍᴀɴ ᴡʀɪᴛɪɴɢ ɪꜱ ɪɴᴄʟᴜᴅᴇᴅ ɪɴ ᴛʜɪꜱ ʙʟᴏɢ ᴩᴏꜱᴛ.
~`~

Magic Numbers: Rounded Fractions

🧠Memorizing Sucks.
As audio engineers, certain numerical values become often-used and thus can become useful to memorize. If you suck at memorizing stuff like me, graphs and charts can be helpful.

🎛0—127.
In Ableton Live and other programs, range values are often scaled from 0 to 127, rather than 0 to 100. So it can be useful sometimes to know certain fractional values to type in (either mathematically perfect for extreme precision, or rounded values for quick input).

Continue reading

Tempo Dynamics

When applying dynamic effects, we are rarely going to need the entire timing ranges available, depending on the tempo, right? The new Tempo Dynamics pack provides go-to racks with minimum and maximum values hard-wired to ranges most potentially useful, given the chosen tempo — avoiding values that are likely too fast or too slow to be helpful.

Continue reading

Ableton Live 11 Key Map Guide & Template by PerforModule

The PerforModule Key Map Template for Ableton Live 11: mapping computer keyboard keys to as many potentially helpful functions as practical.
[Note: if you’re on Live 12 now, maybe hold off on downloading this perhaps for the moment, since i’m working on a new keymap template for Live 12. Feel free to steal some of the ideas from this post in the meantime, though!]

The Template

There are three parts to the template:
•a Live Set pre-loaded with the recommended key mappings,
•a Diagram showing color-coded key functions, and
•a Spreadsheet listing custom-mapped and built-in key mappings, also explaining some quirks.

~`~

Mosey on over to this dropbox folder to download the Key Map Template Live Set, Key Map Plan Diagram, and Spreadsheet Guide. Read on for nauseatingly meticulous details below.

Continue reading

Free Loudness Meter VSTs

“WTF are Loudness Units?” you may ask. Well, they are simply a measure of loudness, just like decibels.
One LU actually is equivalent to one dB. However, an important difference is that Loudness Units are “shaped” according to the human ear’s proclivity to hear certain frequencies more easily than others. Effectively, LUs tend to feel more consistent to our brains than dB will when measuring varying frequency content, and therefore LU meters are preferable to use (compared to, say, RMS meters) for assessing the overall loudness of music.

Below are shown six free LU (aka Loudness Unit) meters, listing features of each. The most important value when matching the loudness of songs is IL (Integrated Loudness), which is the average loudness over the entire course of given time (with very quiet material gated out).

These devices are available as VST effect plugins for any capable VST host (such as Ableton Live, for example).

~`~

Continue reading

Dither Presets for Metal

(intro)

It’s a set of free presets for Dither, optimized for the Metal genre.

They were made for the mastering of the upcoming metal album, Lust & Insecurity by Animus Invidious.

Noise-shaping dither algorithms are theoretically optimized to “bury” the noise in the frequencies you hear least, while avoiding so much in the preeminent tonalities (in this case, distorted electric guitars focused around 2.5kHz).

Download

You can DOWNLOAD HERE and open the .fxp presets using your DAW of choice. If you happen to use Ableton Live 11, you can additionally access the .adg Racks which allow for more easy snapping-to or fine-tuning of the intensity value.

⚠️ You are also going to need to grab the free TB_Dither_v3 VST2 plugin if you don’t have it already, which has been graciously set free amongst a slew of other awesome legacy TB plugins.

Continue reading

Parallel-Friendly Native FX Racks for Live 10+: “ParallAux”

Which Effects Work Best In Parallel?

So one day i got it in my head to figure out which of Ableton Live’s Effects are the best to use in parallel.

What is the criteria for this? Simply, which processes alter the phase of audio passing through them, either to the least degree, or in a nicely summable way.

Why does this matter? Because phase offsets, when summed in parallel with the original signal, will inevitably cause changes to the frequency contour. Sometimes slight amounts of this phase offset can add a nice creamy touch to the sound of things (and pretty much all analog gear causes it to some degree), but when being surgically technical like during the finalizing stages of a track, they are generally just not helpful.

An example of not altering phase at all is Live’s Compressor effect which is phase-neutral; it can be used safely in parallel with no unwanted frequency coloration whatsoever.

An example of altering the phase in a “nicely summable” way is Live’s Reverb. Technically, it’s altering the phase a whole bunch, but it’s doing so in a time-smeared fashion which results in far less likelihood of perfectly-lined-up frequency cancellations, and so, when at 100% wet, reverbs can be just fine to use in parallel, and are often preferred this way.

After carefully checking the phase response of all of Ableton Live Ten’s native Audio Effects, i came up with five distinct racks providing combinations of the most parallel-friendly native effects, optimized for specific purposes with maximal versatility of application.

~`~

>Check Out ParallAux via Isotonik Studios<

>Download ParallAux PDF Manual<

Continue reading

PerforModule Recommends: Effects Order

While we all know that there is no such thing as a perfect or ideal FX chain order for all situations because it totally depends on context, i have eventually developed some general preferences for the order of effects in a signal chain. Recently updating all my templates for Live 11 has further honed my thoughts on the situation.

We can of course swap around the sequential ordering of effect devices, either for a specific intended result or as a matter of experimentation just to see if an alternate routing happens to sound better on given audio.

As usual when sharing my ideas, it is recommended that you not simply adopt the structure as presented, but rather that you test it out in practice and modify things over time to suit your particular style, keeping notes and updating your own templates as you go. Maybe you think the way i place transient shapers before compressors is idiotic. That’s totally fine!

I’ll share below my go-to effects order, and (most importantly)… WHY.
While some of the choices are probably pretty unorthodox, none of them are arbitrary; they all have reasons. Are they bad reasons? Good reasons? Who knows. But i like to think they are built on logical rationale.

Keep in mind you’re seldom if ever going to need all these types of effects on any single track, but for times when you are using even two different processor types, some guidance as to their ordering might prove useful. Resist the urge to add more effects to a chain just because you can. The fewer processors required to get a sound how you want, usually the better.

Scroll to the bottom for a handy cheat-sheet!

~`~

Continue reading