(For the original Live 10 version, continue below.)
While we’re going through some crazy times, it has been heartwarming to experience how humans have upped their compassion game in response to shared crisis. I’ve seen more freebies and crazy deals going on this past week than any other time i remember, which seems because people want to help each other, share and be nice (well, not so much a certain political faction in the usa who seems to prefer that regular people suffer as much as possible. But that’s another topic). With graciousness and care for their fellows is how humans should act, rather than trying to take advantage of each other sleazily—which happens all too much.
In this spirit, i am offering up my super secret stash of “Sweetie Pies”—a small collection of effect racks for Ableton Live Suite 10, each crafted to address a specific need in a sweet manner. These are highly practical yet fun racks with the primary purpose of “getting stuff done”.
i WAS planning on releasing this pack eventually anyways once it grew a bit more, but to expedite the process of getting you the goodies, i’ve decided to simply omit the not-quite-finished devices, give everything a good once-over, and release the pack for free as it is now.
Well, now we’re ratcheting it up a level to give you ultimate control of your own personalized device organization structure, with the ability to decide exactly what those categories will be.
Modified Audio Effect Categories
If you’re like me, you’re obsessed with systematizing your production tools and resources into a cohesive configuration, making it easy to access what you want when you want it, for maximally optimized workflow when diving into creativity.
While working along with the default categories for years, i was never quite fully satisfied by Ableton’s built-in selection of available choices, so i did some research and testing and determined that it’s not only possible, but actually fairly easy to set up your own custom categories. The trick is to plan things out logistically.
If at this point you have no idea what i’m talking about, please check out the above-linked blog post for background on how Ableton’s category structure works. Then come back here and continue on. The gist is that by including devices in folders of particular names, you can get them to automatically show up in Live’s Core Browser. Normally, we’re relegated to using the default built-in categories that Live comes supplied with. All PerforModule Premium Packs are set up with devices like this, so they install and devices show up in the Core Library for anyone who purchases them. But now, should you want to, you can modify those actual categories. Sweetness.
Virtual Folder Config
The trick to setting up your own categories lies with the VirtualFolders.cfg file.
VirtualFolders.cfg Locations (for Ableton Live 10, similar for Live 9)…
PC: C:\ProgramData\Ableton\Live 10 Suite\Resources\Core Library\Ableton Folder Info
Mac: Ableton Live Application (show package contents) > Contents/App-Resources/Core Library\Ableton Folder Info
Always Back Up!
When starting out on this mission, firstly save a copy of the original VirtualFolders.cfg file in a safe place in case you make a mess out of things and need to restore the default state. You can always reinstall Live to do so as well, but that’s not necessary if you back up the file.
In addition, you definitely, absolutely will want to save a backup copy of your own custom-crafted VirtualFolders.cfg in a safe place, because every time Ableton updates Live, it will get overwritten and you’ll need to replace it (just like with Themes aka Skins). Maintaining a backup of your custom configuration is essential in order to continue using it in the future, so do not forget to save a copy of it after you complete it.
Your Custom Configuration
If you open up the VirtualFolders.cfg file in a text editor (such as the recommended Sublime Text 3) and gaze around at it for a while you’ll get an idea for how things work.
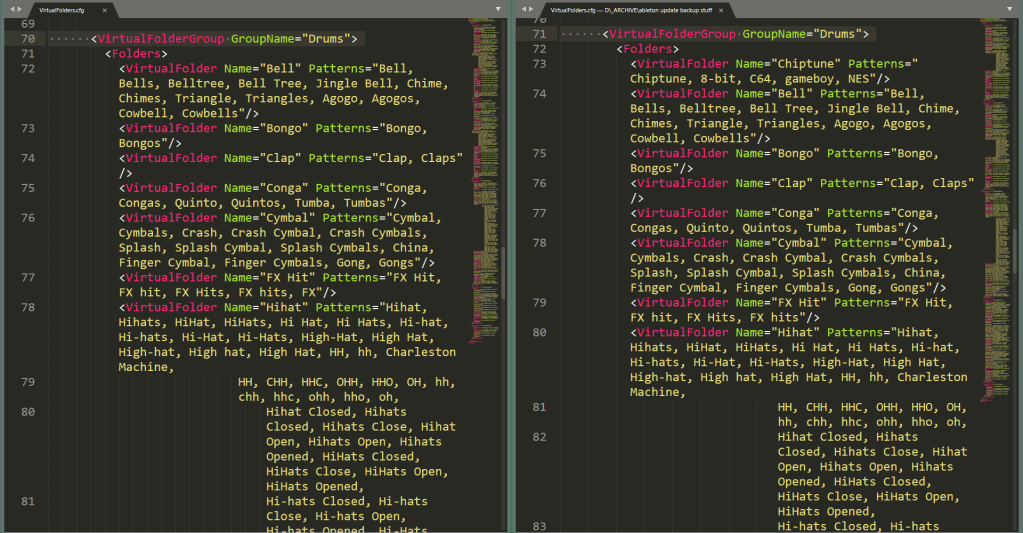
Virtual Folders are arranged in Groups. Each Group can include an arbitrary number of Virtual Folders, which will be the names of the folders that show up in Live’s browser. Each Virtual Folder allows two parameters: the Name (a single string of text that will show up as the category title), and the Patterns, a list of text strings which will trigger search results for devices in that category. Neat!
To set up your own system, simply alter the existing entries, and/or add your own new ones. I would recommend starting slowly, perhaps by adding in one new category to one group and testing it out, before planning a major overhaul to the entire scheme. Be extra cautious about deleting existing options, since while doing so won’t affect any devices directly, it may reduce your ability to easily access certain existing patches.
In the image below, see how on the right i’ve added the “Chiptune” Virtual Folder to the Drum categories. Now i can find chiptune-style drum hits easier. Radical.
After you backup both the original and your new configuration, replace the original with the new one, restart Live and check out what happened. Chaos? Euphoria? Now ponder whether you made a wise decision.
PerforModule’s Configuration Strategy
I’ve found Ableton’s default categories for the Sounds group to be mostly adequate, and so i haven’t altered much there. Notably, i’ve removed the “Booms” entry (new with Live 10), which i find useless and annoying to exist as its own folder, since anything i’ve found that could be classified as such could instead fit into a more appropriate category.
Because i was already invested in having sorted thousands of patches into the existing categories, it made sense for me to keep them, but perhaps in your case it might be a good idea to reassess the default categories and use ones instead that make more sense to you. Perhaps you would prefer to have multiple categories of basses available, for example—coordinating your clean, distorted, and wobbly bass patches separately. I might change “Synth Misc” into “Chiptune”, since that’s basically what i use the category for anyways…
Note that the Drums group is for drum hits, not drum racks. (Unfortunately, i’m still not sure of a way to suavely organize drum racks by type, so for those i still use User Library folders.)
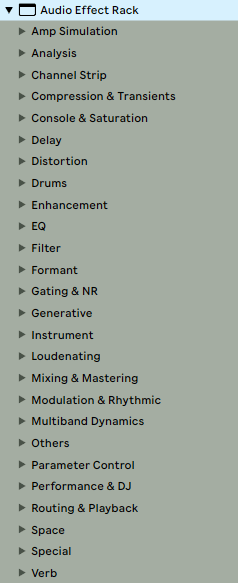
The AudioFx group is where i’ve shifted stuff around a bit more.
The “Analysis” category is added, and it is much welcomed. “Distortion” has keywords added so that degradation effects show up there. Various effects previously crammed within “Mixing & Mastering” have been granted their own categories… I’ve added a “Compression & Transients” category to align with the Elemental Mixing Template. “Gating & NR” category for dynamics-increasing and noise reduction effects. “Console & Saturation” has been added as a category, since i tend to use those for different purposes than more overt distortions. “Delay” (previously placed inside “Modulation & Rhythmic”) now has a dedicated category. “Enhancement” category added for exciters and other special-purpose, hard-to-categorize processors. “EQ” now has its own category apart from “Filter”. “Generative” category added for audio effects that generate sound. “Channel Strip” category added for multi-effect chain plugins. “Loudenating” category (shoutout to chris from airwindows for that term) added for limiters, maximizers… things whose purpose and result is to make stuff louder. “Multiband Dynamics” category added, because those beasts are unique and special-purpose enough to have their own demesnes. “Parameter Control” category because all those MaxForLive gadgets are so damn nifty to have on-hand in an accessible fashion. “Routing and Playback” for all the odd toys that do strange things with channel routing, signal sending, and et cetera. “Verb” because why the heck is there not a reverb category to begin with? They used to live in “Space”, which now i can designate only for things to do with stereo panning, perceived positionality, phase, and depth of field. “Drums” and “Instrument” still exist as effect categories, and are used for instrument-specific plugins (examples: eddie kramer DR, bass professor).
Should you use the same custom categories as me? Probably not. But you can use these examples as thought-food to inspire your own devious system planning that suits your particular preferences.
But Why?
“I can just custom organize stuff however i want in my User Library, and ignore the Core Library. What’s the practical point of this?”
I dunno… i guess if you’re an anal-retentive nerd. It just streamlines stuff and feels like a cleaner, more unified experience. If you can’t see the appeal, then this is not for you. Have fun with your disorganized midden heap of chaotically-organized junk. Just kidding. It’s all love. Well, mostly.
Limitations
As swagtastic as implementing a custom system in this way feels, it’s still far from perfect. There are various improvements that could certainly be had.
Being able to classify individual Samples, Loops, and Clips might be kinda neat. As mentioned above, drum racks don’t count as a group like the other device types, and that’s kinda dorky.
Being able to access things with a sort of tag-style metadata system might be more elegant than folder trees. I know some DAWs can do this.
I’m happy to announce that the complete set of epic amalgamated Ableton Live device packs by Brian Funk are now available, bringing their total to ten. Includes:
“But what if i want ALL of them?” you ask. Not to worry—the Brian Funk ANTHOLOGY is available, allowing you to snag all of the packs at a greatly reduced total cost. Brian spent a ridiculous amount of time creating these devices in the first place over the years, and then i spent an obscene amount of time assessing, organizing, fine-tuning, and packaging them up into self-installing ableton live packs. The price for the full anthology might seem kinda hefty at first glance, but when you realize the scope of what you are getting, it’s actually an insane deal. (By the way, be sure to check out Brian’s awesome Music Production Podcast, if you haven’t yet.)
For the past close to a year, i’ve been working on recording and mixing a collection of original songs by Shavano, an 79-yr old piano player / singer who lives in the same mountainous, forested region of Colorado as me. He dwells in a house built with his own hands, which is powered exclusively by solar and wind energy, on an amazing property with stone-lined paths twisting here and there. It feels like something from a fantasy novel, a magical space that is totally separate from the rest of the world.
I spend a good deal of time listening to music and occasionally take stabs at optimizing the experience. A recent subwoofer upgrade to a nicer one i snabbed at auction for super cheap is one example. Another example is fine-tuning my Desktop PC music playback experience.
Lately i have taken quite strongly to foobar2000 as an exquisite audio playback experience, as it is highly customizable and of utmost quality, but feels quite approachable. And also it’s totally free.
Having recently optimized my foobar interface to a highly satisfying degree, i figured i’d share it with you / the world. You can use it as-is, or (as i would recommend) spend some time tweaking it to your personal liking, perhaps removing some elements, moving things around, or adding features.
OLD NEW IDENTITY In case you haven’t heard the news, Brian Funk is no longer going by the name AfroDJMac. You can hear his thoughts on the evolution to this “new” identity at his podcast episode here.
MONIKERS CAN BE AWKWARD I recall, when i appeared on his podcast for episode 13, joking briefly about the awkwardness of monikers. So from my perspective, this shift has been a long time coming and is totally sensible. HOWEVER…. at the time it happened we were smack dab in the middle of the process of releasing a series of ADM packs, epic agglomerations of his instruments, collected into organized, self-installing, themed ableton live packs, ideal for satiating completionists who desire to access to the catalog of devices in the easiest manner possible.
-AutoAdjustMacroMappingRange will make it so that when you map a parameter to a macro control, the current value becomes the minimum value of the newly-created mapping (rather than 0). I prefer enabling this option because it streamlines workflow by helping to map macros faster, saving the step of typing in the minimum value when it is already in place.
With -AutoAdjustMacroMappingRangeoff, when mapping a parameter to a macro control, it will always result in a range of “min” to “max”, ragardless of the current position.
Say i want to map a parameter to a macro, and i want it to range specifically from 37 to 127.
With -AutoAdjustMacroMappingRange set to off, i would first have to map the parameter, click “map”, and then edit the minimum value to be 37.
However, with -AutoAdjustMacroMappingRange set to on instead, by mapping it, the minimum value will automatically be set to the current value (in this case 37), while the maximum will default to 127.
For cases where the maximum is meant to be 127, this reduces the mapping process to a single quick step, without even needing to open map mode. Other types of mappings might still require turning on map mode to adjust the values, but will still save a step of action if you map it while the current value matches one of the target values.
The unprocessed screengrab below demonstrates various mapping strategies, depending on what you want the minimums and maximums to be.
. . .
NOTE: i believe that a recent update of Live 10 enables AutoAdjustMacroMappingRange by default, whereas in previous versions it was off unless you enabled it manually. Either way, it’s handy to know that you can change it around when desired. Just remember that if you do change it, you’ll have to restart live for the change to take effect (i think).
“How the heck do i implement this?” you might ask. To answer that and for more swag info about Ableton Live’s mysterious Options.txt, Madeleine Bloom’s series on the topic is highly recommended.
You may have heard many varying descriptions of the difference between track compression and bus compression, usually including vaguely-defined, mysterious terms like “punch” and “glue” which don’t really help us understand anything.
Well, i have a kinda dorky yet effective way to think of the difference between track and bus (aka buss) compression for you. Continue reading →
So you’re working on a song and you’ve found a frequency which you want to adjust. Let’s say you want to nudge down 4.4k a little bit to reduce a bit of harshness. Now you ask yourself: what type of EQ should be used?
As time passes by, there becomes more and more dynamic EQ plugins available. Besides, in Ableton, Bitwig, and other DAWs, it’s easy to make any automatable EQ plugin act as dynamic by the use of envelope followers. On the other hand, when using a dynamic EQ plugin, there may be times when you want to use the bands as typical, with no reactivity. So, we have a pretty much open choice of whether to use a static or dynamic EQ on a track we’re working on. So what to do?