foobar rocks
I spend a good deal of time listening to music and occasionally take stabs at optimizing the experience. A recent subwoofer upgrade to a nicer one i snabbed at auction for super cheap is one example. Another example is fine-tuning my Desktop PC music playback experience.
Lately i have taken quite strongly to foobar2000 as an exquisite audio playback experience, as it is highly customizable and of utmost quality, but feels quite approachable. And also it’s totally free.
Having recently optimized my foobar interface to a highly satisfying degree, i figured i’d share it with you / the world. You can use it as-is, or (as i would recommend) spend some time tweaking it to your personal liking, perhaps removing some elements, moving things around, or adding features.
download the theme… if you want to
Here: animus foobar theme. Enjoy?
Before installing the theme, you should take a couple of steps of preparation. First, download the latest version of foobar2000 (v1.4.8 or later should work). If you have an older version installed, it’s recommended to update it, or you might even need to uninstall and reinstall it completely. Please backup your existing theme (if you care enough about it) and take note of currently installed components. Next, download and install the VU Meter component (see below about components). After updating the app and installing that plugin, you’re good to go.
To install, simply drag “animus foobar theme.fth” into foobar2000 while the program is open — just like installing an Ableton Live Pack.
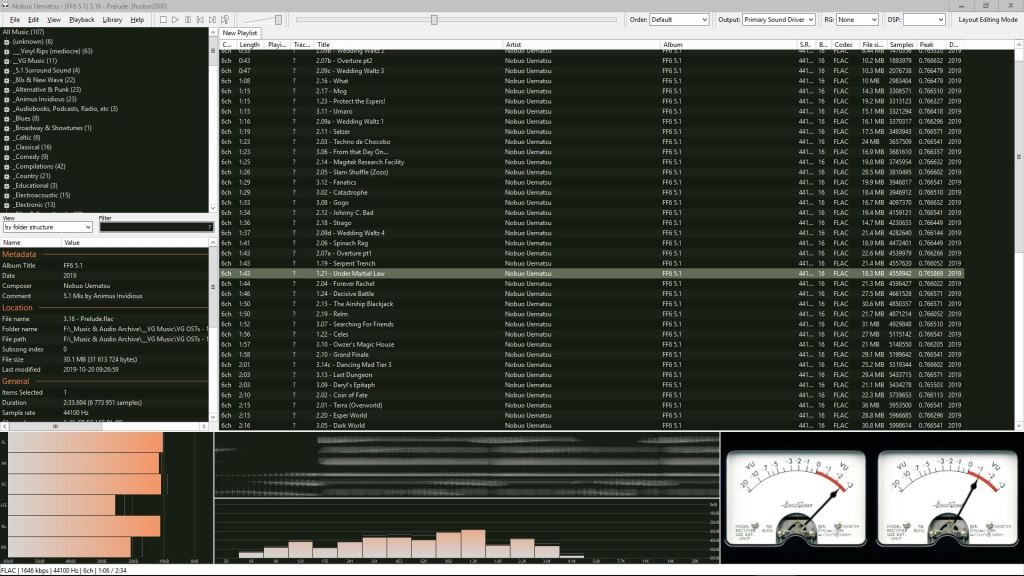
It’s optimized for fullscreen on a 1920×1280 monitor, but it was also designed to be ergonomic when the window size is reduced. Foobariscious.
breakdown of the elements
Top Row: The Toolbar

You are provided with playback buttons: stop, play, pause, previous, next, and random. The media playback shortcut keys on the keyboard controls them automatically which is useful. The random button is pretty sweet; it lets you skip to a random track without changing the existing playback mode. Nice.
Next is a volume control. This is separate from system volume, although i think it may be possible to tie them together.
Next is the Seekbar. I like it big so i can scrub around with more precision.
After that is a row of selectors: Order, Output, Replay Gain, and DSP. These are handy to be able to change options instantly without having to dive into any menus. Finding myself often switching between Default and Shuffle playback, or between Replay Gain album vs track modes, this is very convenient.
The toolbar slots can be moved around at any time, but to adjust the larger areas of the interface, the Layout Editing Mode button is used.
Top Left: The Browser
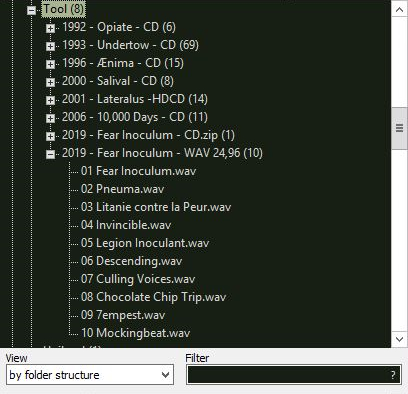
Here you can browse your collection of music. Using the view selector you can choose between your own pre-existing folder organization, or browse according to artist, album, genre, or year. You can use the Filter field to intelligently search for items.
Left Middle: Selection Properties
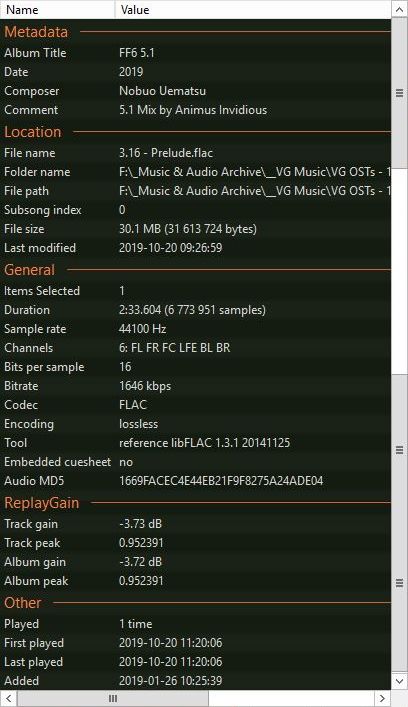
Also thought of as “Track Info”, this nifty area shows you data about the currently selected (not necessarily currently playing) track. The image above shows what my theme loads with by default. I particularly find it useful to see the sample rate, bits, and channel count.
Main Area: Playlist View
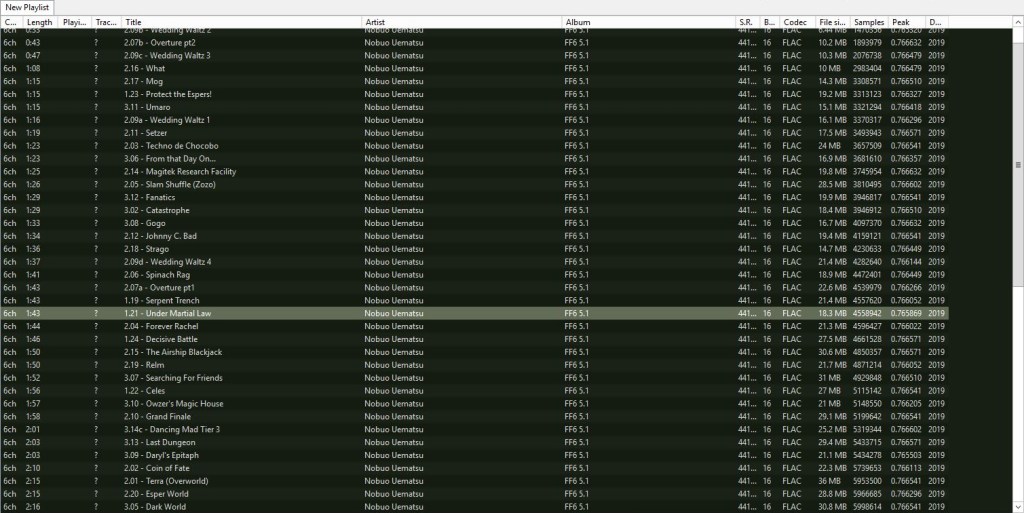
The main area is where you see your playlists. You can have multiple playlists open in tab format, which is incredibly convenient. My current setup is customized to show these columns, from left to right: Channel Count, Track Length, Currently Playing, Track #, Title, Artist, Album, Sample Rate, Bits, Codec, File Size, # of Samples, Peak Level, and Date.
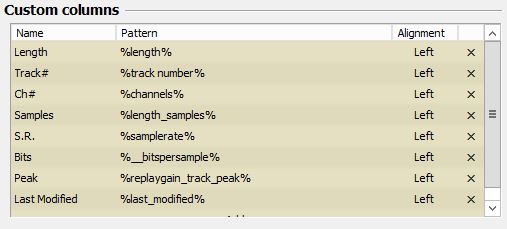
Customize data types available for use as info columns by right-clicking at the header bar and go to Columns>More. Under Custom Columns, reference this nifty webpage resource to enable showing the desired data types in the Pattern field, naming them to whatever you’d like to appear in the interface. For example, i used this to be able to show Bits Per Sample as the Column “Bits”, which is more useful info to me than the default Bitrate column, which i’ve removed. Here’s an image of the ones enabled:
Lower Left: Peak Meter & Currently Playing Info

In the corner is placed a multichannel peak meter. What’s cool is that it adapts to however many channels the audio is. So in the image of the 5.1 audio shown above, it creates 6 bars, with the channel names showing up on the left. If stereo audio is played, on the other hand, the space would be split between 2 bars instead. The very bottom left of the GUI will always show some basic info about the currently playing track. The current time is often useful to see… but sometimes i forget it’s down there.
Lower Middle: Spectra
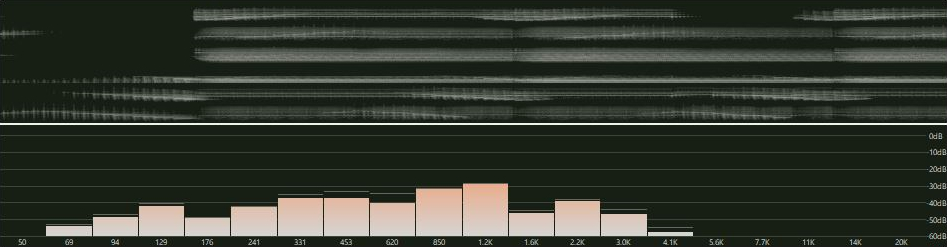
Here i’ve placed a spectrogram and a spectrum analyzer. Useful for assessing the overall frequency contour of material that is being listened to. Plus they look cool.
Lower Right: Oscilloscope + VU Meter
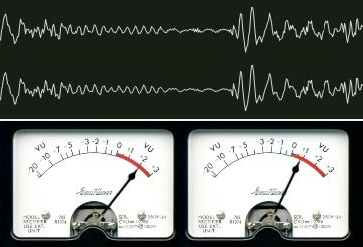
The Analogue VU meter is there more for aesthetics than anything else. It looks cool. However, WARNING!—i caution against thinking of this as serving the purpose of an actual VU Meter, because it has some sort of a non-absolute scale wherein quiet audio will often max out the meter as much as loud audio. So you can’t really tell how loud material is by looking at it… but it is mildly interesting to check out as a sort of dynamics meter, to see how wildly it bounces around for different tracks. If you’re perceptive, you might have noticed that the original full layout pic at the top of this post only has the VU Meter and not the Oscilloscope. That’s because i was doing final tweaks and testing everything out during the process of writing this blog post. You can—and should, of course—customize the layout of the visualizers as YOU prefer. The Analogue VU Meter requires the VU Meter foobar component (not the built in “VU Meter” module which is actually what i above call a Peak Meter). Which brings us to…
foobar Components
foobar2000 utilizes a plugins system to be able to add select functionality to the application. They are called components. To install them into foobar, just go to Preferences>Components and click Install…, then locate the downloaded component. Or, even easier, just select “Open with foobar2000” when downloading a component.
Just like with VST plugins and your DAW, i wouldn’t recommend installing every one you can find all at once en masse; be strategic about it, grabbing the ones that you think will be most useful, and then testing them to the best of your ability to find out if they really do.
Browse & acquire foobar components at this nifty online repository.
The components i have installed and activated are:
•2SF Decoder
•7-Zip Reader
•ABX Comparator
•AC3 Decoder
•Affix Silence
•AOPSF
•ASAP
•Audio CD Writer
•Binary Comparator
•BPM Analyser
•Channel Mixer
•De-emphasis Postprocessor and DSP Set
•DSD Processor
•DSDIFF Decoder
•DTS Decoder
•DVD-Audio Decoder and Watermark Detector
•EBU R 128 Normalizer
•Enhanced Playback Statistics
•File Integrity Verifier
•Foobar2000 Advanced Controls
•Game Emu Player
•HDCD Decoder
•kode54’s ADPCM Decoders
•LazyUSF
•MathAudio Headphone EQ
•MathAudio Room EQ
•Playback Statistics
•Remove Playing Track
•Reverse Player
•Sidplay2
•SNESAPU Input
•Subwoofer
•Super Audio CD Decoder
•VU Meter
•Waveform Seekbar
I haven’t actually had the need or chance to use EVERY one of these plugins, but theoretically, i might at some point…?
Importing CDs at Maximum Quality
To use foobar to rip your CD collection is a great choice, but it’s a good idea to make sure that you set it up to assure optimal audio quality (rather than the default, which is optimized for speed over quality).
To rip a CD, go to File>Open Audio CD.
But here’s the important part: before opening the selected drive, press the Drive Settings button, detect your Read Offset Correction, and set Ripping Security to Paranoid. This will lower the rip speed, but will greatly increase the chances of a perfect read.
After choosing Rip, make sure the automatic gracenote album info is correct, and input data if not. At Converter Setup, import the disc as your chosen lossless file format (i generally go with WAV or FLAC) with Output Bit Depth set to Auto and Dither set to Never.
Under the Other tab, make sure to check Show Full Status Report. Then after your CD imports, it will show you if the digital files are bit-perfect (“no problems detected”) or whether there are mismatches. If you have an imperfect rip, trying again with Limit Drive Speed While Reading enabled under Drive Settings might help, but sometimes that doesn’t matter, so it’s advised to skip it unless you have a bad rip (since it REALLY slows down the import process). If you do have an imperfect rip, it is possible that it’s from an album pressing that is uncommon and the files are actually fine. The higher the values of the numbers in parentheses you see in the report, the more confidence it has.
HDCD.
Under Processing, you’ll want to make sure Enable Decode Postprocessing is checked and that you have the HDCD component installed in case you happen to be importing any HDCD tracks, which will supposedly make sure to decode them properly. However i must caution that recently i had some inconsistency in importing HDCDs this way, so instead i imported them as standard WAVs and then used dbPowerAmp to successfully convert them to 24-bit HDCD tracks.
Incidentally, i null-tested some 16-bit vs 24-bit imported tracks from the same CD and they nulled completely, so i think it’s quite likely that HDCD without peak extension is complete snake oil and provides zero benefit. The jury is still out.
Burning CDs
It is possible to burn CDs using foobar, but it’s a little bit weird to do compared to, say, itunes.
First, make sure you have the Audio CD Writer component installed and enabled. Then, to burn a CD, place the tracks you want to burn to it in a playlist, select them all, right click and select Convert>Write Audio CD. In the settings box that pops up, keep everything off except for Burn Gaplessly, which should be checked on if you need smooth transitions between songs (for example, for a live concert album, or for a seamless ambient electronic album). Make sure the tracks you are burning to CD have already been converted to 16-bit, 44.1kHz to avoid any conversion wonkiness happening at this stage.
There’s lots more that could be said about foobar, but i’m almost at 2k words so i’ll leave it there for now.
Peace!

Ah shucks!! I’m still a Mac user 😥
https://www.foobar2000.org/mac
Hi, are you sure you don’t have the box “agc” ticked in the analog vu settings properties ? because I use the component since several years and never saw it being maxed out by quiet audio, it can be very accurate with the right settings.
I would love to disable the Auto Gain Control, but the only properties i’m given when right-clicking the module are for channel layout, and can’t do it from component preferences. What am i missing?
Pingback: How to Create Loopable OGG Files using Ableton Live and foobar2000 (+ Free Video Game Music) |