EMPATHY is a pack for Ableton Live 10+ Suite containing a handful of high-end effect racks designed to consistently improve a wide possible range of audio sources passing through them. Each rack is suited to a particular purpose, with easy-to-dial-in controls. Together they provide a robust toolkit for general mixing and mastering.


Contains:
Ultimatum: “The ultimate” audio effect rack designed by PerforModule, it’s a 10-step algorithm to magically improve both the tone and dynamics of any audio source in realtime.
‘The One’: One-stop shop for suave, go-to tonal adjustment of tracks in a mix, with low & high cut focus, “light shine” focus, surgical slice, l-r twist, and M vs S intensity.
Auditory Miximizer: The PerforModule twist on the infamous sonic maximizer, with tastefully optimized frequency contours and dynamic reactivity. Comes in 3 versions: stereo, L-R, and M-S.
Dilation Warder: Combination gate and expander for when you want to increase the dynamic range, tighten things up, emphasize punch, and add more of a percussive, staccato feel.
~`~
Skip to the bottom of this post to check out a video overview of Empathy by Brian Funk, or read on for a more detailed overview of each the included devices and what makes them special.
~`~
Ultimatum
Enhance any audio source for more upfront clarity in a delicately nuanced, hyper-intelligent, semi-automatic fashion. It was crafted via an extensive “trial-and-error” testing period of a few years, fined-tuned along the way, to push down moments of misbehaving audio while also pulling out deeply hidden unfulfilled potential, in order to gently (or aggressively) guide things within “the goldilocks zone”.
Purpose:
• Automatic continuous sculpting of tone and dynamics.
• Give “that extra 1%” when mastering.
• Tasteful to aggressive compression that “always works”.
What!? The same processor excels at both delicate mastering as well as smashing the heck out of things? How can that be? The key is in its carefully-planned series of steps. It only does what it does when it needs to!
So how does it work?
Ultimatum follows a series of ten “yes or no” questions of the audio it’s presented with, applying a solution only when it perceives the need, either compressing too-loud frequencies downwards or compressing too-quiet frequencies upwards. Therefore, on audio within the “goldilocks zone”, it does little to nothing, whereas on audio that is imbalanced, it attempts to administer aid. The serial combination of these frequency- specific tasks culminates in a beautifully balanced end result.
But we are creative people, and can’t be having robots making ALL the decisions, can we? With Ultimatum you still have a great degree of control, with the ability to fine-tune the effect’s intensity in a few ways.
Ultimatum Macros:
• Amount determines the total effect. Turn it manually as desired, OR use the Auto Intensity knob instead, which will take over control of it.
• Aggro affects the overall timing for every step. Crank it up to increase aggression, for a more obvious effect. Or roll it back for a more innocuous effect. Try pushing it hard on drum loops for that “smashed” sound.
• Auto Intensity is a magical knob which, once turned above zero, takes command of the Amount knob and auto-modifies it in reaction to the incoming audio. As you increase Auto Intensity you’ll see the Amount react more strongly. The Aggro knob also affects it, tending to increase the average Amount. Auto mode is ideal for unpredictable sources or to avoid boosting background ambience too much.
• Output Level in case you want it. Material that happens to desire more upward compression tends to get a bit louder.
Drawbacks:
•Fairly high CPU: It’s utilizing ten instances of multiband dynamics, so what do you expect? Freezing tracks is your friend!
•Can’t use in parallel: Parallel routing will cause phase issues, guaranteed. Nothing to be done about that unless Ableton makes a linear phase version of MBD at some point, sorry.
•Swelling Decay Tails: Due to the upward compression, at high intensity, sometimes audio that is fading out can result in a bit much of a “woosh” sound (particularly at the tail end of a song). Using Auto instead can help alleviate this, or/and using automation.
~`~
‘The One’
Purpose:
• Sculpt the tonal and panoramic balance of stereo tracks with a quick, console-style approach.
• Dial in a sense of dimensional placement.
• Surgically slice a problem frequency.
This was an attempt to make “one single” effect rack to drop into every track in a mix project, getting raw recordings ready for more intensive subsequent processing. It’s fairly complex under the hood, but easy to dial in.
Special Features:
• Super clean “Light Shine” focus frequency enhancer.
• High and Low Cuts with custom energy-retaining resonance bumps.
• Unique “M vs S Intensity” knob for weighting the front-to-back perception of the results.
Combining the features, you can implement low and high cuts while retaining solidity around the cutoff points, enhance a key frequency of choice, clean up a key frequency of choice, and then carefully balance those tonal alterations in both the lateral (L-R) and proximal (M-S) dimensions.
‘The One’ Macros:
• Low Cut Focus provides smooth low-cut filtering combined with a nice custom resonance bump. Clear out headroom-eating bottom-end while reinforcing the lower fundamental.
• High Cut Focus provides smooth high-cut filtering combined with a nice custom resonance bump. Eliminate ultra-high frequencies while reinforcing top-end sparkle.
• Light Shine is a combination of delicate saturation and frequency-selective dynamic expansion. It “shines a light” on a choice spot, bringing it perceptibly forward in a more suave manner than with brute-force EQ.
• L-R Twist is a special panning knob for carefully rebalancing the stereo field, in concert with the M vs S Intensity (whichever has more weighting, Center or Sides, gets panned more).
• M vs S Intensity is an important control, rebalancing the intensity of all ‘The One‘ processes between Center and Sides signals. Make things feel more in-your-face… or more distant. For example, say you cut below 100Hz and boost 3k with Light Shine. By turning more towards “M”, the low cut’s resonance bump and the Light Shine enhancement will be more focused on the Center than on the Sides.
• Surgical Slice is a hybrid notch + dip filter with a touch of frequency-selective gating, to slice out a select unpleasant frequency with laser precision, while attempting to minimize the phase shift. The majority of the time you shouldn’t need to use this. On occasion it might be helpful.
~`~
Auditory Miximizer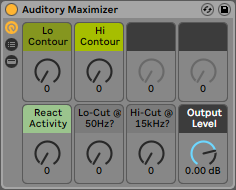
The PerforModule take on the much-maligned “Sonic Maximizer”, with our own preferred custom curvature. The term “maximizer” is somewhat of a misnomer, since it doesn’t limit the signal or anything like that, so we changed it to Miximizer.
Purpose:
• Boost lows while attenuating harshness.
• Boost highs while attenuating muddiness.
• Restore dull or thin recordings transferred from old media.
• Add power and sheen to midrange-focused PA systems.
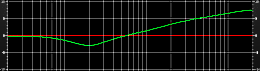
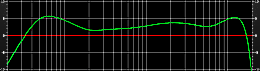
The original hardware’s mid dip is around 700Hz. The PerforModule Auditory Miximizer, on the other hand, has two separate valley regions depending on what you boost. Boosting both retains a degree of mid presence bump around 2k. Overall it has a very natural, pleasant contour on most material.
You have available three versions, covering various routing configurations:
• Normal (mono or stereo-linked).
• L-R (separate controls for left and right).
• M-S (separate controls for center and sides).
Auditory Miximizer Macros:
• Lo Contour boosts the lower frequencies smoothly whilst curtailing upper harshness.
• Hi Contour boosts the upper frequencies smoothly whilst curtailing lower mud.
• React Activity modulates the overall intensity based on the input level. Use for a more organic sound that boosts background noise less.
• • Lo-Cut and Hi-Cut are switchable, with stationary cutoff points, to emulate old analog hardware rolloff. They are sometimes useful when applying significant top or bottom end, to prevent from adding to DC offset or ultrasonic artifacts.

~`~
Dilation Warder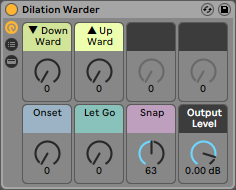
The other effects in the Empathy pack cover EQ and compression tasks quite well. But what about gating and expansion? That’s what the Dilation Warder is for. It wards (gates) and dilates (expands), and quick workflow is the name of the game here.
Purpose:
•Gate stuff.
•Expand stuff.
•Generally increase dynamic range.
Dilation Warder Macros:
• ▼ Down Ward implements gating (aka low-level expansion), making quiet moments even quieter.
• ▲ Up Ward implements high-level expansion, making loud moments even louder.
• Onset lets you fine-tune between a more punchy or soft feel.
• Let Go fills out the sound by delaying how soon signals drop.
• Snap sets the sharpness of transients. Note that since this control alters latency at certain points, it’s not recommended to automate it, since that can cause a “click” sound. Set it and forget it!
Tip: To make the Dilation Warder attempt to “emulate” the transient groove of another track (a nice way to “meld” or “glue” parts that don’t sit well together), unfold the rack and set the sidechain source for both devices to the target track.
~`~
Many thanks to Brian Funk for the video walkthrough and Isotonik Studios for hosting the pack.
Also, shoutout to Aaron Holstein aka Vibesquad who beta tested and purportedly used Ultimatum in the mastering chain of his new (and awesome) E.P. Empathy Waves. The name is a happy coincidence!
