
The PerforModule Key Map Template for Ableton Live 12: go-to keyboard key mappings for optimized workflow.
Built-In Keyboard Shortcuts.
It turns out there aren’t too many changes when it comes to single-key presses between Live 12 and 11.
•o now switches Metronome on or off.
•f now switches Fold to Notes for selected MIDI clips. (It still acts to momentarily enable Fades in Arrangement View while Automation Mode is on, as well.)
•k now switches Scale Highlight on or off.
Fresh Clean Template.
The previous template was pretty cluttered. We’re now eschewing the Computer MIDI Keyboard Mode Keys and have a totally separate image for the Shifted (Capital Letter) Keys.
Feel free to save the below images for handy reference!
How To Use It?
Download the Live 12 Key Map Template Ableton Live Set.
After opening it in Live, go File > Save Live Set as Template.
It’s identical to the factory default set but with the Key Map keys pre-added so that everything is set up and ready to go for you. Feel free to adjust it by incorporating your own favorite key mappings before saving.
Alternately, you can manually map only the specific key commands you’d like onto your own existing custom template (this may save time if your existing setup has greater than about 45 key and/or midi mappings already).
It can be helpful to have access to the fully-fleshed-out key commands in all projects moving forward, providing deeper access to helpful core functions that can optimize workflow in all sorts of studio and stage settings.
The Key Map template is set up to use all the unused keys without stepping on existing single-key shortcuts, while grouping similar functions near together when possible. The Shift keys mostly align with the first letter of their function (e.g. Shift A for toggle Automation Arm, Shift C for Capture, etc.)

LEGEND:
•Grey Keys: Commands built into Live. We ‘re not messing with these. Can remap many if you want.
•Light Keys: Commands mapped into the PerforModule Key Map Template for Live 12.
•Dark Grey Keys: Not used by Ableton Live. They are not nice or helpful. Ignore them.
Keys with Light Grey Text are modifier keys, positions of which may vary based on keyboard model.
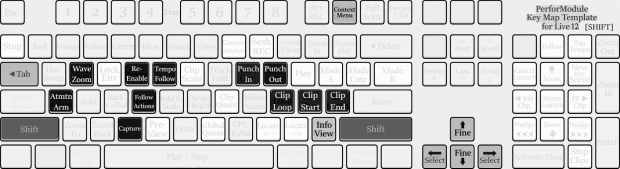
Shifted Keys (Capital Letters).
Instead of trying to cram all the info onto one image, there’s a separate one for when the Shift or Caps Lock key is on.
Rundown of the Mapped Keyboard Commands.
I’m not going to list built-in key commands here. You can check Ableton’s Official Keyboard Shortcut Documentation on that, and/or feel free to see the previous Key Map Template post.
PerforModule Keyboard Shortcuts: Main Typing Area.
| ` | Stop |
| e | Lock Envelope [on/off toggle] |
| y | Clip Scale [on/off toggle] |
| i | MIDI Overdub [on/off toggle] |
| p | Play [immediate trigger] |
| [ | Crossfader [snap to] A |
| ] | Crossfader [snap to] Center |
| \ | Crossfader [snap to] B |
| j | Clip Quantization [option cycle] |
| l | Arrangement Loop [on/off toggle] |
| ; | Clip Loop Position [set] |
| ‘ | Clip Loop Length [set] |
| v | MIDI Note Editor Preview [on/off toggle] |
| n | Global Quantization [option cycle] |
| , | Previous Locator [jump to] |
| . | Next Locator [jump to] |
| / | Locator [set] |
PerforModule Keyboard Shortcuts: Number Pad.
Note: You’ll want to keep NumLock ON in order to make use of the number pad key mappings.
| NumPad / | Display Follow [on/off toggle] |
| NumPad * | Tap Tempo |
| NumPad 7 | Cancel Scene Launch |
| NumPad 8 | Scene Up |
| NumPad 9 | Prepare Scene for New Recording |
| NumPad 4 | Clip Nudge Backward |
| NumPad 5 | Scene Launch |
| NumPad 6 | Clip Nudge Forward |
| NumPad 1 | Tempo Nudge Slower [hold] |
| NumPad 2 | Scene Down |
| NumPad 3 | Tempo Nudge Faster [hold] |
| Numpad . | Stop Clips |
PerforModule Keyboard Shortcuts: Shifted Keys.
| Shift W | Waveform Zoom [on/off toggle] |
| Shift R | Re-Enable Automation |
| Shift T | Tempo Follower [on/off toggle] |
| Shift I | Punch In [on/off toggle] |
| Shift O | Punch Out [on/off toggle] |
| Shift A | Automation Arm [on/off toggle] |
| Shift F | Enable Follow Actions Globally |
| Shift L | Clip Loop [on/off toggle] |
| Shift : | Clip Start [set] |
| Shift “ | Clip End [set] |
| Shift C | Capture |
~`~
Further Notes on Certain Mappings.
` for Stop.
I’ve used this shortcut forever, so I just kept it that way. It feels intuitive having the Stop button below Escape, I guess. Previously, I used that same key shifted (the ~ character) for Stop Clips — but that has now migrated to the NumLock Period key (aka Full Stop or Dot), which more closely reflects Ableton’s GUI.
p for Play: “Instant Play”.
Think of this as Force Play or Instant Play. A key mapped to Play will react differently than using the Space Bar for Play/Stop. Instead of toggling between states, it simply immediately triggers Play. This can be super cool for DJing, allowing you to rhythmically stutter the start point before decisively launching. I’ve also used it during DJing for seamlessly fixing “oops” moments where things go out-of-sync by restarting the playhead on-beat. It’s also very nice during arrangement for being able to instantly restart playback from the playhead. For example, if I’m editing a podcast episode and want to hear a specific moment over and over again while fine-tuning an effect parameter (say a moment of sibilance i want to carefully de-ess), it’s the best way to instantly replay the desired moment with a single button press.
[ ] and \ for Crossfader Snaps: Keyboard DJing!
So fun when DJing. Set some beats on tracks with their Xfader Selectors set to A and B. (I prefer the ‘Transition’ Crossfader Mode, since it doesn’t reduce levels of the original tracks when A or B are isolated.)
Now you can use the Crossfader Snap buttons to bounce the audio around!
HOT TIP: While holding down one Crossfader Snap key, press and let go of another one. Doing so will momentarily switch modes only while you have the second key pressed, then snap back to the first the moment you let go. E.g., Press [ to snap to A; keep it held down; press \ with your other finger to snap to B, but as soon as you let go it’ll snap back to A.
Combine with Force Play to perform beat loop jams in an organic, personalized fashion.
j for Clip Quantization and n for Global Quantization.
(These key choices don’t make that much sense other that they are next to each other on the keyboard.)
Uniquely, these shortcuts cycle through the various quantization options with each press. Cycling through them this way may or may not be more convenient than other ways of adjusting quantization (context menu, or midi map to an encoder), depending on the situation.
One thing to keep in mind is that if you’re using key or midi mappings to mess with Clip Loops / Start Points / End Points, it’s the Global Quantization that defines length intervals, not the Clip‘s, as you might intuit.
l for Arrangement Loop.
Why do we need this when cmd/ctrl l already sets the Arrangement Loop Brace? Because using cmd/ctrl l to turn on the Loop Brace also sets the position of the Loop Brace, and we might not always want that.
The new shortcut adds a slightly different capability: it just toggles Loop on or off.
It’s useful having both abilities on-hand!
Cheat Sheet:
•Use cmd/ctrl l to set the Loop Brace to the currently selected time, or turn off the Loop Brace.
•Use l to turn on or off the Loop Brace without affecting its location whatsoever.
•Use Capital L to toggle Loop on or off for currently selected clips.
p.s. isn’t it annoying how similar l, 1, and I can look to each other in certain fonts?
; ‘ : and “ for Clip Playback and Loop Settings.
Sometimes these can be useful, but a weird thing can happen when messing with clip loops this way whereby the loop ends up getting offset further and further to the right and may be unrecoverable to the initial state using only the key commands.
A better solution that I’ve found is to use the Looper Brace XL Max4Live device from the Modular Series XL pack expertly programmed by Darren of Isotonik Studios — it manipulates clip loops exactly how feels most natural in a performance context, with intuitive length adjustment behavior!
Shitft W for Waveform Zoom.
This toggles the newish Waveform Zoom on or off. You have to set the percentage to something other than x1 for this to have an effect! It can be nice for snapping between a chosen zoom level and the original waveform to check peak levels or average loudness visually.
Special Addendum:
PerforModule Content is All-Original!
I’d like to add a final note that all the blog posts on PerforModule.com are hand-written.
Even though my initials happen to coincidentally be A.I., I never use so-called “Artificial Intelligence” or LLMs (Large Language Models) to generate content whatsoever, because I actually enjoy writing. I find it fun, interesting, and a way to artfully express myself by choosing which words to use and how to structure my sentences. I don’t want an algorithm (which isn’t “intelligent” per se in terms of logical deduction — but rather simply mimics impressive-seeming output) spewing out soulless drivel for me. Seems boring and anyways most of the AI-written articles I’ve read thusfar are rife with useless, incorrect, and redundant info… which is helpful to nobody and frankly leaning on the detrimental side by often providing false or half-baked impressions.
☮︎ Peace!

Pingback: Push 3: User Mode — Free Template. | PerforModule