So there’s this issue with fading between chains in a rack in Ableton Live which i haven’t heard much mention of. Perhaps you’ve noticed it?
Say you have a rack with two chains, let’s call them “A” and “B“.

- Starting to Set Up our Chains
Using the Zone Editors in the Chain Selector Editor of the rack, we’ll place A on the left (full at 0), fading out the other direction. Vice versa for B, placing it on the right (full at 127) and fading out towards the left.

- A … fades to B
Now let’s map the Chain Select Ruler to the first Macro.

- Macro Control to Fade between A and B
Macro 1 will now give us a nifty fader knob between whatever processing we place on chain A versus whatever we place on chain B.
Nice …except for the problem.
At the exact perfect center value, 63.5, we should be getting exactly half A and half B, right? 50% of each?
Except…we’re not. This is the problem.
(Notice in the screenshots below the two different peak levels shown for the chain selector positions.)
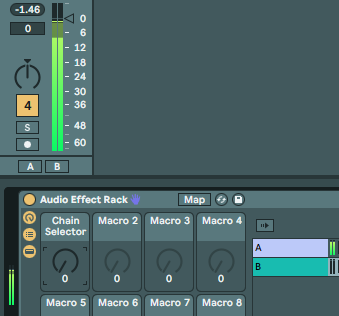
- -1.46dB
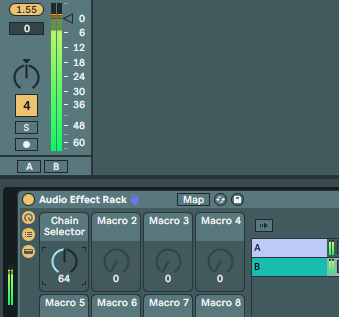
- +1.55dB… what!?!
Unfortunately, tests reveal overlapping chains will actually produce a bump in volume (which increases the more they overlap). In our example at the central position of 63.5, the sound coming out is ~3 dB louder than it should be, bumping up the energy to approximately 130% of what it should be. Whoopsie!
What is the consequence of this? Well, it takes away objectivity when fading between effect chains. If we don’t realize that a volume bump is occurring in addition to the processing fade, a value near the central range of a rack which fades between two effect chains will automatically sound “better” near the middle of the range than it does near the edges.
The level jump can also be an issue for precision tasks such as mastering. For example, lets say we’re mastering a song and want to make a custom parallel blend of Compressor A and Compressor B that fades between them to favor one or the other more during certain song sections. We probably would prefer the raw signal to stay at the same level as we automate back and forth, no?
It can also be an issue for using an A/B rack to compare two effects. While it would be possible to effectively compare full A to full B, comparing either to any partial blend position between would not provide an objective reference due to the pesky volume bump.
Personally, i don’t want to hear things sound arbitrarily louder just because i’m trying to implement parallel processing.
So what’s the solution?
Well, Ableton could maybe at some point implement an equal power curve for chain fades, like available for crossfader and sampler.
But until then, i made a sweet fix for you.
Introducing Neutral Dry-Wet.
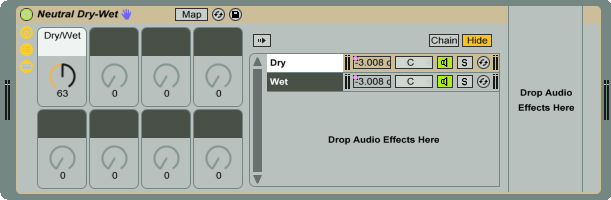
Neutral Dry-Wet will provide that lusciously perfect neutral fading between A and B you didn’t know you ought to be craving.
Is A really Dry? That’s up to you!
Is B really Wet? That too, is up to you!
Put effects in just B and use it as a Dry/Wet knob!
or
Put effects in both B & A and use it as an A/B knob!
Fade between them with ease.
And with neutrality.
Perfectly!
CLICK HERE to grab Neutral Dry-Wet for Ableton Live (9 or 10) for ALL WITH THE FREENESS
Usage: Can be used to add “Dry-Wet” (aka parallel blend) functionality to plugins (ableton native, maxforlive, vst, and/or audio unit) that lack their own just by placing the plugin into the B slot of a fresh Neutral Dry-Wet rack instance. However, if doing so, be sure to watch out for comb filtering as some types of processing don’t work well in parallel.
Alternately, can be used to set up an automatable blend control between two disparate chains of plugins.
Q: Is it absolutely, utterly, 100% perfect?
A: Not quite exactly. But it keeps levels within a minuscule 0.1dB of unity, instead of a gigantic 3dB. That’s more precise, right?

This is super useful! I couldn’t wrap my head around how to pull this off myself. How did you calculate the values to adjust the chain volume relative to the chain selector fade? Was it mathematical or just trial and error?
Well i figured it had something to do with ~6.0206 (double/half energy), and sure enough, yep. By reducing the gain by that amount at the fadeout ends, the halfway point reduces each chain by half of that, approximately 3.0103 dB.
Omg this is so useful!!! thanks!
Btw, looking for this I found a way to do it perfectly with a plugin: Mratio, you have to put mode on Linear and then Map both to a knob, no need to use the chain selector nor the chain volume. It works absolutely perfect but I don’t like to have too many plugins, so your way is a great solution!
I agree. MRatio is a very cool plugin, but being able to sum things perfectly without extra plugins is super useful!
I came across this post from Dylan Tallchief’s video on this problem (it was uploaded just today actually).
Although I am an FL Studio user and not an Ableton Live user, it was pretty interesting to know new technical things about the DAW nonetheless. 🙂
And here’s a link to the video btw: https://youtu.be/nCpeTkEcUzU