
Basic Idea.
So basically you just… avoid boosting any given frequency bump more than any below it.
Example: say you have a song that naturally has frequency bumps at 2kHz and at 1.2kHz. Just make sure that the bump at 2k does not exceed the one at 1.2k in average decibels. Simple enough!
There’s a hefty handful of exceptions to this rule (which we’ll note below), but generally it’s pretty straightforward.
~`~
Balancing Brightness.
Sometimes it can be difficult to know if something we’re working on has too much or too little brightness (especially if we’ve been working on the piece for a long time and have hearing fatigue).
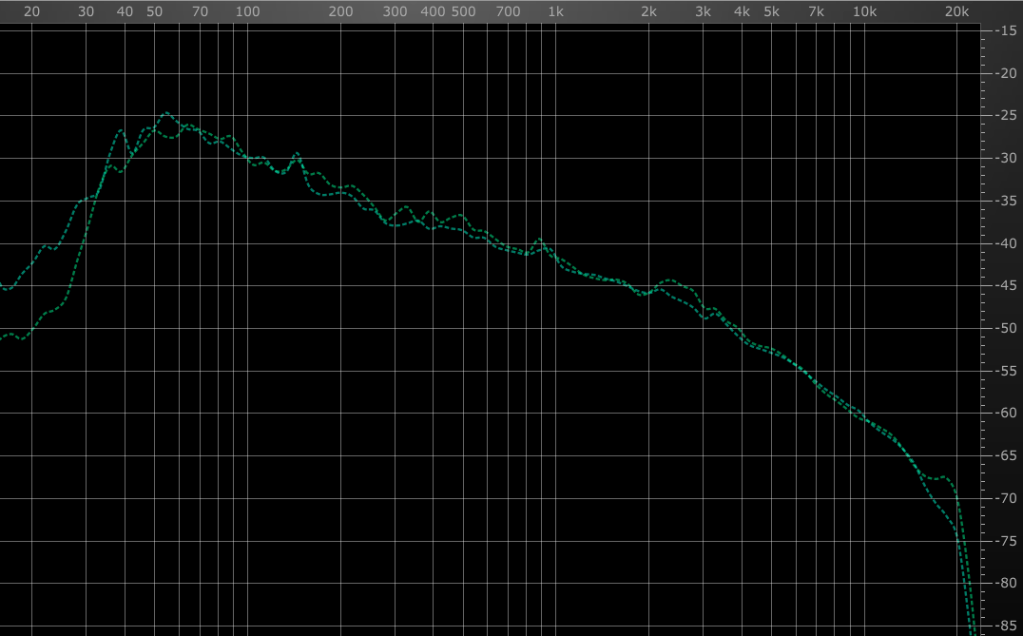
A rule-of-thumb to use, especially early on in the mixing process (when getting things ‘in-the-ballpark’), is to allow the average frequency spectrum contour of the song to slope downwards, with the highest peak in the region of the low fundamental.
This slope is similar to pink noise — however, the contour doesn’t have to be linearly sloping; it’s natural (and sounds better on most material) with a bit of flexing to the curve, unlike pink noise. Every once in a while I’ve encountered an album of music that basically follows the pink noise line exactly, but that is not typical.
~`~
Proper Scaling: Don’t Get Too Granular!
Now don’t go and get too granular with this — only focus on prominent frequency focus points that incidentally occur based on the song’s content. Every song has different notes and tones that naturally occur more often or more loudly than others, so if you get too granular with your smoothing out tiny bumps on the curve (particularly if you try to boost every small node to match the bigger ones), you risk completely flattening the natural tonal character of the track or piece, and we never want that (unless perhaps we’re making a noise sample to layer in with a snare or for sound design, etc). This is a problem many of the “auto-smoothenator” type vst plugins can also fall prey to.
Often one will want to boost an already-prominent resonant frequency in a piece — simply because doing so is effective at making the generating instrument more perceptible in the mix… so refrain from using this trick as an excuse to prevent you from boosting frequencies that sound good to — rather, use it as a sensible guideline for how far not to boost those frequencies beyond, when unsure.
Adjacent Octaves:
Don’t feel overly compelled to make sure frequency boosts aren’t louder than frequencies within the adjacent octaves; e.g. if you were boosting right around 2k because it seems to add the nicest sense of clarity there, i wouldn’t worry much if there is a bit of a dip below it (between 1 and 2k) and/or above it (up to 4k). It’s easy to tell octaves at a glance because it’s simply half or double the frequency.
Dense Areas:
When working with areas of dense melodic and harmonic content that reside within less-than-octave spans, I’d say a good general rule is try to avoid boosting two points that are within less than a third apart, music-interval-wise (major or minor third depending on the key and scale degree).
The Low Fundamental:
In regards to the recommendation to slope down from the so-called “low fundamental”, this is often not the lowest frequency content in the mix, rather the loudest low frequency. For example, the most prominent low fundamental of many songs is somewhere between 50 to 60 Hz, but they will still have a sub bump somewhere between 30 to 40 which is less prominent. Don’t feel the requirement to artificially boost those lower-than-fundamental subs.
Pre-Mixing:
These guidelines can also be helpful for composing and arranging, in anticipation of avoiding later frequency congestion preemptively. Old-school classical composers were really good at this, particularly when it comes to loudness dynamics, because it was one of the few tools they had to actually “mix” and balance the frequency contour of the overall music (a couple of other factors including instrument choice and player positioning).
~`~
Using Spectral Analysis Effectively.
You’ll need a good spectral analyzer that gives you a visual of your spectral contour average over time. The plugin I’ve found that serves this purpose best is the HOFA IQ Analyser, but it’s kinda pricey and also high-CPU, so I don’t blame anyone for not using it.
The important thing is the average over time, not the moment-by-moment peaks.
The free TDR Prism spectral analyzer would be my top recommendation for those on a budget (in many ways, it surpasses the IQ Analyser, even) — just be mindful of the various modes, some of which provide a more ‘straight across’ than ‘down-sloping’ visual to the spectral contour. I recommend spending time analyzing various audio through the various modes, to learn the quirks and decide which mode is apt for the types of material you tend to work on.
Izotope’s also-free Audiolens software is also interesting, though I haven’t found as much use for it, personally.
Ableton’s built-in Spectum is ok. The display on it never really gelled with me. It might work in a pinch if you don’t have access to anything else. If one could freeze snapshots of spectra after playing though some material, it might be more helpful.
~`~
Exceptions to the Rule!
When to follow this rule fairly strictly? On full song mixes, with typical combination of drums/percussion and melodic elements. Even then, however, certain frequency zones may end up with a bit of dip or boost after all, which ends up sounding audibly beneficial on subjective A/B listening tests.
When not to?
Various situations…
The Mud Zone: The range from approximately 300 to 400Hz can end up adding a bit of too much “cardboard boxy” / “roomy” / “muffled” tone to full mixes, and this area is usually avoided being boosted. One exception to this is spoken voice and sometimes singing tones, which can retain a bit more natural “body” in this tonal area than many other instruments can (I think this may have something to do with psycho-social conditioning of humans hearing human voices in boxy rooms a lot?).
The Bite / Clarity Zone: Some music basically smoothly contours down, just like pink noise (I recall scanning some Wilco album mastered at Abbey road with a nice warm fat sound that was like this). Other times, there is a bit of bump anywhere from around 1.5k to 6k — the “clarity” zone. Metal often has a sharp spike around 2,5k, for example, and pop with over-prominent lead vocals may have extra brightness above that.
Brilliance: Some EDM and pop will have really bold hi-hats, with a bit of spike in the super-high region anywhere between around 8 to 20 kilohertz. Vocals can also have bumps up here. I’m not a super-huge fan of this sound, usually.
The Thud Shelf: Modern mixing approaches are dang cutting-edge nowadays and can figure out clever ways to stuff tons of low end into mixes, cleanly. This can manifest as a “block plateau” of low end average peaks that stretch from the lowest fundamental up to just below the mud zone. This technique pretty much guarantees that a track will sound fat, thick, and punchy on any set of speakers. It’s admittedly effective, but does move the contour away from a direct pink noise slope.
For material that doesn’t include drums, (e.g. a song with just acoustic guitar and singing) the low fundamental is often different (usually higher than a kick drum would be), and the overall frequency contour can have a bit more acceptable variability to it, due to certain tones resonating more often and/or more prominently than others, creating average peaks that may look overt but are in fact artistically just fine. Be careful about squashing melodic peaks arbitrarily if they do already sound “good in the mix” when checked by ear, and try to focus on attenuating ones that audibly add unpleasant degrees of overt resonance / sound harsh / cause ear fatigue.
Individual instruments / song layer stems often sound best with one or two particular frequency “focus points” that jut out above the overall contour. The rule falls apart a lot when you get to instruments, creative mixing layers, and especially sound design, which can vary wildly in what frequencies tend to bump out. Often with a bump in the lows and one in the highs (the infamous “smile”). I’ve especially realized how true this is in my research into the upcoming DeathStalker guitar-betterizer Ableton rack that is nearing the completion of development. Excellent-sounding electric guitars will often have a low-end poke for that sense of solid chug, and a mid-high bump for that sense of bite, each of which combine for the overall satisfying feeling of “heaviness”.
Drums often have a bit of a comparative mid-range dip… the infamous “smile curve” (but not the same one as for metal guitars).
…So it is NOT recommended to apply the “When to High-Frequency Boost?” trick on a soloed-track-by-track basis. Instead, approach the concept in reference to the full mix — but do go ahead and apply those boosts or cuts onto the individual tracks which will result in the most obvious change. For example, if your mix has too much 18kHz, but that 18k is coming primarily from the hi-hat, reducing 18k on other instruments (by using a mixbuss EQ, for instance) may be extraneous, when all you really needed to do was reduce the 18k on that one particular track to solve the problem for the full mix.
^TL;DR: Scan and analyze the full mix, but apply boosts and cuts to individual tracks!
Spoken Vocals (for podcasts, film dialog, and the like) have their own optimal contour which usually includes two low fundamentals (one closer to 100 Hz, one closer to 200Hz, a “solidity point” or “low-mid fundamental” above the dreaded mud zone, and around 500 Hz (which is very important to maintain for a sense of solidity / thickness). The mud dip zone for spoken vocals tends to be lower than for music, between 200 and 300 Hz (rather than between 300 and 400). Weird, huh? Vocal sibilance often causes peaks around 5 to 6 kHz, but these are often attenuated down with a de-esser to basically be back within a pink noise slope.
Compared to full-range music mixes, spoken vocals typically have a higher low fundamental, more tolerance for a bit of boxy room tone, way more buildup around the 500Hz region, and a lower top-end rolloff, often as low as around 12k.
~`~
Remember, the tip is avoid boosting any given frequency bump more than any below it.
Enjoy boosting your highs with a touch more confidence! Peace!
