I found some old notes i had taken (for my own reference) about the parameters of Ableton’s Gate audio effect plugin and figured others could use the info as well, so i’ve polished ’em up, expanded on them a bunch, and dropped them here for you.
I’ve found that getting to know exactly how each parameter works with gate plugins leads to attaining desired results exponentially easier, and in particular learning how the more exotic parameters such as lookahead and hysteresis work facilitates sophisticated gate optimization.
Visualizing the Gate
For the purposes of this article, i recommend visualizing the “gate” like a castle portcullis. When it’s fully open, it’s “up”, and the full audio stream passes through unimpeded. When it’s fully slammed down, it’s completely shut and nothing is coming through. Partially closed positions indicate a level reduction.
Hold and Release have to do with the portcullis gate moving downwards—closing—dropping—attenuating.
Attack and Return have to do with the portcullis gate moving upwards—opening—letting the sound come back in.
With that visualization in mind, let’s proceed.
Pre-Emphasis
Used to preserve (or cut) a specific frequency (or frequency range) more than others.
The frequencies you boost on the pre-emphasis EQ will be heard as louder by the gate (without directly changing the output); therefore the gate is less likely to be triggered by moments in the material which are heavy in those frequencies.
For example, say you have a certain quiet but important note in a recorded keyboard line that is getting triggered by a gate when you don’t want it to, but everything else is reacting perfectly. You could pre-emphasize the dominant frequency of the trouble note, boosting it just enough so that the gate no longer triggers when it sounds.
Cutting a frequency on the pre-emphasis, on the other hand, is a way to program the gate to be more likely to cut moments when those frequencies are prominent; not taking them into account as “valuable audio to be saved”. Do this if there’s a frequency that you really don’t care to preserve. Selecting the cut or shelf filter options can be useful if using a gate for noise reduction; for example, a microphone at a rambunctious live gig could have a gate with a low-cut pre-emphasis in place to ignore possible thumps if the mic stand is moved while the singer is inactive.
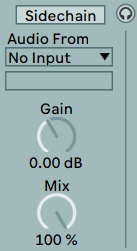
Sidechain
Used to make the gate react according to an external signal, rather than the source signal it’s working on (or a blend between the two). Kinda like pre-emphasis, but instead of altering the given signal, it reacts to a different signal altogether (which can itself be pre-emphasized if desired). You can make it react only to the external signal, or to a percentage thereof (which is pretty sweet, actually). Often, sidechaining is used in conjunction with flip mode to “duck” an audio track, causing it to attenuate when another (more important) signal arrives.
An example of sidechain blended with the original might be for when gating a bassline that is intended to closely match a kick drum with most—but not all—of its notes. By setting the parameters carefully, the bass could be made to naturally shorten the ringing decay of the bass to match the kick while still allowing wayward bass notes to stab out unimpeded.
An example application of sidechain ducking might be for an announcer over background music—any time the announcer speaks, a flipped, fully sidechained gate ducks the music down to carve out some immediate headroom, popping back up as soon as the announcer shuts up.
How is sidechain gating different than using sidechain compression? Not that different, really; it’s just a matter of how the timing and intensity parameters determine the dynamic gain changes happening, and whether you’re squishing or expanding the dynamics. Gates are designed for expanding dynamic contrast (though they can be flipped to do the opposite) and compressors are designed for condensing dynamic density (and they can be switched into expander mode to do the opposite, though to a smaller max ratio).
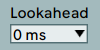
Lookahead
Used to respond extra-precisely to the front end of the audio. It’s like “seeing ahead of time”, able to react to transients as they occur, rather than only in reaction after their occurrence. The lookahead value is the length of time it can “see in the future”, so you may need to adjust it based on the frequency content, timbre, and tempo of the material.
Using lookahead can help you to have a quick attack for a gate while minimizing possible negative issues generally caused by extremely fast attack times (i.e. clicking). What’s the drawback? That amount of added latency. So, when using super fast gating and getting ugly clicks… try adding some lookahead. For a more analog or live sound, use no lookahead.
Return
Provides more tolerance to moving dynamics. Think of a gate with no return (aka hysteresis) as being hyper-reactive, always affected by every movement of the material across the threshold point, meaning that sometimes when transient peaks are crossing back and forth across the threshold quite often it may lead to a chattery, unpleasant result. Setting the thresholds of gate plugins that don’t have a hysteresis control can often be difficult to do perfectly, requiring a compromise of lower placement than optimal to avoid chatter.
Adding in some return can serve to alleviate this to a degree by preventing a gate which has been closed from bothering to open when it’s going to need to immediately close again a moment thereafter. You could think of it as giving the gate a bit of momentum when it’s triggered to close, pushing the level down and keeping it down for a bit before it’s allowed to come back up.
It’s similar to hold but for the opening action of the gate rather than the closing of it.
More return = more heavy-handed, less fickle, gating.
Attack
If you’re used to how a compressor’s attack control works, please note that a gate’s attack control is not the onset of the gate clamping down (as you might intuitively think), but rather, the onset of the reopening of the gate. A longer attack value for a compressor will serve to retain peaks; the opposite is true for a gate’s attack. Slow Attack: Transient Eater A slow attack time will mean that after a gating action occurs, the gate will be a bit sluggish to open again to let audio back through, meaning that the first transient after some gating has happened can get softened or even eaten. This means that if your gate is set to trigger quite often, you’ll most likely be softening a bunch of note attacks—which may or may not be a desired outcome. This is something one should be aware of when it’s happening. It can be used deliberately to use a gate more like a compressor, altering the dynamic contour. For example, a gate with slow attack as well as slow release set so that it only attenuates a couple of dB here and there could be used more as a transient shaper than as a noise reducer. On the other hand, you may find the softening undesirable, say for punchy metal drums.
Fast Attack: Click Factory A gate with a fast attack on the other hand will “snap back open” as soon as it detects loud enough audio, letting it crack through with less softening of the onset. However, very fast gate attack can lead to audible signal distortion and attack of faster than about 1ms (depending on the material) can result in nasty clicking as the waveforms have misplaces edges. Lookahead (see above) can help address this issue. Generally, using fast attack on gates may sound more natural than fast release might, due to the general nature of transients being quick punchy impulses compared to the dense and lower level of the sustain portions of most signals.
Since too-fast and too-slow gate opening both come with probable drawbacks, the attack setting should be adjusted carefully as a compromise between too fast leading to distortion and too slow leading to unnaturally-softened transient onset. Consider automating during key moments.
Hold
Hesitation before the gate starts to close after it gets triggered. This can serve to preserve a bit more of the decay tail of the material, or even lead to rhythmic effects if coupled with fast release and attack.
It delays the moment in time before the release curve starts to slope down, while preserving the slope of the release curve itself. If you find that your gate is triggering more often than you’d like it to, increasing the hold time can help to reduce chatter from the gate closing prematurely, similarly to how return can help to reduce chatter from the gate opening. However, too high of a hold time may result in the gate no longer triggering enough.
Release
How long it takes the signal to get down to the floor after gating been triggered (after the audio level has passed below the threshold + the hold time has passed). This parameter defines the signal attenuation slope.
Think of it like a “smoothness” control for how quickly the gate closes—a short value will give an almost instantaneous drop to the floor after the signal gets too quiet. The higher the value is set, the slower the drop will occur, making the gate feel less like a physical gate slamming shut and more like something squishy… actually, like an expander.
If you want to use a gate less like as a tool to “chop out the unimportant quiet bits between the important loud bits” and more as a dynamics shaper, a slower release value is recommended, which will cause the gain to swim around rather than chop abruptly. On what would you want to do that? Hmm, perhaps on some material which seems a bit dynamically flat and could use a bit of additional dynamic pizazz?
Distorted material is a sensible candidate for either abrupt or smooth gating (or a sort of hybrid halfway-point between), both to help the background noise from being excessively boosted and also because distortion tends to a have a dynamics-flattening sort of effect. Distorted material is also less likely to be impaired by waveform offsets from super fast attack or release settings.
Floor
The easiest parameter to understand, really. This is the maximum decibel amount that the gating action, when it occurs, can reduce the audio signal by. Remember, all a gate is doing is reducing gain… all these fancy parameters are just defining precisely when and how it does so. If you use slow hold + release values, the gate may seldom or never actually reach the floor, as it might begin opening again before it has time to reach the bottom. Thus the floor is the maximum possible amount of gain reduction, not necessarily the actual maximum amount attenuated. So you may want to make it a practice to do final adjustments to the floor after you have adjusted all the other parameters to your liking.
A smaller floor value (particularly when coupled with less-than-snappy timing parameters) is also a way to make the gate act less intense and push it into expander territory: more like “the opposite of a compressor”.
Flip
Basically makes the gate into a compressor / limiter instead. When audio gets too loud, it says “nuh uh” and has none of that. Fast response values are likely to sound very weird and unnatural, as it will be retaining most material except for the loudest transients. Which just sounds odd with deep floor values. Slower action can sound more like you’re used to compression sounding; transients trigger the signal to dip and then it flexes back up once it’s no longer “too loud”.
NOTE: for a rack which allows you to place different effect chains above and below a threshold by exploiting gate’s flip functionality, check out Gate Splytter from the Advanced Splytterz pack at Isotonik Studios.
Threshold
The value at which audio will begin to get gated, once it falls below. You could say this is the most important parameter, because everything else depends on it.
The moment the audio signal gets quiet enough to fall below the threshold, a chain of events starts to unfold: • first, the hold value prevents anything from happening for hold milliseconds. • after that, the release slope starts. If it’s a short value, it’ll drop down quickly, otherwise more gradually, taking release milliseconds to reach the floor value. • lastly, once the floor is reached, the gate will stay closed and the level will remain the same until the audio exceeds the threshold again.
However, this process will be interrupted at any point if the audio signal goes back above the threshold (adjusted by return).
How long it takes for the signal to get back up to unity 0dB? That’d be attack. Gates are kinda like the opposite of compressors, so attack happening last kinda makes sense, since it happens first on a compressor.